
Starting an ATV that has been sitting for an extended period isn’t always as simple as turning the key and hitting the starter button.
You never know what happened through storage, and the vehicle’s condition might not be the same as when you left it.
In this post, we’ll outline the correct procedures for starting an ATV that has been inactive for an extended period. We’ll also share some valuable tips if you encounter difficulties getting your machine to run.
1. Perform a Pre-start Inspection
Before attempting to start the ATV, performing a quick pre-start inspection is a good idea. Not only does this make it easier to start the ATV, but it also helps ensure no underlying issue will be causing any damage.
If you know you did all the proper preparations before putting the ATV in storage, the pre-start inspection should only take a few minutes.
However, starting an ATV that’s been sitting for years or when you don’t know its condition may take longer.
2. Ensure the Fuel Is Good
If the ATV has been sitting for more than a couple of months, and you did not add a fuel stabilizer before storage, chances are the fuel has gone bad and needs replacing.
Gas is considered fresh produce and goes bad with age due to evaporation, causing an imbalance in the mixture. Fuel that’s gone bad smells like turpentine and has a darker color.
Related: How to Know if the Gas in Your ATV Is Bad or Not
Other times, the fuel might have become contaminated with water, debris, or corrosion from the gas tank.
Bad or contaminated fuel can cause the ATV not to start, and if you pull bad fuel into the carburetor and engine, you might have to perform a complete cleanse.
Draining the old fuel and adding fresh fuel is usually best to avoid issues.
Some ATVs have a drain plug at the bottom of the tank, while on others, you need to use a siphon.
3. Inspect the Fuel Lines and Carburetor
Fuel lines tend to harden and become brittle over time, causing leaks. Replacing them before starting the ATV is best if that’s the case.
If the ATV has a conventional carburetor, it’s a good idea to drain the old fuel from the carburetor bowl as it’s likely not as fresh as it once was.
Look for a drain plug at the very bottom of the carb housing and drain the carburetor content into a small container.
4. Ensure the Air Filter Is Clean

Air filters typically don’t get dirty during storage, but they might not have been clean when the ATV was put away.
Clean or replace the filter if it is dirty or damaged, and ensure it seats properly inside the air filter box.
Also, ensure the air filter box is clean and not full of leaves or water.
5. Inspect the Spark Plugs
While spark plugs typically don’t go bad during storage, it’s good practice to ensure they are in good condition before starting the ATV.
Healthy spark plugs should be milky brown, as in the photo below.

If the plugs are full of zoot or corrosion, it’s best to replace them with new ones of the proper specs.
This is why spark plugs go bad in the first place.
Also, ensure the spark plug wires are not damaged or cracked and seat properly onto the spark plugs.
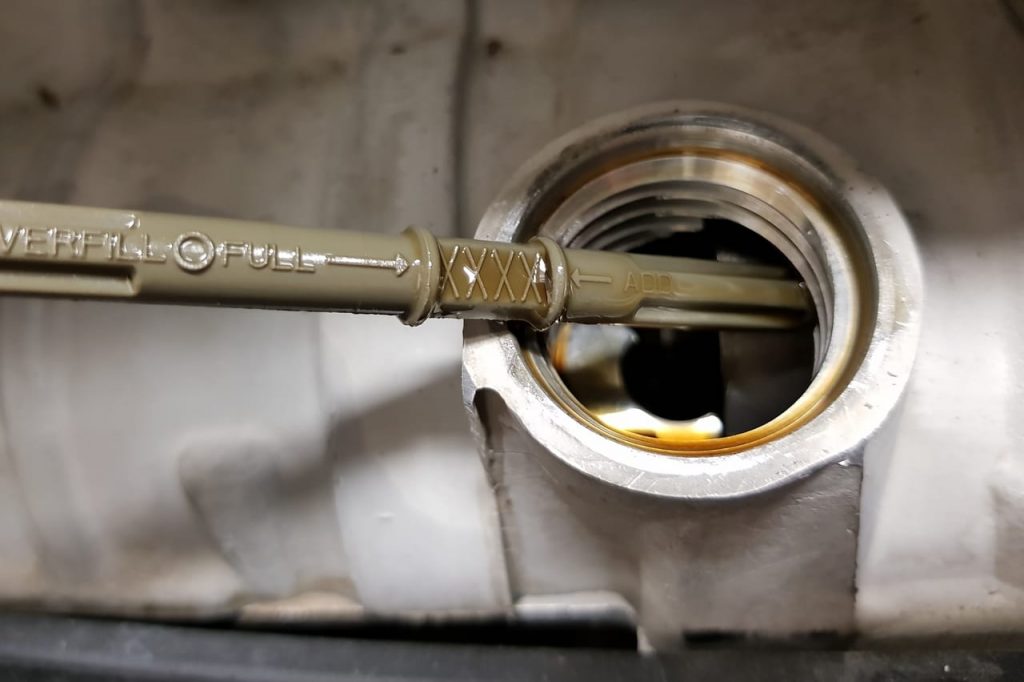
6. Check Oil Levels and Condition
To prevent engine damage, you must ensure the engine oil level is correct and the oil is in good condition.
Remove the dipstick for inspection, typically on either side of the motor. The level should be between the minimum and maximum marks.
If you’re unsure when the engine oil and filter were replaced, now is an excellent time to change the oil.
It is recommended to replace the engine oil every six months or no less than once a year.
While at it, ensure the transmission oil level and front and read transfer case oil levels are correct. If the oil levels are low, you might as well drain out the old oil and add new up to the specified level.
7. Check the Coolant Level
The coolant should be between the maximum and minimum levels, marked on the coolant reservoir/pressure tank.
If the coolant level is low and you don’t know what type was used previously, you’re probably better off performing a coolant flush and adding fresh coolant according to spec.
8. Check the Brake Fluid Level
While not critical to starting the ATV, it’s a good idea to ensure the brake fluid level has not dropped below the minimum mark and that the brakes are in good working condition.
9. Ensure the Battery Is Charged and Healthy
Unless you’ve hooked the battery to a maintenance charger through storage or performed regular maintenance charges, it has likely drained and gone bad.
All batteries self-discharge at a rate between 1 to 3% depending on battery type. When a battery sits in a discharged state for too long, it becomes permanently damaged due to an internal chemical called battery sulfation.
Begin by giving the battery a proper charge. If the battery doesn’t or won’t hold a charge, it might have gone bad while in storage. Here is how to test if the battery is still good.
If the battery can no longer hold a charge, you must replace it with a new one.
This is how you select the proper size and type of battery for your ATV.
10. Check Tire Pressure and Condition
Over time, the rubber in ATV tires may dry, rot, and begin to crack. Inspect the tires and ensure they are still good to use.
Related: How Long Do ATV Tires Last? When Should They Be Replaced?
Even the tiniest leak will leave the tires completely drained after some time in storage. Make sure to Inflate the tires to the proper tire pressure using an air compressor before you begin riding.
11. Inspect and Lubricate
Ensure throttle cables, brake wires, and clutch cables are undamaged and move without drag. The last thing you’ll want is your ATV taking off stuck at full throttle.
Lubricate if necessary or replace damaged components. Also, ensure all lubrication points like bushings, axle joints, and bearings are properly lubed.
12. Check for Signs of Rodents
Rodents like rats and mice love ATVs for building nests and chewing on the cable insulation.
Use a flashlight and thoroughly inspect the entire vehicle to look for signs of old nests that can cause a fire. You might need to remove a couple of body covers and the seat to get a good view, and don’t forget to look inside the exhaust muffler.
If you notice any signs of damaged cables, you should repair or replace those before attempting to start the ATV to prevent shorts.
13. Start the ATV
It’s time to start the ATV according to the standard starting procedure.
To start the ATV, I recommend using the BONE-C checklist for guidance:
- Brakes – Ensure the parking brake is on.
- On position – Ensure the fuel valve and ignition key are ON.
- Neutral – Put the gear shifter in neutral (N) or park (P).
- Engine – Ensure the engine stop switch is in the RUN or ON position.
- Choke – If the engine is cold, turn on the choke before starting the ATV.
If you want more detailed guidance, here is our complete step-by-step guide on how to start an ATV.
The guide also includes a pre-ride checklist. I highly recommend applying it before you begin riding.
Related: How to Start a Chinese ATV: Step-By-Step Guide
What to Do if Your ATV Is Not Starting After Sitting
Here are a few tips to try if you have a hard time getting an ATV that’s been sitting to fire up.
For an engine to start, it needs these three things: Fuel, Air, and Spark. If one is missing, the ATV won’t start, no matter what you do.
Ensure the ATV Is Getting Spark
Testing if the ATV gets a spark is relatively straightforward.
- Remove the spark plug cap and remove the spark plug using a spark plug tool, typically 16mm or 19mm.
- Put the spark plug back in the boot and place the firing end against the engine head.
- Hold the spark plug by the wire, and don’t touch any metal.
- Crank the engine to see if a spark forms between the plug and the engine.
Please refer to this guide for more thorough testing and troubleshooting of a no-spark situation.
Ensure the ATV Is Getting Fuel
The tip should be wet from gas when removing the spark plug after cranking the engine.
If there are no signs of fuel, ensure you’re not making the classic mistake of forgetting to put the fuel valve in the RUN position if your ATV has one.
Sometimes, if the ATV has a removable petcock valve, you’ll find that the small screen inside the tank has become dirty. Use compressed air to clean out the filter after removing the valve.
Other causes of a no-fuel condition might be a dirty or clogged carburetor.
There are two ways of cleaning a carburetor:
- The easiest and fastest alternative is adding a carb cleaner to the fuel. My preferred brand is Seafoam.
- If that doesn’t work, you might need to disassemble the carburetor for a deep clean and rebuild.
In rare cases, the AT not getting fuel is caused by a damaged fuel pump or plugged fuel lines.
Ensure Nothing Is Blocking the Air Intake
Finally, you need to ensure nothing is blocking the air intake into the engine and that engine compression is within spec.
Worn piston rings, broken seals, or damaged valves can cause poor engine compression.
If you have access to a compression testing tool, you can use it to verify a poor compression condition and continue your troubleshooting from there.
If you still have not managed to get your ATV to start, I recommend heading over to our complete guide on troubleshooting an ATV that won’t start.