
ATV and UTV batteries are consumables that go bad over time due to sulfation, bad cells, poor maintenance, improper storage, or old age. Before you go ahead and buy a new battery, it’s a good idea to test the condition of the one you have. That way, you know you are not wasting your money when other issues may be the actual cause of your weak battery.
No single test will troubleshoot all the potential problems a battery can have. But by going through the steps in this little guide, you will cover most aspects that may be causing issues.
These are the tools you will need:
- A battery charger
- A multimeter or voltmeter
- Optional: A consumer-grade battery load tester
Caution: We recommend using safety glasses and gloves for all the testing in this post.
1. Ensure the Issue Is Battery-Related
If you’re facing issues starting your ATV and suspect a dead battery as the cause, keep in mind that a variety of other reasons could also be making your ATV appear completely dead or preventing it from starting.
Before spending too much time testing the battery, we recommend you make sure there are no simple solutions like forgetting to turn off the kill switch, not having the gear shifter in “park,” or keeping the brake lever activated.
The mechanical safety features that might prevent your ATV from starting can vary depending on the model. Here is a complete guide for when an ATV won’t start.
2. Inspect the Battery for Defects
Before you begin testing, inspecting the battery for defects and other damages is a good idea. You may need to remove the battery from the ATV for a proper inspection.
If you notice any of the following defects, there is a good chance your battery is bad beyond repair. Replace it with a new one; no further testing is necessary.
Bumps or bulges in the outer casing
A visible bulge may be a sign of overcharging. Smart chargers shut off automatically when a battery is fully charged.
On the other hand, manual chargers need to be monitored and turned off manually as soon as the battery reaches a full charge, or you risk overcharging the battery.
Loose or Broken Terminals
The terminals should feel solid and not move even slightly. A loose terminal may create a potentially dangerous short circuit.
Melted or Burnt Plastic Near the Terminals
When a terminal becomes loose and causes a short circuit, the battery can rapidly discharge its power, producing excessive heat. This heat can potentially melt the plastic or even cause a fire. In some instances, a direct short of this nature could even lead to a battery explosion.
Visible Cracks or Ruptures in the Outer Plastic Casing
Battery casings are tough but may crack open from impacts, mishandling, or if the battery has frozen. A cracked battery might still function correctly, but for safety reasons, it should be replaced regardless.
Visible Battery Fluid Leaks
Battery fluid should not leak off the battery. If it does, the battery should be replaced.
Discoloration
This only applies to filler-cap lead-acid batteries.
If the color of the electrolyte fluid inside one or more of the cells has turned brown or dark, your battery is most likely defective. It does not matter if the other cells look healthy; the entire battery is rendered useless if one cell is dark.
Check the Fluid Level
This only applies to filler-cap lead-acid batteries.
Conventional lead-acid batteries contain electrolyte fluid that should be high enough to cover the lead plates fully. Usually, these batteries have specified minimum d maximum levels.
Carefully remove the filler caps and inspect using a flashlight. If electrolyte levels are low, top off with distilled water until you reach the correct level. Never try charging a dry battery, as it may cause it to catch on fire.
If the battery has been sitting dry or with a low electrolyte level for too long, it may have sulfated beyond repair.
3. Charge the Battery to See if It Holds a Charge
By fully charging a battery and then measuring its open-circuit voltage, you can tell quite a few things about its overall health.
1. Charge the Battery
If you are unsure how to charge your type of battery properly, I advise you to follow the steps in this guide.
2. Allow to Rest to Relieve the Battery Surface Charge
After charging the battery to a full charge, and with the charger disconnected, allow the battery to “rest” for a minimum of 12 hours.
This is necessary for the battery voltage to stabilize after the charging process, or you may get a false reading. A surface charge may remain present for a while, even after disconnecting the charger.
If you don’t have time to wait as long as 12 hours, you could also turn the lights (high beams) on for two minutes to remove the surface charge.
3. Measure the Battery’s Open-Circuit Voltage
Use a multimeter or voltmeter to read the battery’s voltage under no load.
- Disconnect the battery terminals to ensure nothing is drawing power from the battery. Always remove the black (-) cable first, then remove the red (+) cable.
- Set the multimeter to “DC voltage 20” if you have a manual multimeter or to “V” if you use an auto-ranging multimeter.

- Place the red lead on the positive (+) battery terminal and the black lead on the negative (-) battery terminal.

- Use the table below to analyze your findings (applies to 12V batteries):
| Open-circuit voltage reading | What it tells you |
| 0V | The battery is heavily sulfated beyond repair and cannot hold a sufficient charge. |
| Less than 10,5V | One or more dead cells. |
| Less than 11,8V | The battery is heavily sulfated beyond repair and cannot hold a sufficient charge. |
| Between 11,8V and 12,4V (12,4V equals about 75% state of charge) | The battery is sulfated to a level where it may no longer be fully recoverable. |
| 12.4V or more | The battery is heavily sulfated beyond repair and cannot hold a sufficient charge. |
4. Load Test the Battery
While the open-circuit voltage reading described above is helpful, it doesn’t always provide a complete picture. The battery may still be defective even if you get a reading of 12.4V or higher.
Sometimes, you will find that the voltage drops fast as soon as you draw power from the battery. If so, the battery is likely bad and needs to be replaced.
You can perform a so-called load test to test if the battery can drive a load. This test aims to ensure that the battery voltage does not drop too low when drawing a high load.
A healthy ATV or UTV battery rated at around 200-400CCA should maintain a voltage of 9,6V or more even under load (at 70°F (21.1°C)). A 400CCA battery should not drop below 10V.
Method 1 (Good): Multimeter Load Test
You will need a multimeter. Preferably one that has a max/min function. If you use a multimeter without a max min, you may get a false reading, as the display refresh rate cannot keep up to show the actual minimum voltage reading.
- Begin the test with a fully charged and rested battery; see steps 1 and 2 above. The open-circuit voltage reading should be 12.4V or more.
- Set the multimeter to DC voltage.
- Connect the leads:
- The red lead goes to the positive battery terminal
- The black lead goes to
ground .
- Push the min/max button to start recording the voltage, or have someone observe the voltage reading.
- Activate the starter. The starter draws a high current from the battery in a short amount of time. It’s OK if the ATV starts.
- Turn off the engine and have a look at your readings.
- A perfectly healthy ATV battery should not drop below the range of 9.6V to 10.5V (depending on battery CCA rating and temperature at the time of testing).
- Your battery is likely defective if your minimum reading is below 9.6 volts. It does no longer hold sufficient capacity.

Method 2 (Better): Consumer-Grade Load Tester
A variety of consumer-grade batty testing tools are available in the $20 to 50 price range, where the two major types are digital and analog testing tools. Each tool has a specific user manual that needs to be followed, but I will outline how they work on a general level below.
Regardless of Which Tool You Use, These Guidelines Apply:
- Begin with a fully charged battery for more accurate results. You may get a good CCA rating in a partially-discharged battery or a bad CCA rating in a fully-charged battery. So ensure the battery is fully charged to leave its state of charge out of the equation.
- Disconnect the battery connectors and connect the testing tool directly to the terminals. This ensures a solid connection, leaving less room for a possible voltage drop.
- It is safer to remove the battery before testing. In the unlikely event that something goes wrong during the testing, removing the battery from the ATV or UTV before conducting the test is advisable. A damaged battery may, in some cases, catch on fire or explode.
Test With a Conventional Analog Load Tester
An analog testing tool simulates a high load using a built-in resistance element/heat coil. The tool measures the voltage drop under load, indicating if the battery is good, weak, or bad relative to its CCA rating*.
* CCA is the amount of current the battery can put out at -18°C (0°F) for 30 seconds while maintaining a cut-off voltage of at least 7,2V. You should find the battery’s CCA rating on the battery label. Each battery comes with a specific CCA rating. The actual CCA capacity decreases as the battery gets older or damaged.
- Green (good): The battery capacity is OK.
- Yellow (weak) or red (bad): The battery capacity is not OK. As long as you know the battery is fully charged, it is likely defective and needs to be replaced.
You know the battery is bad if the voltage recovers to its full potential a few seconds after releasing the load switch. However, if the voltage recovers slowly, it’s likely that your battery is merely depleted and needs a proper recharge.

Please refer to the user manual of your testing tool for test directions specific to your tool.
Test With a Digital Battery Load Tester
Digital consumer-grade battery analyzers are inexpensive, compatible with most battery types, and can offer a range of test features such as:
- Open circuit-voltage reading
- Internal resistance reading
- Actual CCA (Cold Cranking Amps) reading
- AH test mode
- Battery capacity reading, in %
- Estimated battery life remaining, in %
To load test the battery, set the tool to its CCA mode. You must insert the battery’s CCA rating before you begin the test. You should find the rating on the battery casing or look up the battery model number online.
Head to this post to learn how to read ATV battery numbers.
The test will demonstrate the amount of CCA the battery can produce.

Based on the measured CCA, the test tool may also provide you with a helpful capacity reading or state-of-health reading in %:
| State Of Health (SOH) in % | Battery status |
| 0% to 40% | The battery is damaged or too old and should be replaced. |
| 40% to 60% | The battery is getting old or getting weak. Consider replacing it. |
| 60% to 80% | The battery is in good working order. |
| 80% to 100% | The battery is in good to excellent working order. |
Measuring the Battery’s Internal Resistance
A digital test tool may also test the battery’s internal resistance. Resistance is measured in milliohms (mΩ) and tells you how much restriction the electrons encounter as they travel through the internals of the battery. A lower value indicates less restriction.
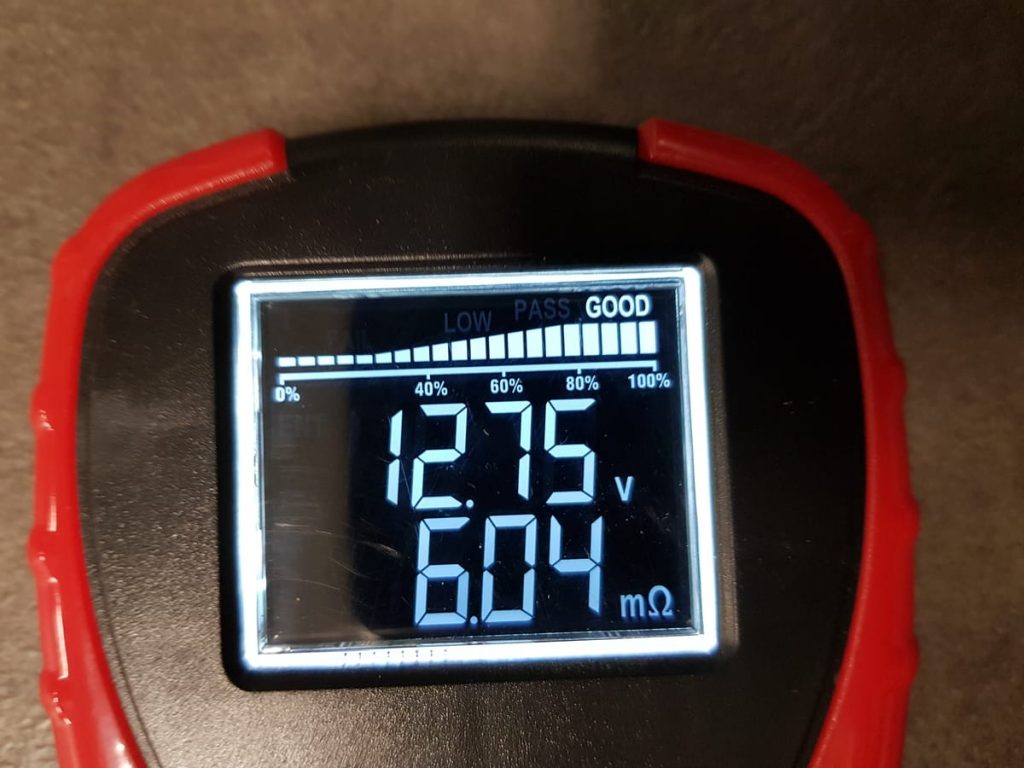
The internal resistance of a modern ATV battery stays relatively flat throughout its service life and then increases as the battery starts to go bad. A high resistance reading indicates that the battery is near the end of its life span.
The internal resistance can vary as much as 5-10% from one batch of batteries to another. For the most accurate results, you need to measure the resistance of your specific battery when it is brand new as a reference for later testing.
A few years later, when you teat again and get a significantly higher reading, you know the battery doesn’t have much time left.
Method 3 (Best): Professional Load Test
Method 1 and 2 give you a relatively good indication of your battery’s health, but the accuracy of consumer-grade test tools is not always the best.
To get the most reliable results, you should have it tested with a professional load testing tool. A proper load test should draw a load that is half of the batteries rated cold-cranking amps for 10 seconds.
Most Battery suppliers have one and usually don’t charge to do a test. Disconnect the battery and bring it fully charged to be tested.
Battery Sulfation and How It Affects Battery Health
Several of the tests in this post are designed to indicate your battery’s level of sulfation. But what is sulfation, and why does it matter when testing an ATV or UTV battery?
Over-sulfation is the most common cause of premature battery failure. An undamaged battery with low levels of sulfation is healthy, while it gradually loses its capacity as levels of sulfation increase.
Therefore it can be helpful to have a general idea of what sulfation is and what it does to your battery:
- All lead-acid batteries sulfate. This applies to sealed and filler cap flooded (wet) lead-acid batteries and modern AGM batteries.
- Sulfation is the natural build-up of lead sulfate crystals on the lead plates inside the battery.
- Sulfation happens due to the chemical process between the electrolyte and lead plates as the battery discharges.
- Recharging the battery reverses the natural sulfation process, where most crystals turn back into the electrolyte.
- Since not all of the crystals return to an electrolyte, the battery develops a small amount of sulfation build-up each time the battery is charged and discharged.
- Overcharging, undercharging, or leaving the battery discharged for some time will cause rapid sulfation. Just a few days at a discharged state can be enough to cause permanent damage.
- Low electrolyte levels where the lead plates are exposed to oxygen cause rapid sulfation build-up.
- Sulfation negatively affects the battery in several ways:
- It reduces the battery’s ability to provide cranking power.
- The battery will require more time to charge.
- Increases heat build-up from the charge/discharge process, possibly causing the battery to “boil out.”
- Reduces the battery’s ability to reach a full charge (lowers the available amp hours between each charge).
- Significantly shortens the battery’s service life.
- A sulfated battery self-discharge is faster than usual.
- A desulfation charger may help to reverse the sulfation process, but only to some extent. When the level of sulfation has reached a certain level, the battery cannot be restored and needs replacing.
FAQ
What are the signs of a bad ATV battery?
Signs of a bad ATV battery include difficulty starting the ATV, dim lights, and frequent need for jump starts or recharging.
How often should I replace my ATV battery?
Typically, ATV batteries last 3-5 years. Regular maintenance can extend this life span, but it’s a good idea to replace it when it shows signs of failure.
Is it bad to let an ATV battery die?
Yes, letting an ATV battery fully discharge can damage the battery, leading to a shorter lifespan or immediate failure.
Related: How to Charge a Dead ATV Battery
Wrapping Up
With the advice shared in this guide, it’s clear that checking the health of your ATV or UTV battery is not as daunting as it may initially appear.
Regularly monitoring your battery’s condition and taking corrective measures when necessary can maximize its lifespan and performance.