
Few things are more annoying than getting ready for an exciting ATV trail ride only to find the battery completely dead. You turn the key, but nothing happens, not even a click or a flicker of light.
Fortunately, if your battery hasn’t been dead and unused for too long, you might be able to get it working again.
Not All Dead Batteries Can Be Charged
A battery that has been left in a discharged state for some time has likely gone bad due to excessive internal sulfation and cannot be salvaged.
When a battery drops below 11.5 volts, an internal chemical process known as sulfation begins and keeps going until the battery can’t hold a charge anymore or it shorts out. This process happens gradually but advances relatively fast when the battery sits without a charge.
However, a battery that’s merely drained overnight by leaving the lights on by mistake or from a short somewhere in the ATV’s wiring can usually be revived back to complete working order. To increase your success rate, it is essential that you discover the issue before too much time has passed and charge the battery as soon as possible.
Related: 10 Reasons Why Your ATV Battery Keeps Draining (Going Dead)
But what if your smart charger won’t charge the dead battery?
As a safety precaution, modern smart chargers (or automatic chargers) are designed not to charge defective batteries. While the general idea behind such a feature is good and has likely prevented several charging accidents, it doesn’t always work out as intended.
The problem arises when your smart charger, due to a low voltage reading, mistakenly believes that your battery is faulty and refuses to initiate the charging process. In that case, we need to be a bit creative.
Related: How to Test an ATV or UTV Battery. Good, Reduced, or Bad?
How to Charge a Dead ATV Battery
If your smart charger refuses to initiate the charging process on your dead or drained battery, you can use a healthy and fully charged battery to boost the charging process.
The method involves using the healthy battery to pre-charge the dead battery until it’s above the minimum voltage level of the charger.
Caution: Only attempt this method if you know that the battery is drained but otherwise in good condition. If the battery has been sitting without a charge for a more extended period, it is likely sulfated to an extent where it can no longer be reconditioned.
Connecting a good battery to a damaged or short-circuited one can harm the good battery, too.
Charging batteries can be harmful if you are not careful. Always wear rubber gloves and proper eye protection, and perform the procedure in a well-ventilated area.
Things you will need:
- A 12V smart charger with a low-amp charging mode for motorcycle and power sport batteries.
- A healthy and fully charged 12V battery, such as another ATV or car battery.
- A set of jumper cables.
1. Disconnect the Battery and Remove It From the ATV
Since you’re working with a battery that might be damaged, it’s best to disconnect and remove it from the ATV. Then, charge it in a safe place away from the vehicle. That way, if something unexpected happens, like a short, you don’t risk damaging your vehicle.
Here is a step-by-step guide on safely removing and installing an ATV battery.
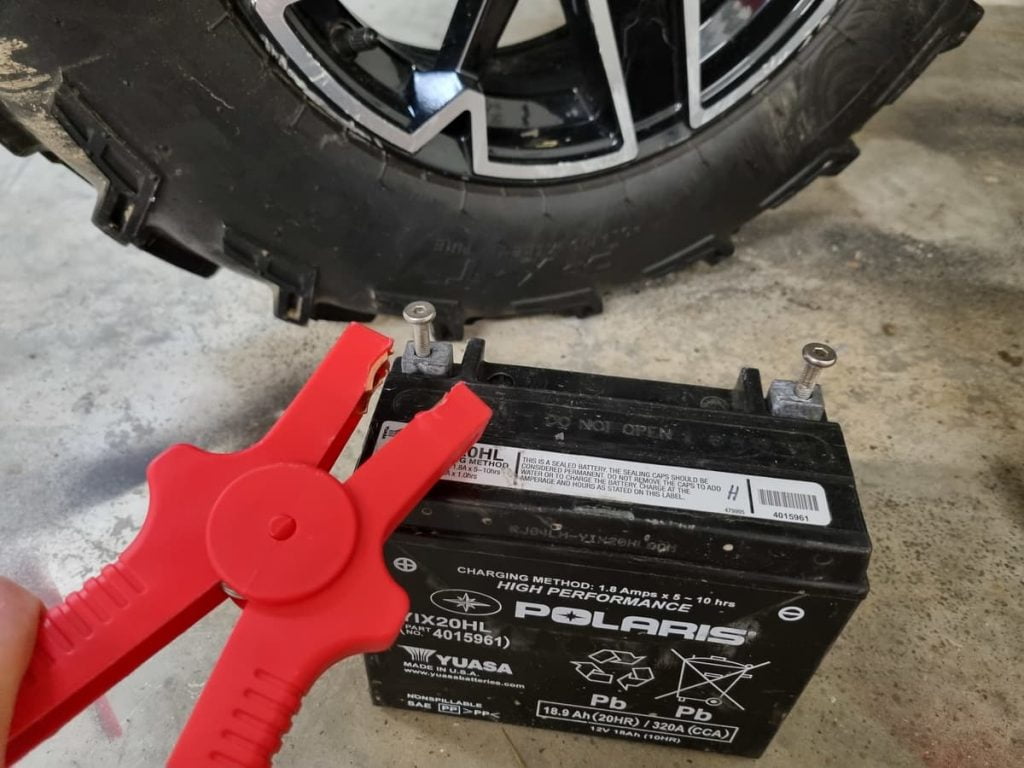
2. Connect the Dead (drained) and the Healthy Battery

Place the two batteries next to each other in a well-ventilated area. Connect the two batteries in parallel using the jumper cables in the following pattern:
- Connect the two negative battery terminals (marked with the symbol “-“) using the negative (black) jumper cable lead.
- Connect the two positive battery terminals (marked with the symbol “+”) using the negative (red) jumper cable lead.
The dead battery will now feed off the charge from the fully charged battery.
Caution: With the red lead connected to the battery, the other end of the lead is hot. Be careful not to touch the negative battery terminals, the negative (black) jumper cable leads, or anything grounded, as it will cause a short. Shorting a battery will likely cause permanent damage to the battery and can be very dangerous.
3. Leave the Batteries Connected for an Hour
Leave the two batteries connected for about an hour to allow the dead battery to gain some charge. Do not let it sit too long, tho, as this may drain the healthy battery below what is recommended.
4. Disconnect the Jumper Cables
When disconnecting the jumper cables, do it in this order:
- Fully charged battery positive cable
- Low battery positive cable
- Low battery negative cable
- Fully charged battery negative cable.
Optional: After disconnecting the jumper cables, use a multimeter or voltmeter to read the voltage level of the dead battery. The meter should now read 11.5V or more.
If you do not have a multimeter or don’t know how to use one, you may safely move on to the next step. If the charger is still unable to initiate the charging process, the voltage level of the dead battery is likely still not high enough.
In that case, reconnect the jumper cables and allow them to sit for one more hour. If that doesn’t help increase the voltage, the battery is likely bad and needs replacing.
5. Connect the Battery Charger to the Dead Battery
Connect the battery charger to the dead battery like you usually would:
- The charger’s negative (black) lead attaches to the positive (-) battery terminal.
- The charger’s positive (red) lead attaches to the positive (+) battery terminal.
6. Initiate the Charging Process
Now that the battery and charger are set up, it’s time to plug the charger into a wall socket and initiate the charging process as usual. As a rule of thumb, you should use a charger with a charging output of no more than 1/10th of the batteries rated CCA. On an ATV battery, this is typically around 2 Amps.
Check this post to learn how to identify your battery’s CCA and other crucial metrics. If you need a more in-depth guide on charging a battery, please refer to this illustrated step-by-step guide.
7. Charge for up to 24 Hours
Hopefully, the charger will now initiate the charging process as usual. In that case, allow the battery to fully charge until the charger shuts off automatically or enters maintenance mode.
This process usually takes up to 24 hours with a completely drained battery.
8. Install the Fully Charged Battery to the ATV
With a full charge, the battery is now ready to be installed on your ATV again.
- First: Connect the RED positive (+) cable to the positive battery terminal.
- Second: install the BLACK negative (-) cable to the negative battery terminal.
9. Charge the Healthy Battery
Remember to charge the healthy donor battery after successfully charging the dead battery to a full charge. It has likely lost a lot of charge from being used to boost the dead battery.
How to Charge a Dead Battery Using a Manual Charger
Instead of using a donor battery and a smart charger, you can charge the battery overnight with a manual charger set to a low amp charge.
It may need some time to get the charging process going, but you’ll get the best result by not going too hard on the amps. When charging batteries, slow and steady winch the race every time.
If charging your battery overnight on the lowest amp setting doesn’t work, try using a slightly higher amp setting next time.
Caution: You should never exceed 3Amp charger output when charging ATV batteries. Note that car chargers typically come with an output of 10A or more. Charging an ATV battery at this rate will overheat it and cause permanent damage.
What Is a Dead ATV Battery?
A battery is considered dead when it drains to a charge near zero. While a battery with a charge of just under 11.5 volts does likely not have enough power to start a vehicle, it is still not completely dead.
But when a battery sits too long at a deficient charge (below 11.5V), it will soon become completely dead due to internal sulfation.
How Does an ATV Battery Die?
An ATV battery can become completely dead in many different ways. Sometimes, you can restore the battery if you charge it before it sits too long with a low charge.
Typical scenarios where an ATV battery drains and goes dead:
- When unintentionally leaving the lights on overnight.
- From extensive winch usage, it pulls more power than the ATV’s built-in charging system can keep up with.
- From old age. An ATV battery typically lasts 3 to 5 years in real-world conditions.
- Low fluid levels in the battery. This only applies to serviceable batteries. Do not attempt to open a sealed battery.
- From a loose or corroded ground cable.
- From parasitic amp-draw: When an issue in the electric system causes a small current draw that may drain the battery completely given enough time.
- When the ATV’s charging system is not working correctly, typically, it is a bad stator or regulator.
- From driving in extreme sub-zero temperatures.
The Bottom Line
If your ATV battery dies, quick action can save it. However, batteries left dead for too long may not be recoverable. Remember, always prioritize safety when charging and working with batteries.