
Starting an ATV is not difficult as long as you know the proper procedure. However, If you miss some steps, you might struggle to get the engine to fire up.
This post covers everything you need to know about turning on a four-wheeler, including some of the things you should know and do before you start up the engine to go for a ride.
Quick Guide: How to Start an ATV
To properly start an ATV, it is widely recommended to use the BONE-C checklist for guidance:
- Brakes – Ensure the parking brake is on.
- On position – Ensure the fuel valve and ignition key are ON.
- Neutral – Put the gear shifter in neutral (N) or park (P).
- Engine – Ensure the engine stop switch is in the RUN or ON position.
- Choke – If the engine is cold, turn on the choke before starting the ATV.
If this is your first time starting an ATV, you might want more detailed instructions to guide you through each step. You’ll find them further down in this post.
Is This Your First Time Starting an ATV?
Before starting an ATV for the first time, you should familiarize yourself with how the vehicle operates and ensure you understand rider safety.
Safety First
Ensure you understand the risks of riding an ATV and how to do it safely.
Always read and understand the safety instructions and precautions in the owner’s manual before you ride. Failing to do so can result in severe injury or death.
Wear the proper safety gear, such as a helmet suitable for ATV riding, eye protection (goggles or helmet with visor), gloves, over-the-calf boots, and a long-sleeved shirt and long pants.
Also, feel free to check out or post 10 tips on how to prevent ATV accidents.
Learn How the ATV Operates
Before you ride, you must learn proper riding techniques and basic features and controls to operate the ATV.
As a bare minimum, you should know how to operate the gear shifter and perform controlled acceleration, steering, braking, and stopping.
ATVs are rider-active, meaning you shift your body weight when turning, going up or downhill, or crossing obstacles like rocks and logs.
This highly active form of riding is the main difference that separates ATV riding from most other vehicles and requires learning and experience to master fully.
Taking an ATV riding course is highly advised, or if you know someone with previous riding experience, ask them to guide you. ATVSafety.org offers a free online course to get you started. https://atvsafety.org/atv-ecourse/ Finishing the course qualifies for a state ATV certificate, as some states require.
Before you begin riding, I recommend watching this information-packed video by Tracker ATVs.
Pre-Ride Checklist
Before you start the ATV, it is recommended to always go through a quick pre-start checklist to ensure the ATV is safe to start and operate. It also helps reduce the risk of getting stranded out in the woods.
This is not the most thrilling part of ATV riding, but it could be the most important 5 minutes of your day.
Your owner’s manual will have detailed instructions on what to check on your specific ATV.
However, the essential T-CLOC checklist makes a good starting point to learn and apply before riding any ATV.
T-CLOC is an abbreviation designed to help you remember what to check and stands for Tires and Wheels, Controls, Lights and Electrical, Oil and Fluids, and Chassis.
T: Tires and Wheels
- Tire pressure: Ensure all tires are inflated to the proper pressure specified in the owner’s manual.
- Tire condition: Check for wear or damage like cuts or gouges.
- Wheels and Fasteners: Inspect and ensure the fasteners are tightened to spec.
C: Controls
- Steering: Ensure free operation.
- Brakes: Check controls for smooth operation, engagement point, and position.
- Throttle: Ensure proper operation.
- Throttle limiter (if available): Adjust according to the rider’s skill level and age.
- Cables: Ensure all cables are correctly adjusted and move smoothly in both directions.
- Gear shifter: Ensure proper operation.
- Clutch: Check operation (applies only to manual transmissions)
L: Lights and Electrical
- Engine stop switch (kill switch: Ensure proper operation.
- Headlights, indicator lights, and brake lights: Check lamps and switches for operation.
O: Oil and Fluids
- Oil Level: Remove the dipstick to ensure the oil level is between min and max.
- Fuel Level: Fill up the tank; you might ride farther than you plan.
- Coolant: Ensure the coolant level is between min and max.
- Brake fluid: Ensure proper level.
- Air filter: Inspect and clean.
- Hoses: Check the fuel and coolant hoses for leaks.
C: Chassis and Chain/Driveshaft
- Front and rear Suspension: Remove any sticks or stuck rocks. Lubricate if necessary.
- Bolts and Fasteners. Inspect and ensure fastener tightness.
- Chain: Inspect, adjust, and lubricate.
- Driveshaft: Check for leaks and lubricate.
ATV Starting Procedure: Step-By-Step Guide
Please note that this is a generic start-up routine that does not replace consulting with the ATV owner’s manual. Some details might differ slightly for your specific ATV make and model, but the basic principles remain the same.
The detailed procedure, as outlined below, builds on the BONE-C checklist from the beginning of this post.
To recap, the BONE-C checklist is Brakes, On, Neutral, Engine, and Choke.
1. Activate the Parking Brake
Ideally, when you learn to start and ride an ATV, the vehicle should be on a level surface, pointed in a safe direction.
Before you climb onto the ATV, activate the parking brake to prevent the vehicle from accidentally rolling.
Most ATVs have an interlock future with a switch integrated into the brake lever that prevents the engine from starting if the brake is not engaged.
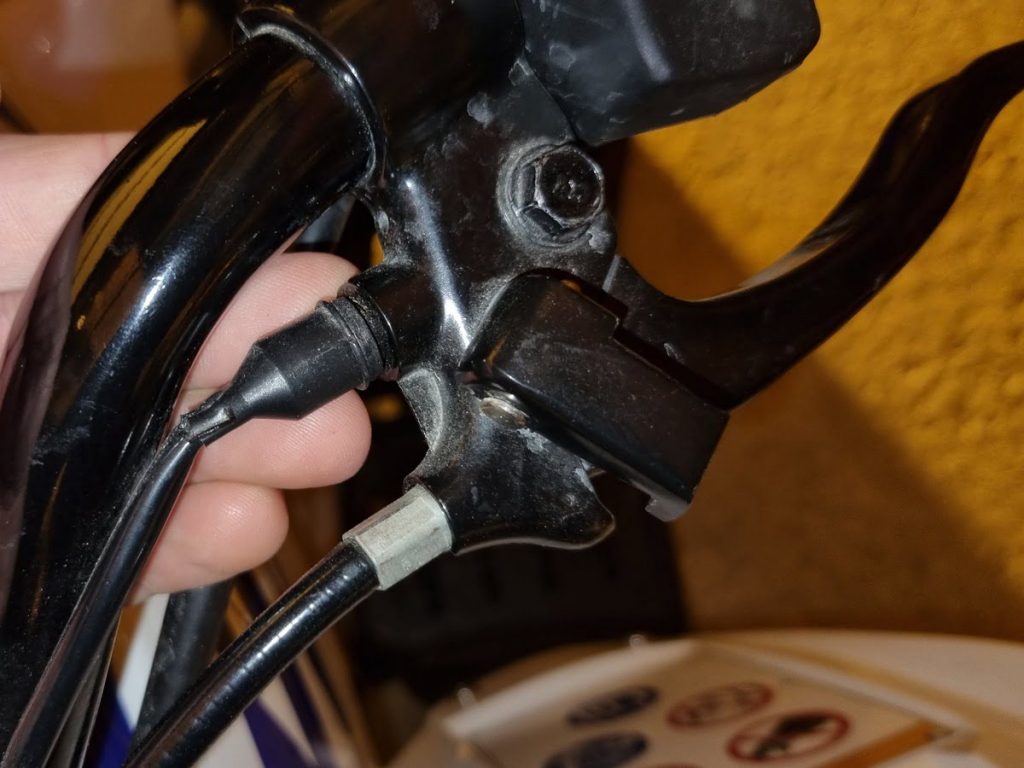
The parking brake is typically located on the left handlebar brake lever. To turn on the brake, squeeze the brake lever firmly toward the handlebar and flip the parking brake lock to engage the lock.

With the parking brake engaged, board the ATV from the left and sit in a straddled position.
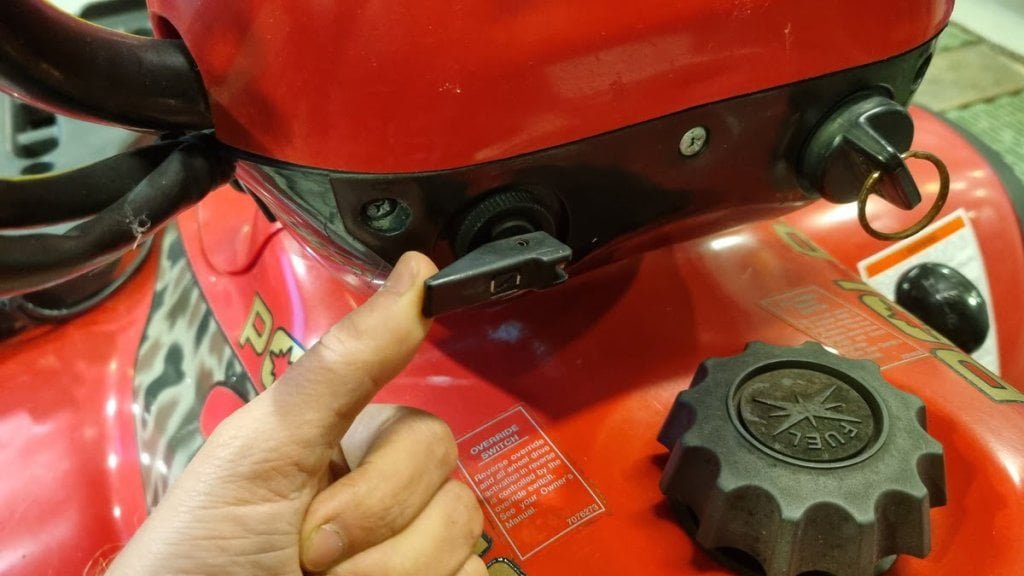
2. Turn On the Fuel Valve and Ignition Switch
First, turn the fuel valve to the ON position.

While not available on all ATVs, the fuel valve, or petcock valve, is typically located at the cotton of the fuel tank on your left-hand side when facing forward.
The valve has three positions.
- OFF: The fuel supply is cut off when the valve is in this position.
- RES: The reserve position accesses the last fuel in the fuel tank and is for when you accidentally run out of fuel.
- ON: When the valve is in this position, fuel flows freely from the gas tank to the engine.
TIP: The fuel shutoff valve prevents leaks when the ATV is not used for extended periods. When the ATV is used daily, many riders leave the valve in the ON position.
Next, insert the key and turn the ignition switch to the ON position.

The ignition switch is typically on top of the ATV near the instrument panel. If your ATV has one, the ignition switch must be turned on for the ATV to start.
The switch typically has three or four positions:
OFF: When in this position, the switch cuts the power from the ignition system. It stops a running engine or prevents a running engine from starting.
ON: When in this position, the switch turns on power to the ignition system but does not activate the starter.
LIGHTS: On some ATVs, the ignition switch must be turned one step further to turn on the headlights.
START: On some ATVs like the one in the image above, the ignition switch has a fourth position that activates the electrical starter. Be careful not to turn the switch too far before you are ready to start the engine.
3. Put the Gear Selector in Park (P) or Neutral (N)
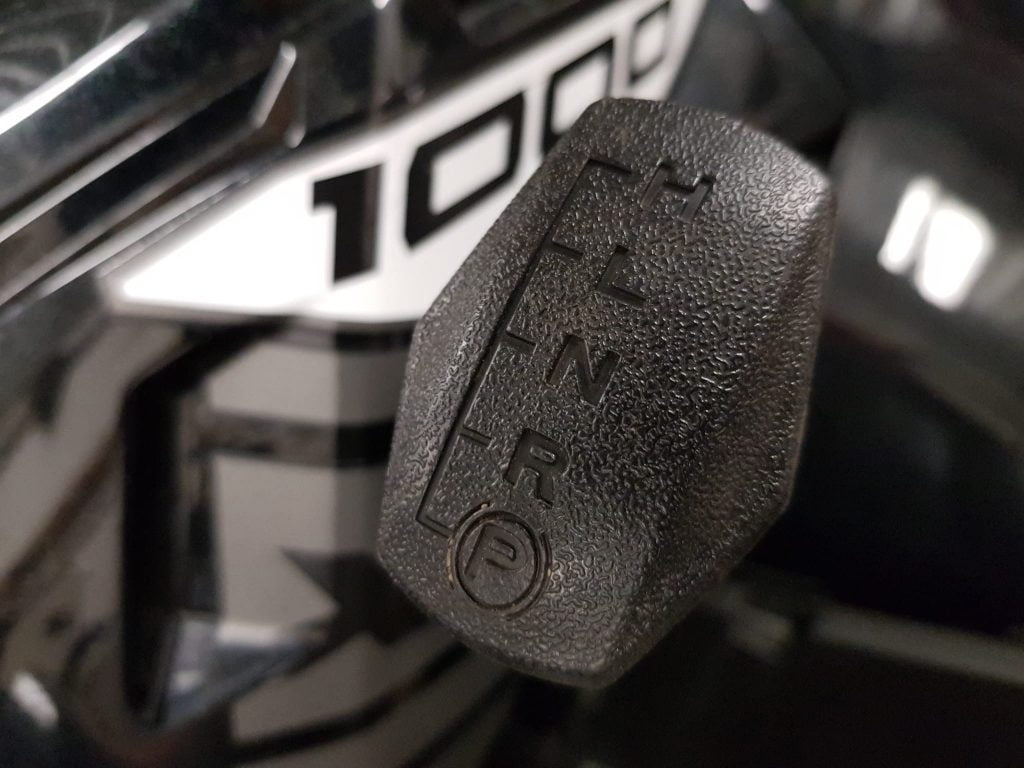
Gear selector design varies between ATV brands and models, but on most ATVs, the gear selector must be in Park or Neutral for the ATV to start.
Look for a hand lever on either side of the engine if the ATV is an automatic or a foot shifter on the left side if it’s a manual.
The ATV’s gearbox layout is typically stamped into the top of the hand lever, or it might have gear indicator lights in the instrument panel.
On a manual, Neutral is typically between first and second gear. Squeeze the clutch lever and repeatedly press the foot shifter down to find the first gear. Then, gently press the shifter one click up to put the ATV in neutral.
TIP: Getting the gear shifter in Park or Neutral becomes more manageable if you gently rock the ATV by shifting your body weight back and forth.
4. Put the Engine Stop Switch in the RUN or ON Position
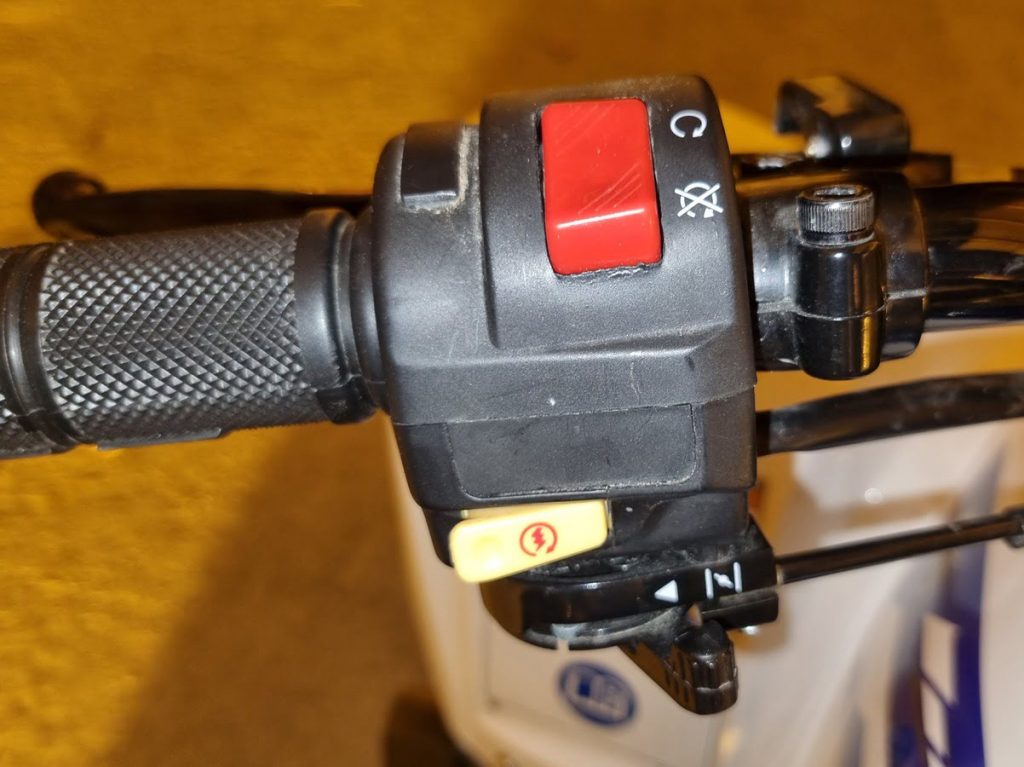
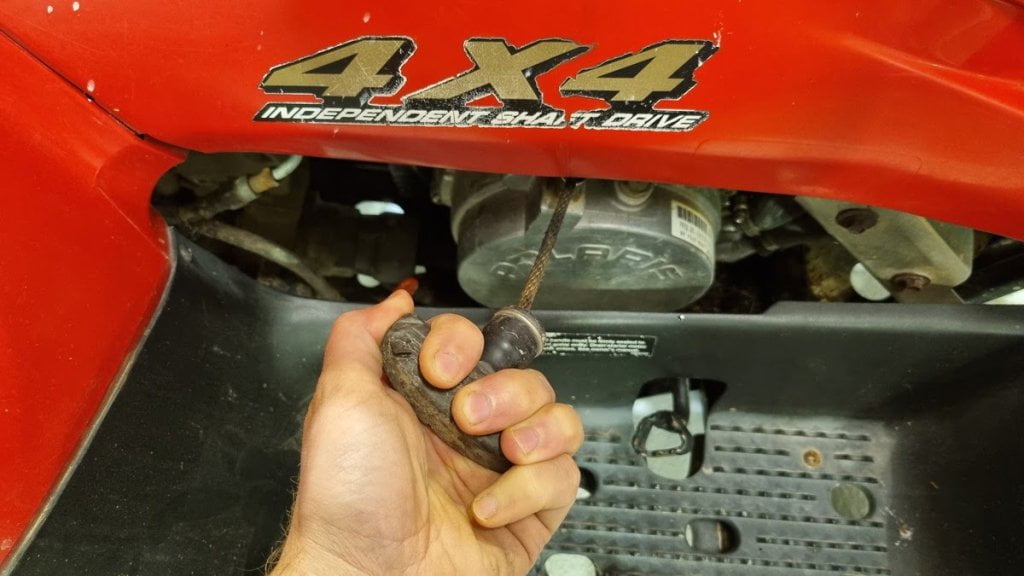
Most have a red engine emergency stop switch, also known as the kill switch, on the left handlebars.
Some youth models use a tether cord-style kill switch rather than a conventional switch.
Check out our guide on how to start a Chinese ATV for more information about those.
The switch has two positions:
ON/RUN: The ATV electric circuits are connected in this position, and the engine can start and run.
OFF/STOP: In this position, the ignition’s electric circuits are cut off, and the engine shuts off or will not start.
TIP: The purpose of the kill switch is to stop the ATV quickly in an emergency. It is not meant for regular engine stops.
5. Use the Choke When The Engine Is Cold
A cold engine starts easier with a richer air/fuel mixture. The choke is a mechanism that limits the carburetor air intake, effectively increasing the amount of fuel relative to the air that enters the engine.
Having the choke turned on can be beneficial when starting the engine in cold weather or when it’s your first ride of the day.
Older ATVs and some budget-friendly models have a manual choke, while most modern ATVs have a fully automatic choke where the whole process happens automatically.
The choke lever on an ATV with a manual choke is typically located on the carburetor or as a pull lever near the handlebars.

With the choke turned on, press the electric starter button or turn the ignition switch to the START position to fire up the engine. Never activate the starter for more than five seconds at a time.
As soon as the engine starts, release the starter button. If the engine does not start, release the starter button and wait at least five seconds.
As the engine warms up, turn the choke off gradually. Allow the engine to heat properly before hard acceleration or rev-ing the engine.
When starting a warm engine, leave the choke OFF.
Starting an ATV Without an Electric Starter
Some older ATVs and youth models don’t have an electric starter and must be manually started.
The starting process is identical, except you pull a pull cord or operate a kick starter to fire up the engine.
With a pull starter, grab the pull cord by the handle and pull firmly. Stop before you reach the end to prevent tearing the cord. The pull cord is spring-loaded and pulls back when you release the tension. Repeat until the engine starts.
On ATVs with a kick start, the lever is typically located on the left-hand side footwell.
Flip out the lever. Stand with your right foot firmly on the opposite footrest and the left foot placed on the lever. Press down the lever in a swift movement as fast as you can. Allow the spring-loaded lever to spring back and repeat until the engine starts.

Typical ATV Starting Problems and Solutions
Sometimes, the ATV does not want to start even when applying the proper starting procedure. Here are a few common issues that can prevent an ATV from starting:
- The Battery disconnect switch is in the OFF position. Turn the switch to the ON position.
- The battery has drained. This is how you charge a dead battery.
- The engine has become flooded with too much fuel. Let the ATV sit for 30 minutes to allow the excess fuel to evaporate. To speed up the evaporation process, remove the spark plugs.
- On some ATVs with a manual gearbox, the clutch lever must be pressed for the ATV to start.
If the engine still doesn’t start, please refer to this extensive guide on possible causes to look into when an ATV does not start.