
Before riding an ATV for the first time, you must learn and understand the basic controls to operate the vehicle safely. This guide covers all the main controls on most modern ATVs.
The essential controls of an ATV include the handlebars for steering, brake levers to stop, a throttle lever to control speed, and various switches for operating the lights, winch, and ignition system.
Please continue reading to learn more about how each control mechanism works and what it does.
Throttle Lever
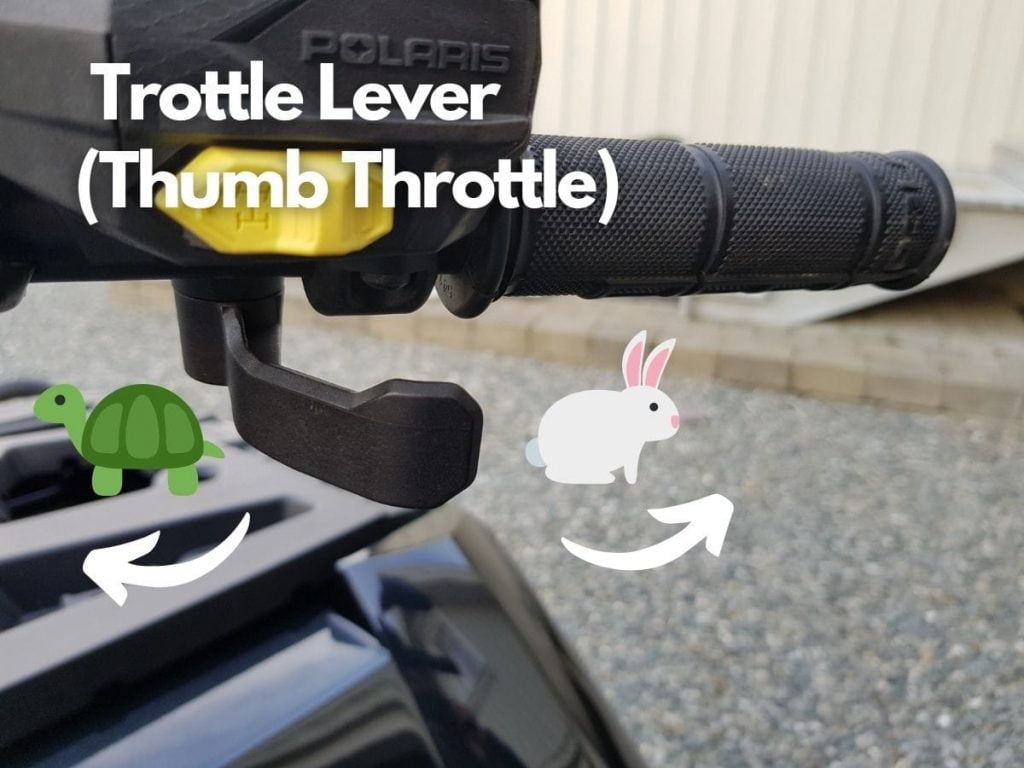
ATVs come with a thumb-operated throttle lever that works like a car’s gas pedal or the twist throttle on a motorcycle.
- Press the lever gradually to increase engine speed and vehicle movement.
- Release the lever gradually to decrease engine speed and vehicle movement.
The throttle lever operates through an electrical or electro-mechanical (drive-by-wire) system, translating the movement of your thumb to adjust the carburetor’s settings. Some older or budget ATVs connect the throttle lever and carb using a steel cable.
If you’re curious why ATVs come with a thumb throttle instead of a twist throttle, you’ll find the answer in this post.
Hand and Foot Brake
Your ATV has one or two hand brake levers, a foot brake lever, and a parking brake feature.
Hand Brake Lever

The hand brake lever is located on the handlebars and operates both the front and rear brakes on the ATV. Squeeze the lever against the handlebar until the desired braking effect is reached. Release the lever to disengage the brakes.
If you squeeze the lever too hard, your wheels may begin to skid or slide. If this happens, reduce lever pressure to regain control of the vehicle.
Most riders prefer to use the hand brake lever as their primary braking control.
For active or high-speed riding, it’s good practice always to leave one or two fingers resting on the brake lever to reduce reaction time and stopping distance. The other fingers should maintain the grip around the handlebars at all times.
Foot Brake

The foot brake is located near the right footrest and operates both the front and rear brakes (on most ATVs).
Note that on some ATVs, the foot brake only operates the rear brakes. Refer to your user manual to learn how your specific bike works.
Press the pedal down with your foot to activate the brakes. Release pressure by lifting your foot to disengage the brakes.
Parking Brakes

Most ATVs use a locking mechanism on the hand brake lever to activate the parking brake. Squeeze the lever against the handlebar and press the parking brake lock to engage the lock.
To disengage the parking brake, squeeze the hand brake lever until the brake lock disengages automatically. On some ATVs, the parking brake lock must be manually deactivated.
Related: How Do ATV Brakes Work? Learn the Basics
Handlebars
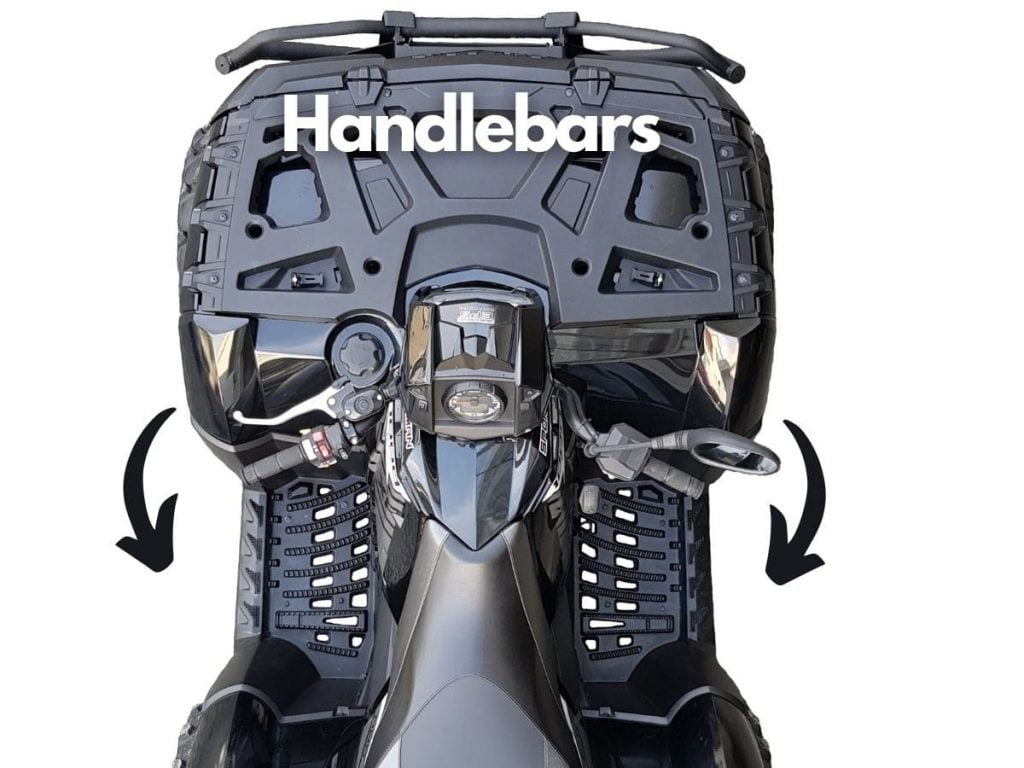
On an ATV, you steer using handlebars like a motorcycle and not with a steering wheel like a car.
- To go left, you pull the left side of the handlebars towards you and push the right side away.
- To go right, you pull the right end of the handlebar towards you and push the right side away.
Note that you don’t countersteer on an ATV like on a motorcycle that has only two wheels and leans in the direction you are turning.
Gear Shifter
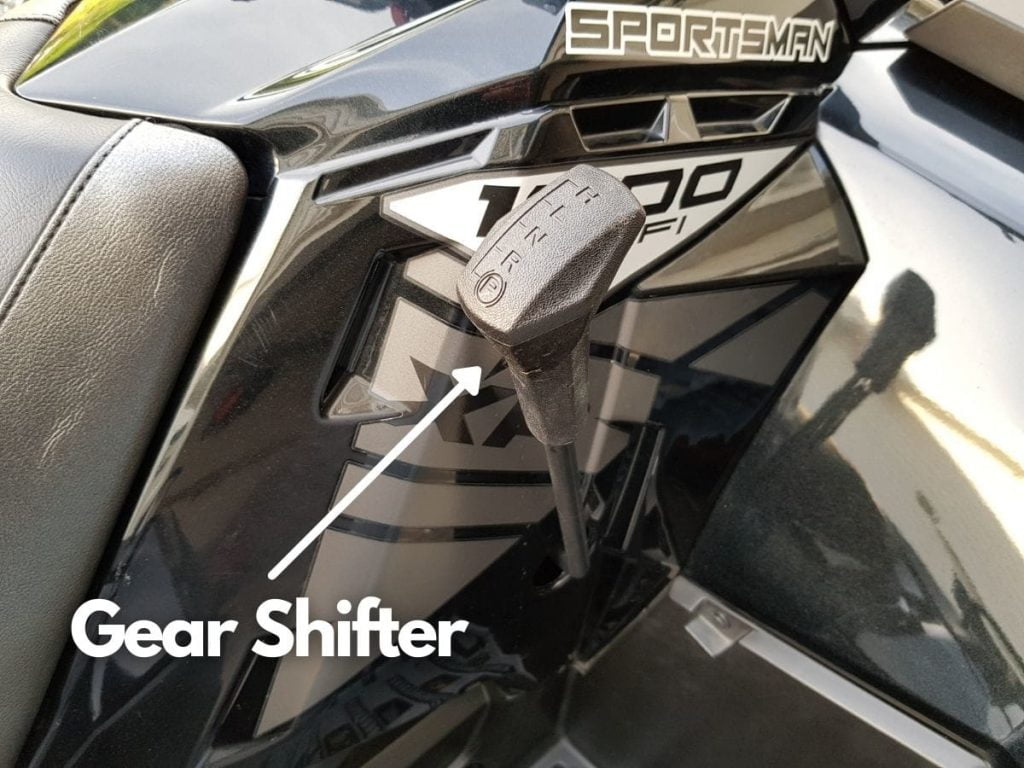
Depending on what type of transmission your ATV has, it will have either a switch, a hand lever, or a foot pedal to shift between gears.
Gear shifting controls on Automatic ATVs: ATVs with automatic transmissions typically have a hand lever to switch between the available gear ranges:
- P: Park
- R: Reverse
- N: Neutral
- L: Low gear range
- H: High gear range
After selecting the gear range, the gearing is handled automatically by the transmission and clutches.
Gear shifting controls on Semi-Automatic ATVs: ATVs with semi-automatic transmissions typically have a push-button style of gear-shifter. Push UP to switch to a higher gear, and press DOWN to switch to a lower gear.
Gear shifting controls on Manual ATVs: Some youth ATVs or budget adult models come with a manual gearbox and a foot pedal to shift between gears. In addition, you’ll find a clutch hand lever that needs to be compressed each time you switch gears, like on a car with a manual gearbox.
The gears are typically laid out like this:
- Shifter all the way down: First gear
- Shifter one click up: Neutral
- Shifter one more click up: Second gear
- Shifter one more click up: Third gear
- …and so on.
Related: How to Put Different ATV Types in Reverse (Incl. Hondas)
Switches
An ATV is equipped with a range of switches to control the various electric components of the vehicle. There are the main ones you should know:
Ignition Key Switch

Use this switch to start and stop the ATV. Insert the correct key to turn the switch. The switch typically has three or four positions:
- STOP: Cuts all electric power to the engine
- LIGHTS ON: Turns on the headlights and instrument cluster. Return to this position after starting the ATV to turn the main headlights on.
- PARKING LIGHTS ON: After starting the ATV, the switch will return to this position where only the parking lights and taillights are on.
- START: Starts the engine. The engine stop switch must be in the RUN position for the ATV to start.
Note that some ATVs require that the gear shifter is in PARK and that the hand brake lever is compressed for the bike to start.
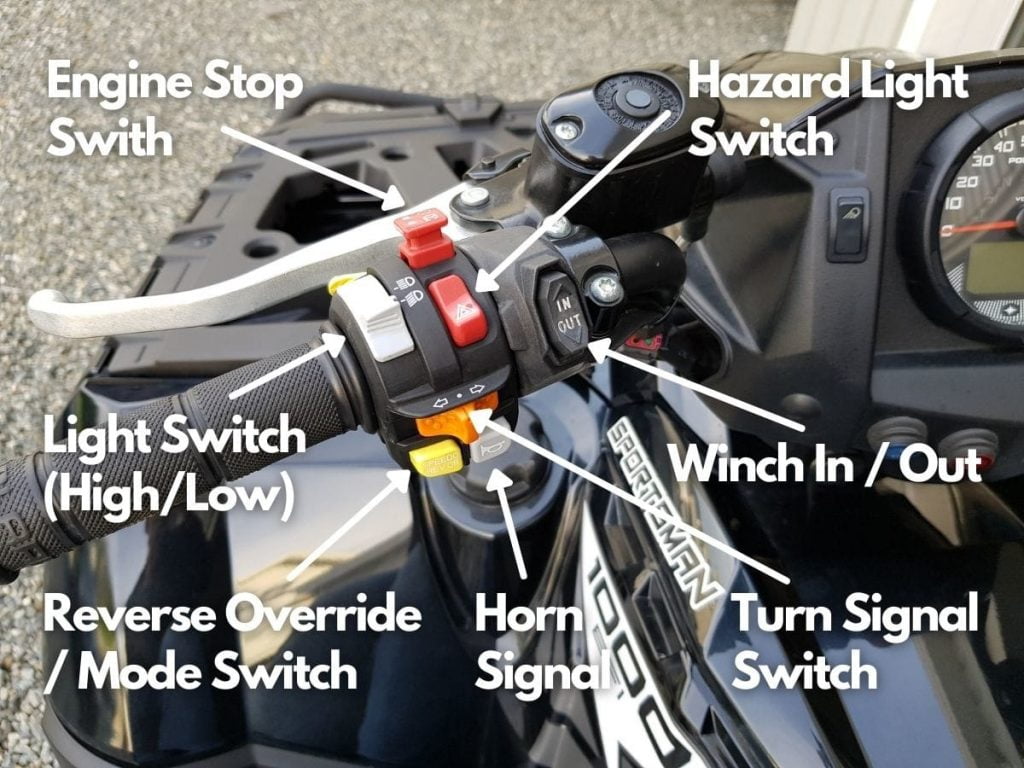
Engine Stop Switch – Also Known as “Kill Switch”
When the switch is OFF, the engine will not run. Use this switch to turn off the engine in an emergency.
Momentary High Beam Switch
Pressing and holding this switch will activate the headlight high beam. The light will return to the low-beam position after the button is released. This feature can be used to signal other drivers.
Mode Switch
The mode switch allows you to toggle through your speedometer’s various display modes and functions. These features vary between different ATV brands and models but may include a trip counter, battery voltage, engine rev counter, and odometer.
Reverse Override Switch
Most modern ATVs have a rev limiter to prevent unintentional, fast acceleration when in reverse. Unintended acceleration can happen when the rider’s leg or hip accidentally pushes on the throttle switch while driving in reverse.
By activating the reverse override switch, you temporarily deactivate the rev-limiter as long the button is pressed. Use this switch with caution. It’s easy to lose control of the bike while driving fast in reverse.
Winch Switch
If your ATV has a winch, there is a winch switch on the handlebars, typically on the left-hand side. The switch has two positions: “OUT,” which will spool the winch rope out, and “IN,” which will spool the winch rope back in on the winch drum.
Related: How to Winch an ATV: A Step-by-Step Guide
High/Low Beam Switch
This switch changes between high and low beams.
Work Light Switch
If the bike has work lights, you’ll find a separate switch to turn on these lights. Never use work lights when riding on-road.
Hazard Light Switch
Activates all turn signal lights to flash simultaneously. Use this feature to alert others of an emergency or a situation that requires caution.
Turn Signal Switch
Move the switch to the left to activate the left turn signals. Move the switch to the right to activate the right turn signals.
4×4 Switch

Depending on your ATV’s transmission, it may have an electric 4X4 switch that toggles between 2X4, 4X4, and other modes such as 4X4 ADC or other model-specific transmission modes and features.
Some ATVs use a mechanical lever to switch between 2×4 and 4×4.
Hand and Seat Warmer Switch (If Equipped)
Some high-end comes with optional hand or seat warmers to keep you warm when riding in freezing conditions.
Front Differential Lock (If Equipped)
Some utility ATVs come with a locking front differential that, when activated, forces both front wheels to rotate simultaneously when driving in slippery conditions.
On some ATVs like Polaris, the diff lock is automatic, while other brands have a dedicated front differential lock switch that must be operated manually.
Related: ATV Diff Locks Explained: Are They Worth the Investment?
Instrument Cluster

The instrument panel displays helpful information such as:
- Vehicle speed
- Engine RPM
- Fuel level
- 4X4 mode
- Warning lights
- Indicator lights
- Over Temperature
- EPS warning (if equipped)
- Neutral
- High beam
- Check engine
- Turn signal
- Trailer turn signal
- Fault codes
- Odometer
- Service notification
The gauges may be digital, analog, or a combination of both. The displayed information aids the rider in driving the vehicle safely and within legal limits.
Be alert for any fault codes or warning lights on your ATV. These are early signs that there might be an issue with your vehicle.
Noticing the warning early and identifying what’s causing the alarm can prevent expensive repairs down the line.
Related: Avoid These Mistakes: 15 Surefire Ways to Ruin Your ATV
Fuel Cap
The fuel cap is always located on the highest portion of the gas tank. Only use gas according to manufacturer recommendations.
Operator Presence Detection (If Equipped)
Many modern ATVs come with a so-called operator presence detection feature that registers whether the driver is present on the bike or not. When the vehicle detects that the rider is not present, it will alert the rider with a sound or display message.
The alert or message occurs when:
ATVs Without a Tether Switch
- The gear shifter is not in park (P)
- And the vehicle is not moving
- And the hand brake is not applied
ATVs With a Tether Switch
- The gear shifter is not in park (P)
- And the vehicle is not moving
- And the hand brake is applied
- And the tether switch is not connected
Battery Quick Disconnect (If Equipped)

Some ATVs come with a battery isolator or battery wick disconnect switch.
Turning the switch to the OFF position removes all power from the vehicle. This feature may come in handy to reduce the risk of the battery draining when the ATV sits for long periods.
To re-engage the switch and turn back on the power, turn the switch 90 degrees to the ON position.
ATV Controls FAQ
What Are the Basic Controls on an ATV?
Basic ATV controls include the throttle, brakes, steering handlebars, gear shifter, and start/stop switch.
How Does the Throttle Work on an ATV?
The throttle, usually a thumb lever, controls speed. Pushing it down increases speed, and releasing it slows the ATV.
What’s the Difference Between an ATV Foot Brake and Hand Brake?
The foot brake typically controls the rear wheels, while the hand brake controls the front, offering different braking dynamics.
How Do I Start and Stop an ATV?
The start/stop switch controls ignition. Turning it to ‘run’ and pressing ‘start’ begins operation. ‘Stop’ or ‘kill’ ends it.
Wrapping Up
Now that you know the basic controls of an ATV, you should be ready to move on to basic training.
However, understanding how various ATV controls function in theory is insufficient for safe real-world operation. To ensure safety, you should practice until operating these controls becomes a matter of muscle memory.
It’s recommended that all new ATV riders take a riding course or, as a minimum, ask someone with previous ATV riding experience to guide them the first few times of riding.
ATV riding is a skill that requires a lot of practice to maintain control of the vehicle under all conditions.
Related: Beginner Guide: What Is ATV Riding?