
Troubleshooting an ATV with no spark or only a weak spark can be challenging and mildly frustrating, but it doesn’t have to be. That’s why I’ve made this simple step-by-step guide to help you identify why your bike is acting up.
What Causes No-Spark or a Weak Spark on an ATV?
Your ATV’s ignition system consists of various components that work together to create a spark. Each component in the system is just as important as the other. They all have to function correctly, or there will be no spark, or the spark will weaken.
When your ATV is not getting a spark, the problem is with one or more of these electrical components:
- The spark plug
- The spark plug wire
- The ignition coil
- The stator
- The crankshaft positioning sensor
- The CDI or ECU
- The battery
- Wiring and connectors connecting these components

How to Diagnose No Spark on an ATV
The easiest way of identifying which of the listed components is failing is through elimination.
When dealing with electrical issues, it’s always wise to start with the simplest checks. If you assume the worst and begin by removing the stator, you might end up disassembling numerous components unnecessarily.
You will often find a problem with the spark plug, the kill switch, a wire, or a connector.
Through various tests, you should be able to pinpoint which component is faulty. Before establishing which part is acting up, there is no need to focus on one single component.
Troubleshooting Guide for an ATV With No Spark
1. Confirm That the ATV Has No Spark
Whether you’ve done this step or not, it’s a good idea to confirm that the ATV indeed lacks a spark before proceeding with troubleshooting.
While you may feel confident that a lack of spark is the issue, remember that other starting issues could be causing similar symptoms. Therefore it’s not enough to assume the spark is not there; you need to test it.
An ATV requires fuel, air, and a spark to start. If you’re uncertain whether the starting issue with your bike is due to a lack of spark or another factor, we suggest consulting this guide.
How to Test an ATV for Spark
- Disengage the fuel system. If your bike has one, it’s a good idea to close the fuel tank petcock valve as a safety precaution or remove the fuel pump fuse before checking the spark.
- Remove the ignition coil lead boot from the spark plug. Pull straight outwards from the engine.
- Remove the spark plug from the engine. Use a spark plug socket wrench. Spark plug sockets are either 5/8 inches (16mm) or 13/16 inches (21mm).
- Connect the spark plug with the ignition coil lead. Push the spark plug into the spark plug boot by hand until it is seated.
- Place the spark plug on the cylinder head or near an exposed metal part of the frame. The plug’s metal part must touch the metal on the engine or frame for this to work. This will ground the spark plug so that it can create a spark.
- Crank the engine and watch for a spark. You may need a helper to push the starter for you. Make sure to keep your hands at a safe distance from the spark plug. You should see a bright blue spark that fires continuously on a healthy spark plug.
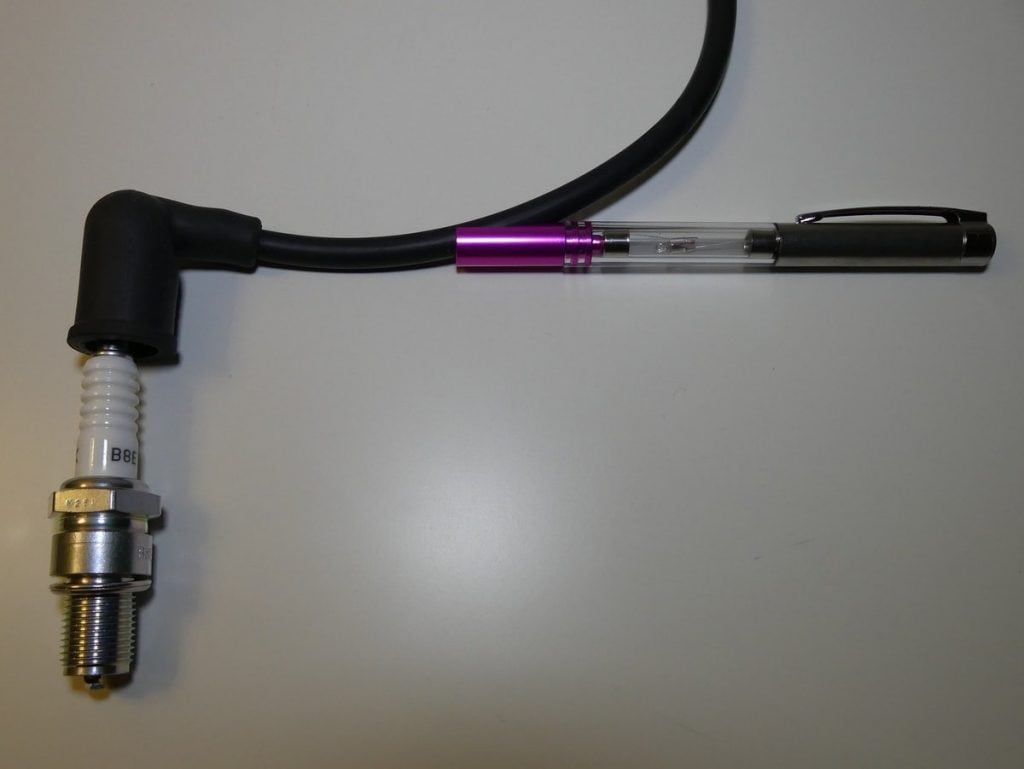
Alternatively, you can test the plug by using a spark plug tester. Spark plug testers come in various styles, but here are two of the most common.
With the first spark plug tester style, you place the tool’s grooved part over the spark plug wire while the engine runs. The bulb inside the tool will flash to indicate a spark and its power and consistency.
The second style of tester connects where the spark plug usually would be. Remove the spark plug boot from the spark plug and connect it to the tool. The tool has an alligator clip that connects to ground, such as the engine or an exposed metal part of the frame.
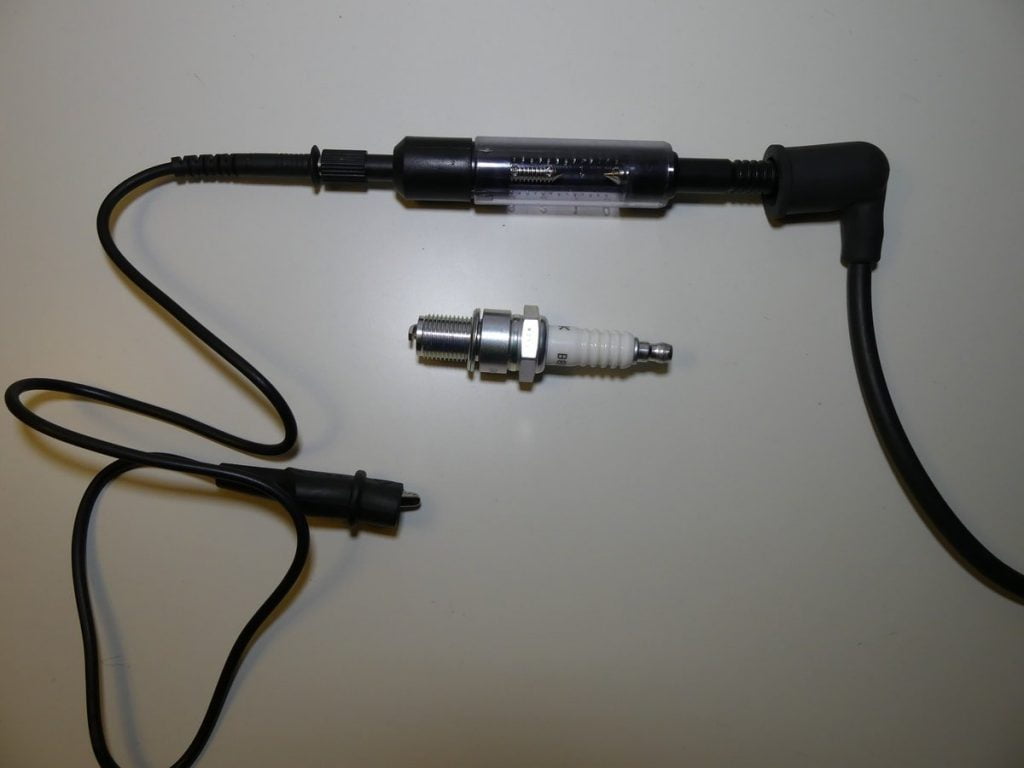
If there is a spark, it will appear inside the see-through tool casing, jumping between the tho metal leads. If the spark is good, it will have a regular purple-blue color. If the spark is weak, the spark inside the tool will appear yellow-red and have a more inconsistent spark pattern.
Now that you have verified that there is no spark, it’s time to begin troubleshooting.
2. Make Sure the Kill Switch Is On
The ATV will not create a spark when the kill switch is off. However silly it may seem, you’d be surprised how often people forget to turn it on before attempting to start their ATV.
ATVs with electrical starter motors won’t even crank the engine if the kill switch is off. So if the engine cranks, you know the issue is likely not with the kill switch.
On the other hand, pull start or kick start ATVs is another story. No matter how much you try, the ATV will not start with the switch turned off. So make sure the switch is turned on, or you might end up wet-fouling the spark plug.
3. Ensure the Battery Is Charged and Has Good Ground
While some ATVs will run without a battery, others need a healthy battery to power the ECM (electric control module) and electric fuel pump. The ECM is a small computer that tells the ignition coil when to create a spark.
If the battery holds an insufficient charge, the ECM may not power up and will not tell the ignition coil to create a spark.
Read the battery voltage by setting your multimeter to DC volts, placing the red lead to the positive battery terminal and the black lead to the negative terminal. A healthy battery should read 12.45 volts or more when fully charged.
If you want to learn how to charge your battery correctly, please refer to this guide.
To test the battery ground, place the black lead on the engine block or an exposed metal part of the frame. The red lead goes to the positive battery terminal. If the battery ground connector is good, you should get a reading close to or identical to the one you got when testing directly to the battery.
If you get a reading indicating bad ground, ensure the main engine ground is appropriately fastened and has not corroded. You find it by tracing the big black wire coming from the battery.
4. Check the Spark Plug
Spark plugs are cheap and easy to replace. They are considered consumables that may go bad for no apparent reason.
Be careful not to crank the engine for too long before checking the plug, or you risk overheating and possibly damaging the starter motor.
Whether the spark plug gapping is incorrect, the plug has gone bad, or it’s the wrong plug altogether for your engine, it may no longer be able to provide a spark. Note that a spark plug may have gone bad even if it still looks good.
The easiest way of testing if the issue is a bad plug is by replacing it with a new one before testing for spark, as described above. You don’t even have to remove the old plug. Just pull off the bott, insert a new plug and test for spark.
If your new spark plug isn’t creating a spark either, you know the problem is not with the actual spark plug.
5. Check for Loose, Damaged, or Corroded Connectors
A poor electrical connection in a connector may prevent the ignition system from working as it should. Ensure all connectors in the ignition system wiring harness are not damaged from corrosion, are not full of dirt, and are properly connected.
Check all connectors, especially the ones that connect the kill switch or ignition key.
- Unplug the connector.
- Clean the pins with an electric cleaner.
- Apply dielectric grease to prevent future corrosion issues.
- Plug the connector in and out several times to establish a proper connection.
Now test if this has fixed your no-spark issue.
6. Check for Damaged Wires in the Wiring Harness
If a wire gets damaged, exposing the metal leads, you may get a short to ground. Trace all the wires connecting the various components of the ignition system. If you find a damaged wire, repair or replace it.
7. Check the Kill Switch and Other Safety Switches
If the kill switch internals fails, it may stay off even in the “on” or “run” position.
You can test the switch by performing a continuity test using a multimeter, a test light, or a simple continuity tester.
Insert one probe into each of the two cables going into the switch. There should be no continuity when the switch is off and continuity when it is on.
Alternatively, you can do this simple test:
- Put the kill switch in the “on or “run” position.
- Turn the ignition key one step clockwise to turn on the power. Please do not turn it far enough to activate the starter. If the instrument panel lights up, you know you have power.
- Then turn off the kill switch. You should now see no light or any other signs of power. You now know that the switch works.
If your ATV has a 5-pin CDI box, you can use it to identify a safety switch issue. This test only works on 5-pin CDIs, typically found on cheaper Chinese youth ATV models or older ATVs.
- Look for a small black box with five wires going to it.
- Remove the CDI box from the ATV. You may leave the rubber CDI box suspension connected to the bike’s frame.
- Locate the center wire, usually white with a black stripe.
- Use a tiny screwdriver to release the tap that holds this pin in the connector.
- Remove the black and white wire from the connector. When removing this wire, you deactivate the many safety switches commonly found on cheap Chinese youth ATVs.
- With the center wire pin removed, reinstall and test if you get a spark by removing the spark plug and looking for a blue spark. Do not attempt starting the bike, as you cannot stop the engine with the white and black center wire removed.
- If you get a spark, you know that the issue is with a safety switch.
8. Check the Ignition Coil
The ignition coil generates the electrical pulses of current sent to the spark plug to create a spark.
- On single-cylinder ATVs, the coil is generally cylindrically shaped with two connectors at one end (the primary side) and one single high gauge ignition coil leading out the other end (the secondary side).
- On ATVs with more than one cylinder, the ignition coil pack may have a more boxed shape, but it could also be cylindrical.
How to Test the Ignition Coil With a Multimeter
With a multimeter, you can read the ohms resistance of the ignition coil’s primary and secondary sides of the ignition coil. Each of these readings can tell you whether the coil is okay.
- Locate the ignition coil. You will find the ignition coil by tracing the spark plug wire from the spark plug end.
- Disconnect the ignition coil and remove it from the ATV. This makes testing more straightforward and safer.
Test the primary side:
- Put the multimeter to its ohms (resistance) setting.
- Place the leads on the primary side terminals of the ignition coil. Place one lead on each terminal; it doesn’t matter which lead goes where.
- Read the ohms resistance. A typical ohms resistance reading on an ignition coil’s primary side ranges from 0,2 to 5 ohms. Refer to your ATV service manual for the exact value of your bike. If you get a reading outside this range, the ignition coil is likely bad and needs replacing.
Check out eManual Online to get factory workshop service and repair manuals for your ATV.
Test the secondary side:
- On dual lead ignition coils, place one lead in each of the spark plug boots. Your typical reading will range from 15k to 25k ohms.
- On single lead ignition coils, place one lead in the spark plug boot so that it touches the spark plug connector and the other lead to one of the connectors of the primary side of the ignition coil. Your typical reading will range from 10k to 15k ohms. Most of the resistance comes from the spark plug boot. That’s why you typically get a lower reading on single-lead ignition coils.
- Any reading outside the typical ranges may indicate a bad ignition coil.
9. Check the CDI or ECU
While modern ATVs nowadays have ECM/ECU, many cheaper Chinese youth ATVs and older ATVs use 5-pin CDI boxes to control the spark.
There aren’t any good ways of testing these boxes at home. A CDI is relatively cheap, so your best bet is to replace it and try again.
ECUs, on the other hand, are more expensive. You’re likely better off testing or replacing your ignition coil and stator before possibly replacing the ECU.
10. Check the Stator
The stator is what creates the electricity on your ATV. It is located behind an engine cover, but luckily you can test it without removing it.
There are two main ways you can test the stator. A static test, where you test internal resistance when the bike is turned off, and a dynamic test, where you read voltage while the engine is running.
If the stator fails any tests, you may have a defective exciter coil inside the stator, and the stator needs to be replaced.
11. Check the Crankshaft Position Sensor
The crankshaft position sensor (CKP-sensor) registers and tells the engine exactly where the piston is as it moves up and down. This information is necessary for the CDI or ECU to tell the ignition coil when to power the spark plug.
The CKP sensor is built into the stator assembly or located separately on the engine.
If you have a separately located sensor, look for damaged wires going to the sensor or a cracked or bent sensor bracket.
You can test the sensor by using your multimeter to measure its resistance:
- Remove the sensor connector, or identify which wires are going to your sensor.
- Set your multimeter to ohms, put one lead on each sensor connector, or insert the probes into the sensor wires if they don’t have easily accessible connectors.
- Refer to your service manual to learn what reading you should get on your specific sensor.
FAQ
Can a bad kill switch cause no spark in my ATV?
Yes, a damaged or malfunctioning kill switch can interrupt the ignition circuit, preventing the ATV from producing spark.
How can I test the ignition coil on my ATV for spark?
Disconnect the spark plug, attach it to the coil, ground it, and crank the engine. A visible spark indicates a working coil.
What role does the CDI box play in ATV spark production?
The CDI (Capacitor Discharge Ignition) box controls the timing of the spark. A faulty CDI can disrupt or eliminate spark.
Can a drained battery result in no spark in an ATV?
While a weak battery can cause starting issues, it usually doesn’t prevent spark. However, it’s good practice to maintain a fully charged battery.
Wrapping Up
ATVs, while durable, can sometimes present ignition challenges, leaving enthusiasts puzzled. This guide offers actionable solutions to the daunting “no spark” problem, ensuring your machine is ready to roll once more.
Remember, the heart of the problem often lies in the ignition system, and with the steps outlined above, you’re now well-equipped to tackle any spark issue with confidence and precision. Safe riding!