
A clean carburetor is crucial for your ATV’s performance. Over time, gum from old fuel, varnish, resin paraffin, debris, and carbon deposits build up inside the carburetor, limiting or blocking air and fuel passageways and causing parts to stick.
A range of engine problems can be caused by partially or entirely clogged-up carburetors:
- Harder starting
- Stalling: the engine runs but will not idle
- The engine only runs with the choke activated
- The engine idles, but RPM will not increase
- Fluctuating idle
- Poor Engine power
- Poor fuel economy
- Excessive exhaust smoke
Fortunately, with some knowledge and effort, you can clean your ATV’s carburetor in your garage.
What Is the Best Way to Clean an ATV Carburetor?
There are two main ways to clean an ATV carburetor, each with pros and cons:
- Chemical cleaning without removing and disassembling the carburetor.
- A complete carburetor teardown and deep clean.
Pros & Cons of Cleaning a Carburetor While Attached to the ATV
- The fastest alternative.
- It’s not as effective as a complete carb teardown and deep clean.
- Works best on a mildly contaminated carb that has not yet clogged up completely
- Very little mechanical skill is required.
- Regular carb cleanses are a helpful preventative measure to ensure proper carb function and performance.
Pros & Cons of Disassembling a Carburetor for Cleaning
- Much more time-consuming.
- More effective in severe cases.
- It usually gives a better and longer-lasting result.
- While not overly challenging, it demands a systematic and delicate approach. Components can be easily lost or damaged, and it’s possible to lose track of how the parts reassemble.
Caution: Carb cleaning products use strong chemicals that may hurt your eyes and skin. Always wear eye protection and chemically resistant gloves when working with such chemicals. If you get carb cleaner in your eyes, seek medical attention immediately.
How to Clean an ATV Carburetor Without Taking It Apart
The products you’ll use to clean a carburetor without removing it from the vehicle and without taking it apart fall under two categories: fuel additives and aerosol can carb cleaners.
Cleaning the Carb With Fuel Additives
Fuel additives are mixed with the fuel at a specified ratio and help remove varnish deposits, causing restrictions in carburetor passageways. The additive dissolves the deposits and turns them into fluids that burn off with the fuel.
Specific instructions and rations vary between brands, but here is how the Seafoam brand recommends you do it:
- Pour at least 8 ounces of fuel additive into the tank when it’s low on gas. Ensure the gas on the tank is fresh. About 3 or 4 parts of gasoline to 1 part Seafoam is about right.
- Start the engine and allow it to idle for about 8 minutes. This allows the mixture to flow through all the carb passages. Shut off the engine.
- To clean an engine that does not run or won’t idle, remove the spark plugs and crank the engine several times to draw the cleaning mixture into the carburetor.
- Leave the engine OFF for at least a few hours and up to three days for best results to allow the mixture to soak and do its job.
- Start the engine after the soaking period and idle for 5 minutes.
- Fill the tank with fresh fuel and idle the engine for 5 more minutes.
- Operate the ATV as usual.
Other additives are designed to mix with a full tank of fresh gas at a specified rate and then run the ATV as usual. The additive will help to clean the carb as you burn the fuel and additive mix.
Cleaning the Carb With Carb Cleaner
Another method is using a spray can carb cleaner to clean the carb exterior and spraying into the carb air inlet port to clean the carb internals.
Ensure you use a carb cleaner that is safe for rubber. Carb cleaners are not recommended on fuel-injected ATVs.
With the engine off and cool:
- Use generous amounts of carb cleaner and a toothbrush to clean the carburetor externals and all the linkage. Avoid spraying into electrical connections, and protect painted surfaces and sensors from overspray.
- Remove the air cleaner to access the carb air inlet. Do not spray carb cleaner into the carburetor when the engine is off.
With the engine running:
- Keep the engine running about 1000rpm over idle so it doesn’t stall. Ask a friend to help you out.
- Spray carb cleaner on the choke valve shaft while you work the choke on and off.
- Spray carb cleaner into air bleeds and vacuum ports.
- Spray carb cleaner into and around the carb air inlet (carb throat). White exhaust smoke during this process is normal and will clear off when you stop spraying.
- Stop the engine and allow the carb cleaner to hot-soak for 10 minutes.
- Go for a ride to burn off any remaining hydrocarbon residue.
While It’s generally considered safe to spray carb cleaner into the carburetor when the engine is running, always read the instructions on the can. If unsure, refer to the product manufacturer to verify it’s safe.
Caution: Never spray brake cleaner into the carburetor; it will cause poisonous and potentially fatal exhaust fumes.
How to Disassemble and Clean an ATV Carburetor

This guide does not cover a specific brand and model carburetor. Some steps might differ slightly between models. However, most ATV carburetors disassemble the same and are cleaned the same way.
Things You Will Need
- Aerosol spray carburetor clean or electrical contact cleaner.
- Carburetor dip.
- Phillips and flathead screwdrivers
- Pliers
- A rag or shop towel
- A Toothbrush
- Compressed air (Air compressor or air in a spray can)
- Ultrasonic parts cleaner (optional)
Do not use a wire brush, which can damage soft metal alloys.
Step 1: Remove the Carburetor From the ATV
1. Access the Carburetor
With the engine off and cold, remove any side panels restricting access to the carburetor.
2. Clean the Carburetor Exterior
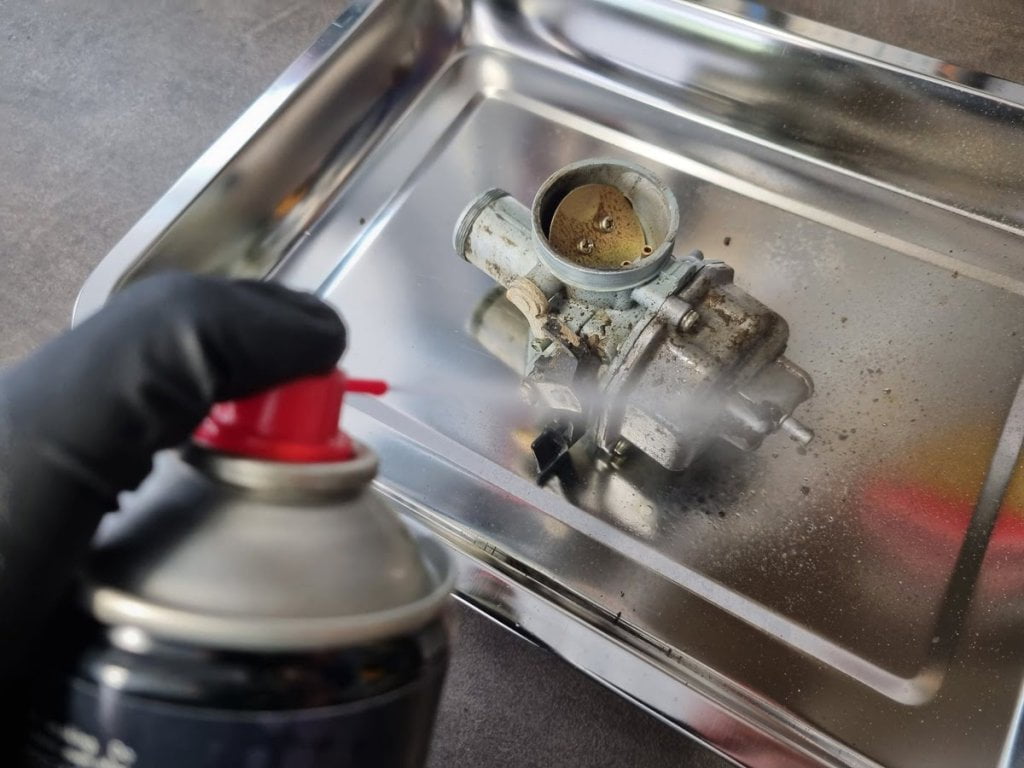
Use compressed air or spray can carb cleaner to remove loose dirt and debris from the outer casing so it doesn’t get inside the carb or engine.
Ideally, it would be best to do this while the carburetor is still attached to the ATV, or you can do it on your workbench before disassembly.
3. Turn the Fuel Valve OFF
Most carbureted ATVs have a fuel valve at the bottom of the gas tank. Close it to prevent leaks. If your ATV does not have one, fold the fuel line back over itself after disconnecting it from the carb and secure it with a zip tie.
4. Drain the Carb Bowl
Open the drain screw at the carburetor bowl’s bottom and drain the content into a suitable container.
5. Disconnect Fuel and Vent Lines
Use pliers to loosen the spring-loaded fuel line clamps and disconnect the fuel line, fuel overflow line, and vent lines.
6. Disconnect the Choke Cable
Loosen the choke cable retaining screw and disconnect the cable end from the choke arm.
7. Disconnect the Oil Injection Mechanism
On 2-stroke ATVs with a separate oil tank: Lose the oil injection mechanism retaining screws and slide the mechanism out of the carb housing.
8. Disconnect the Throttle Cable
The throttle mechanism is typically retained with a slide cap that unscrews by hand.
9. Loosen the Intake Boot
There is a rubber intake boot between the carb and the air filter. Loosen any bolts or clamps securing it to the carb.
10. Remove the Carburetor Mounting Bolts or Clamp
Remove the carburetor from the ATV.
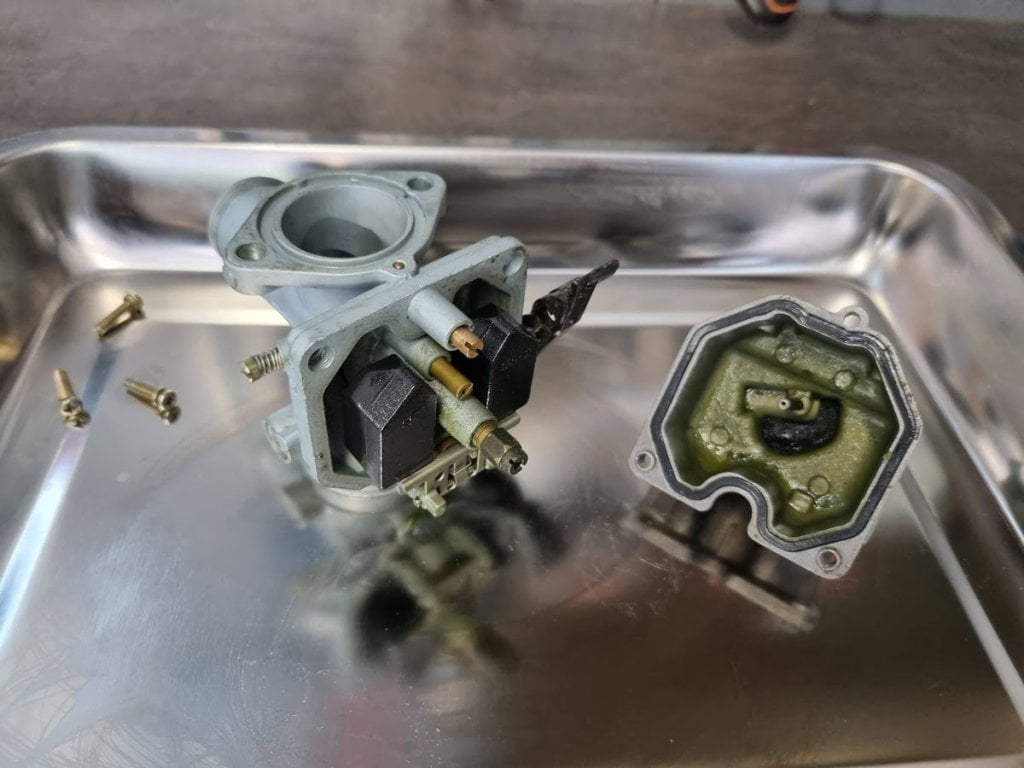
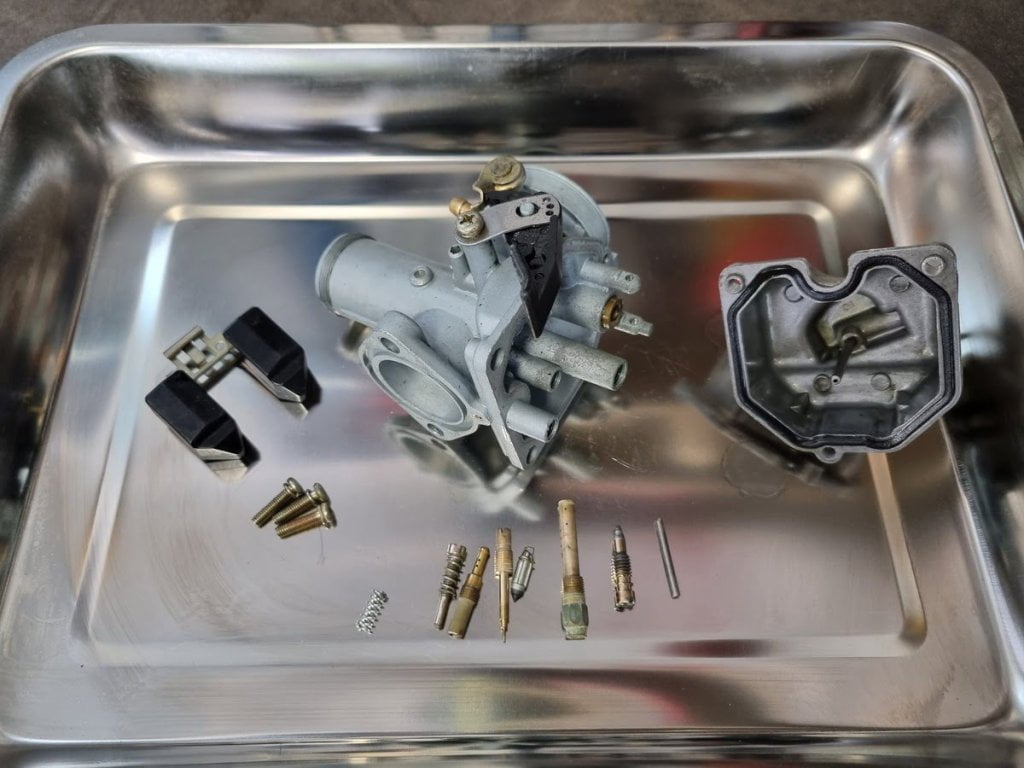
Step 2: Disassemble the Carburetor
Place the carburetor on your workbench on a shop towel or in a tray for disassembly. Prepare a suitable plastic or metal container to avoid losing any components.
Tip: Take photos underway as a future reference if you forget where each part goes.
1. Remove the Float Bowl
Turn the carb upside down and remove the two or four float bowl retaining bolts. If the carb is completely gummed up, you might need to tap the bowl with a screwdriver’s handle to get it loose. Sometimes, you might need a flathead screwdriver to gently pry it open.
2. Remove the Float Pin and Float

Use a punch or a small screwdriver to gently press the float pin to the side and out. Unless the carb is completely gummed up or corroded, you shouldn’t have to use excessive force to remove the pin.
After removing the pin, unhitch and remove the float bowl (usually plastic).
3. Remove the Inlet Needle

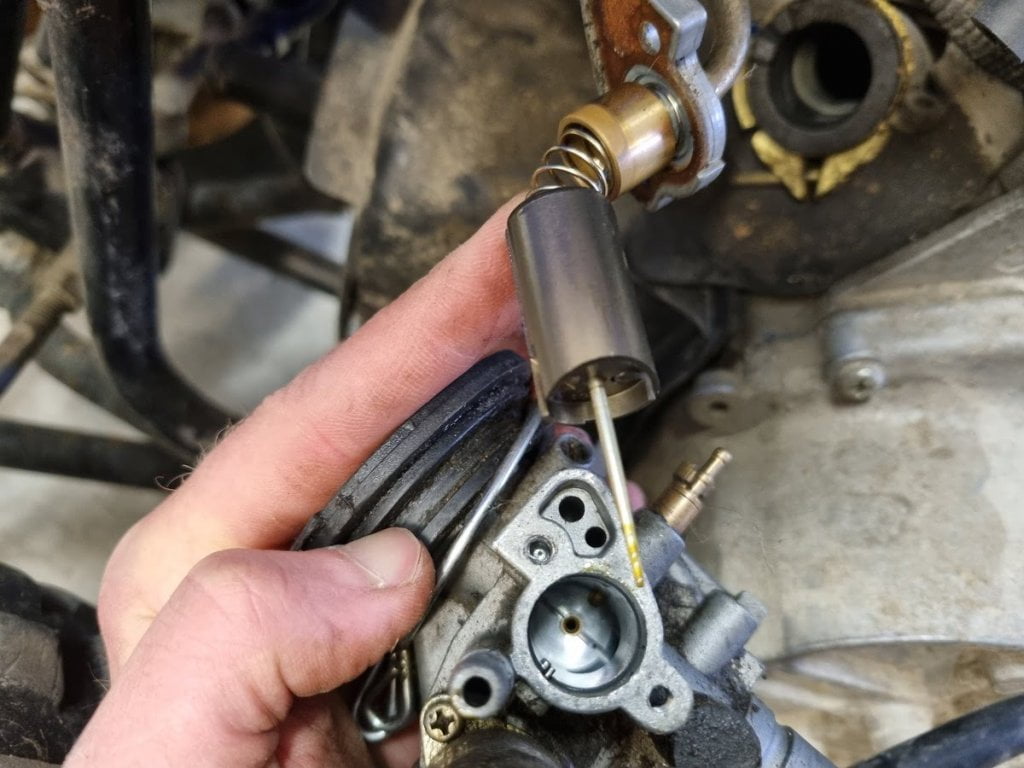
The float keeps the inlet needle in the inlet seat. After removing the float, the inlet pin pulls straight out.
4. Remove the Inlet Seat
On some carbs, like the one in step 3, the inlet is press-fitted and best left untouched. Other carbs have removable inlet seats for easy cleaning.
Unscrew the inlet seat retaining bolt and remove the retaining bracket and inlet seat from the carb.
4. Remove the Pilot Jet, Main Jet, and Emulsion Tube

These parts are typically threaded and use a flathead screwdriver. Turn anti-clockwise to remove them. If available, also remove the starter jet.
5. Remove the Idle Speed Screw and Air/Fuel Mix Screw
Before removing them, turn the screws all the way in until they lightly seat, and count the number of turns as a reference to ensure you reinstall the screws in the same position.
6. Remove Rubber O-rings and Gaskets
Remove the rubber o-ring and metal washer from the threaded fuel/air mix hole. Put these parts aside so you don’t lose them. Remove all rubber seals and put them aside.
Step 3: Clean the Carburetor Components
Caution: Remember to wear safety glasses; you never know where carb cleaner shoots out!
1. Clean All Metal Components With Carb Cleaner

Using a spray can of carb cleaner, clean the carburetor body, jets, and all carb body passages with a carb cleaner or electrical contact cleaner.
Use a toothbrush or a cut-off paintbrush to rub the contaminated parts.

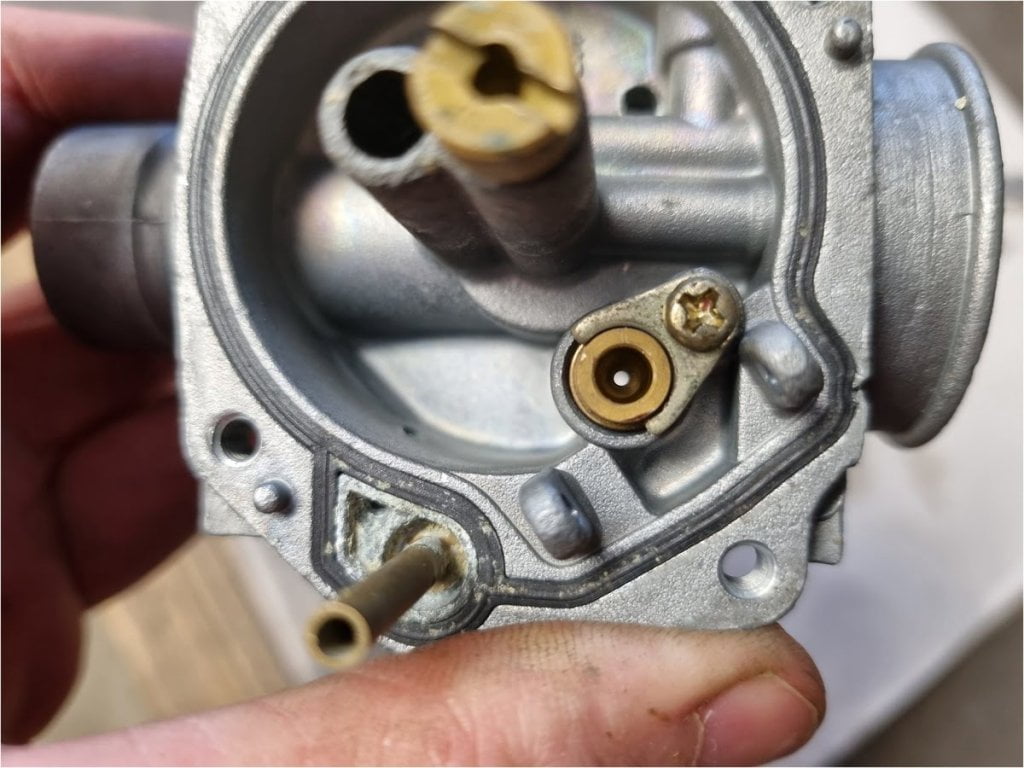
In my case, the carburetor bowl was full of sand sediments, and one of the jets was completely clogged. No wonder the ATV wouldn’t start.
2. Soak Metal Parts in Carb Dip or Carb Cleaner
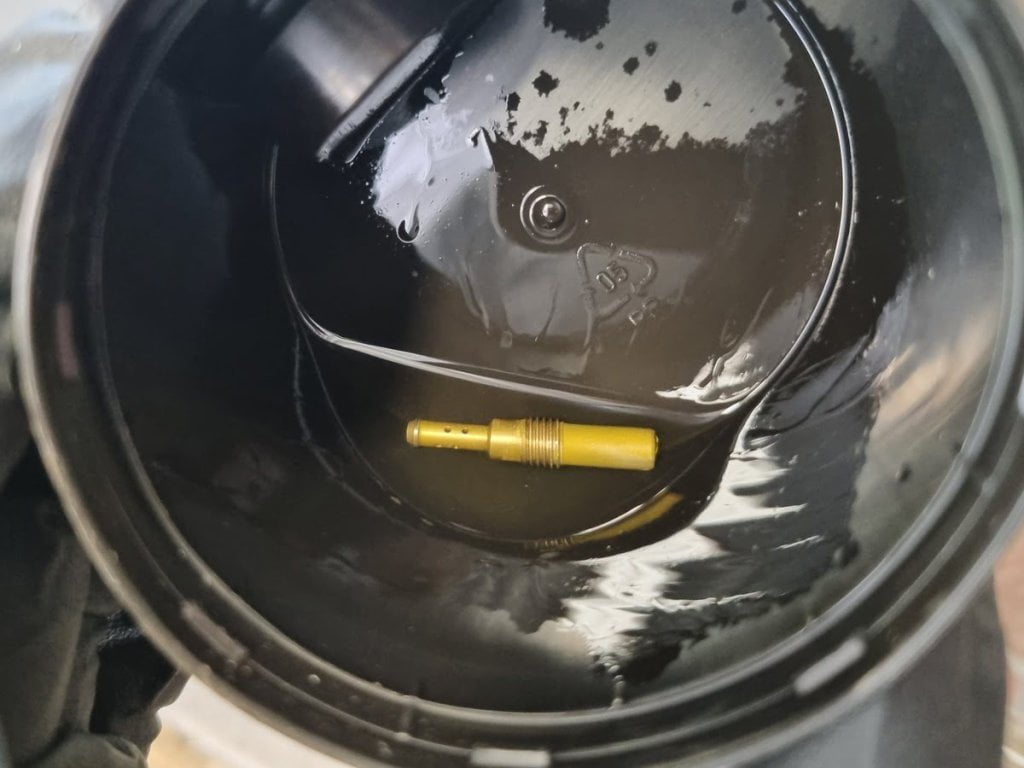
If the parts are very dirty or you find it difficult to clear a clogged passage, as seen with the jet in the above image, you should clean them more thoroughly.
Soak the parts in carb cleaner or carb-dip for a few hours or more according to the instructions on the bottle.

Remember not to place rubber or plastic parts in the cleaning solution, as some cleaners may damage non-metal components. Extended soaking periods can loosen the adhesive sealer on the passage welch plugs.
3. Use Compressed Air to Blow Out All Passages and Openings
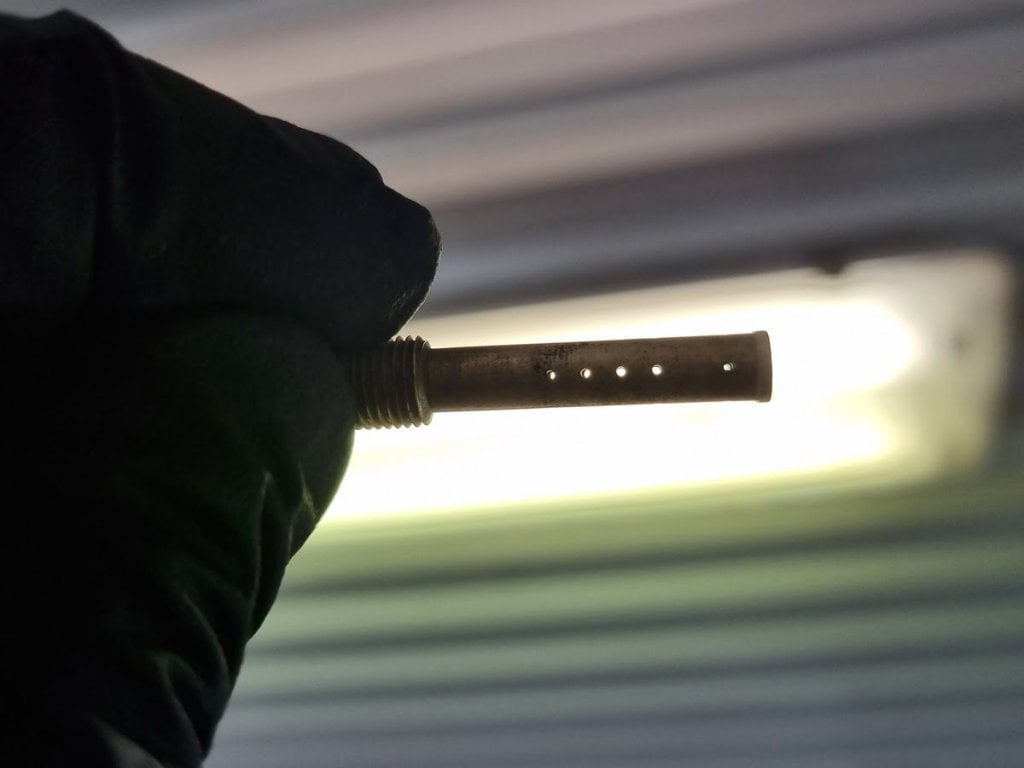
The jets in the carburetor have small openings that can easily become clogged.
To clear them, use compressed air to blow through every opening in the carburetor housing and the jets. This helps to ensure all passages are clear. Don’t forget to check both the horizontal and center openings.
Do not use steel wire or welding tip cleaners; they may damage the soft metal alloys.
4. Verify That All Passages Are Unobstructed

Spray carb cleaner through all passages and openings to remove the carb dip and verify they are not clogged. Clean off any remaining carb dip with carb cleaner.
5. Allow Parts to Dry
Use compressed air to dry the parts and blow out any carb cleaner from the passages.
Alternative method: If you have or can borrow an ultrasonic part cleaner, it is an excellent alternative to clean all carburetor metal components rather than using strong chemicals.
Step 4: Reassemble and Reinstall the Carburetor
- Put all the parts back in place in reverse order as you removed them. Ensure you don’t forget small components like rubber o-ring and washer.
- Screw the adjustment screw in until they lightly seat, and screw them back out according to your previous notes. If you lost track of the adjustment screw position, please refer to this guide to adjust the carburetor after reassembly.
- Reinstall the carburetor in the reverse order as when you removed it from the ATV.
- Open the fuel valve, check for leaks, and start the ATV as usual.
Prevent the Carburator From Getting Dirty
Always use fresh, clean fuel to prevent having to clean your carburetor too often. This is how to know if the Gas in Your ATV Is Bad.
Also, you need to ensure the air filter is clean and properly installed.

In my case, an old, poor-quality air filter was why gravel had gotten into the carburetor, causing it to clog up.
If your air filter looks like the one in the image above, I recommend replacing it with a new quality filter.
Related Questions
Can You Use Brake Cleaner to Clean a Carburetor?
While brake cleaner cleans metal components well, here are three reasons why you should not use it to clean a carburetor.
- When burned off inside the combustion chamber, the chemicals in brake cleaner create potentially fatal fumes if inhaled.
- Brake cleaner is more likely to damage plastic and rubber materials inside the carburetor.
- Carburetor cleaner leaves a thin protective oil film, but brake cleaner does not.
Wrapping Up
Regular carburetor maintenance can prevent various engine issues and extend the lifespan of your ATV. Whether you opt for a quick chemical cleaning or a more thorough teardown, both methods have advantages and purposes.
By keeping the carburetor pristine, you invest in prolonging your ATV’s vitality and peak performance.