
You turn the key or push the starter button on your ATV, but nothing happens. The bike is completely dead, with no sign of wanting to start. But do not worry; there is no need to panic just yet.
When you find your ATV in a “no crank, no click, no light, and no start” situation, a few things could be wrong. This troubleshooting guide will help you identify and fix the most common causes.
Note What Happens When You Try to Start the ATV
Most ATV owners will find themselves in a situation where their bikes won’t start at some point or another. However annoying it may be, the problem is more often than not caused by a minor issue that is relatively simple to fix by yourself.
The key to successfully troubleshooting such an issue is to note how the ATV behaves when you try to start it. Doing so helps you narrow down the possible culprits quite a bit.
This guide only covers a situation where you turn the key or push the starter button, but the ATV is completely dead:
- The engine does not crank
- There are no clicking sounds or other noises
- None of the lights turn on
- The instrument panel does not turn on
If so, continue reading to discover what’s causing it.
However, if your ATV does show signs of life, such as the lights or dash coming on, it makes a clicking sound when you turn the key, or if the engine cranks but doesn’t fire up, the problem is likely something else entirely. If that’s the case, we recommend checking out this troubleshooting guide.
How to Start a Dead ATV: A Step-By-Step Guide
When you first notice that your ATV is dead and does not show any sign of wanting to start, it’s only natural to suspect a dead battery. After all, that is the most common cause when faced with such an issue.
However, before inspecting the battery, it’s wise to rule out the more superficial things. This guide starts with quick and easy steps before progressing to more time-consuming issues.
If you’re confident that your battery is dead, you may skip ahead to the part on starting an ATV with a dead battery.
1. Make sure the kill switch is in the ON or RUN position
While this may sound too obvious, you’d be surprised how common this simple mistake is. The run switch, also known as the kill switch, must be on for the ATV to start.
I’ll be the first to admit having assumed that the kill switch was in “ON” like I usually leave it. Only to later realize, after wasting precious riding time on troubleshooting, that I had switched it off the last time I parked the bike.
Another scenario is if someone else has pushed down the kill switch. If you have children, you know they like playing on parked vehicles by randomly pushing buttons. The shiny red, easily accessible killswitch is a temptation that can be hard for them to resist. So, always begin by making sure it is set to “RUN” or “ON.”
Some ATVs use a tether pull-cord style kill switch instead of or in conjunction with a kill switch. Make sure the cap at the end of the cord is connected correctly.
2. Make Sure the ATV Is in Park and the Parking Brake is Engaged
As a safety precaution, many ATVs are designed not to start when in gear. The gear shifter must be in “Park” or “Neutral,” or the starter will not engage.
Also, on some models, the parking brake must be engaged to turn off the starter interlock.
3. Make Sure the Battery Terminals Are Properly Connected
Now, it’s time to inspect the battery and connectors for issues. Remove any panels or covers to access the battery. On modern ATVs, the battery may be hidden underneath the seat or behind removable plastic covers, usually at the front of the vehicle.
After gaining access to the battery, make sure both the positive and the negative battery terminals have not come loose from the battery terminals. Also, ensure the terminals do not look overly corroded, leading to a bad connection.
4. Make Sure the Main Power Switch Is Turned On
Some ATVs have a power cutoff switch near the battery that cuts all electricity to the bike. Make sure it is turned “ON.”
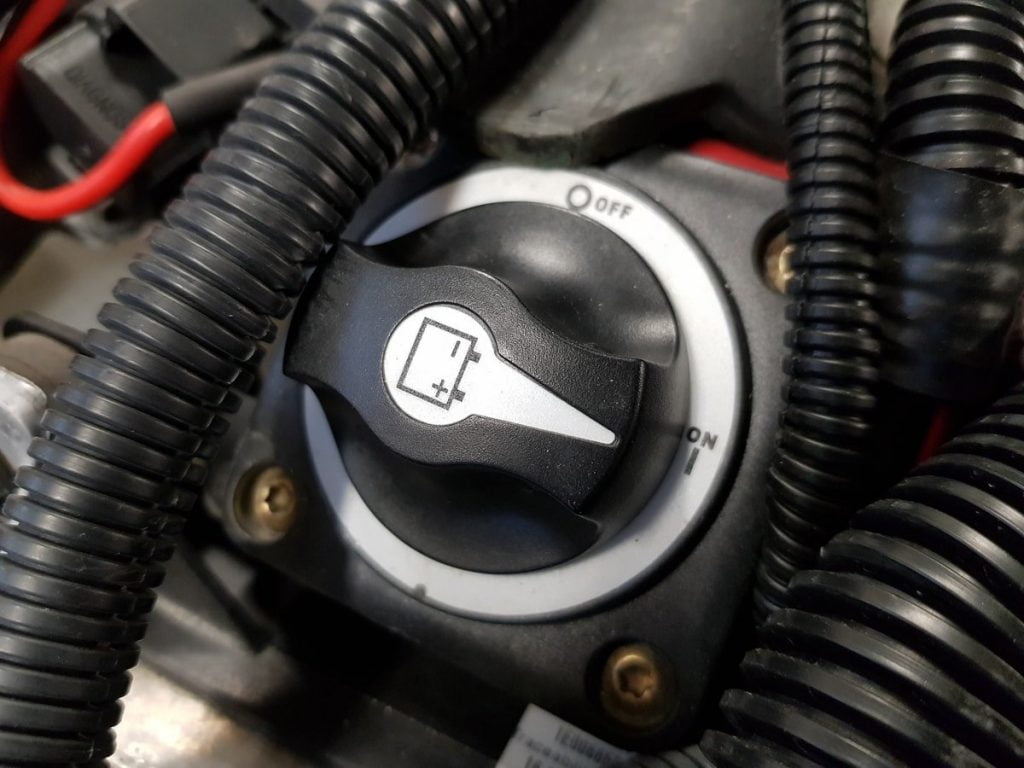
You usually won’t use this switch daily. Still, it’s good practice to turn it off to prevent shorts whenever you’re working on the bike’s electrical system or prevent parasitic battery drain when you leave the bike sitting for extended periods.
Like the kill switch you usually don’t use every time you ride, it’s easy to forget to turn the main power switch back on when you’re ready to use the ATV again.
5. Make Sure the Battery Is Charged
You will need a multimeter or a simple voltage tester to check the battery. Some ATVs also have a built-in voltage meter in the instrument panel, making reading the battery’s state of charge a bit easier.
A fully charged ATV battery should read between 12.6 and 12.8V with the engine off. If the voltage drops below 11.5V, the battery won’t have enough power to start the bike. If it drops even lower, the lights and possibly the instrument panel won’t turn on.
To read the voltage using a multimeter, follow these steps:
- Connect the red lead to the “V” voltage port and the black one to the multimeter’s COM port.
- If you have an automatic meter, set the dial to “V.” The meter automatically chooses between AC and DC voltage and the proper voltage range.
- If you have a manual meter, set the dial to 20 VDC.

- Place the black lead probe on the battery’s negative (-) terminal and the red lead probe on the battery’s positive (+) terminal.
- The battery’s current state of charge, measured in voltage, should now show in the multimeter’s display.
If you read a voltage between 11.5V and 12.4V, you should charge the battery with an external charger. This guide will tell you how to charge the battery correctly.
If the voltage reads below 11.5V, the battery is deemed dead. A dead battery cannot always be revived, particularly if it has been left with a low charge for more than a few days.
But if you notice the low state of charge early on and act fast, it may be possible to bring the battery to almost complete working order. This guide shows you how you can charge a dead ATV battery.
If the battery won’t charge or hold a charge, you may need to replace it with a new one. Before you do, it may be worth testing the battery to verify it is bad before spending money on a new one. This is how you install a new battery.
Related: 10 Reasons Why Your ATV Battery Keeps Draining (Going Dead)
6. Check the Main Fuse
Most, but not all, ATVs have the main fuse. It cuts off power to the ATV’s electrical system when blown. So, if the battery checks out fine, you must ensure the main fuse hasn’t blown. To locate the fuse, please refer to the user manual. It is usually located close to the battery.
If the fuse is blown, replace it with a new one with the same rating as the old one, assuming no one has previously switched it to an incorrect rating.
7. Make Sure the Kill Switch Is Working
The kill switch is usually not operated during regular riding but sits fully exposed on the handlebars. Over time, internal corrosion caused by dirt and water may cause malfunction by preventing a proper connection.
Sometimes, you can return the switch to a working order by soaking it with WD40 while repeatedly operating it. If possible, disassemble the switch to clean its internal metal connectors.
While this may bring the ATV back to life, it should only be a temporary fix. Corrosion issues tend to return sooner or later when they first appear.
Your best bet for a more permanent fix is to replace the switch with a new one and protect it by packing the internals with non-conductive dielectric grease.
Also, ensure the switch is not full of mud and water, which would cause an internal short.
8. Make Sure the Solenoid Has Power
The ignition key or starter switch on your ATV is not designed to handle the high current required to power the starter. It would have to be much bulkier with high gauge wiring going to and from the switch.
That’s where the solenoid comes into play. The solenoid is located between the battery and the starter. It acts like an electrically operated switch that turns on when it gets a smaller electrical signal from pressing the starter button.
Each time you press the starter button or turn the key, you should hear the solenoid’s audible “clicking” sound. This tells you that the solenoid is getting power from the battery. The problem is likely with the solenoid itself.
Solenoids sometimes won’t fully engage due to internal corrosion. Sometimes, the problem may be with the actual starter, but this is less common.
When there is no sound, the solenoid may not be getting power from the battery, or it may not be getting a signal from the starter button/key. Use the multimeter to verify no power at the solenoid’s positive terminal.
Look for loose, damaged, or corroded wiring. Another potential culprit is a faulty starter button or ignition switch, often due to internal corrosion.
9. Other Causes of a Dead ATV
We have now addressed the most common causes to investigate when your ATV won’t start. However, the list is not yet complete.
Other things to look for are blown fuses (lights, instrument panel, or ECU fuses), loose or corroded ground wires, damaged wires shorting out, and a defective rollover shutdown relay.
All these topics are covered in our post on why your ATV is not getting power.
How to Start an ATV That Has a Dead Battery
Suppose your initial testing deemed the battery dead, but you cannot charge or replace it. In that case, the options you are left with are limited.
Jump-Start the ATV
Jump-starting is a method that uses a set of jumper cables to connect the battery on another vehicle, such as an ATV or a car, to the battery on your ATV. The healthy battery will provide external starting power to the dead battery.
Jump-starting is not a suitable method to fully charge your dead ATV battery. It’s only meant to stay connected for a few minutes until you succeed in starting the dead ATV.
IMPORTANT: When using a car as a donor battery, it should stay OFF during the entire procedure.
How to jump-start an ATV:

You will need a set of jumper cables, preferably with built-in circuit protection.
Caution: Make sure the black and red connectors never touch when connected to a battery. Also, ensure the red lead connectors never touch any exposed metal when connected to the battery. Both of which will cause a direct short. This short may damage not only the battery but also the electronics in both of the vehicles. It may also cause a potentially fatal accident from the battery exploding. Always wear protective eyewear when working on the battery.
- Turn the ATV ignition off.
- Connect the two positive battery terminals using the red lead.
- Connect one end of the black negative lead to the healthy battery negative (-) battery terminal.
- Connect the other end of the black, negative lead to an unpainted metal part of the AT V, like the engine block or frame.
- Wait a few minutes before you attempt to start the dead ATV.
- As soon as the ATV starts, disconnect the jumper cable leads in the opposite order:
- Bad battery negative terminal or metal part.
- Healthy battery negative terminal.
- Healthy battery positive terminal.
- Bad battery positive terminal.
Use the Pull Start (If Available)
Most modern ATVs with larger displacement engines do not have a pull start. However, if you ride a youth ATV or an older model with a smaller engine, it may have a pull starter for emergencies like this.
On some models, the pull starter is visible; look for a pull starter handle on the side of the engine. On other models, you may need to remove a plastic cover to access the pull handle.