
Chinese-made ATV brands such as TaoTao, Baja, X-Pro, and Linhai offer an affordable entry point into ATV riding. But just like with anything with an engine, you may eventually find yourself in a situation where the vehicle does not want to start.
When troubleshooting no-start issues with ATVs, especially newer models, the problem is often straightforward and easy to fix.
However, with older ATVs that have either been heavily used and abused or have not been used for extended periods, you may need to invest more time and effort to get them back running.
How to Start a Chinese ATV
Before spending too much troubleshooting potential mechanical issues, it is a good idea to revisit the proper starting procedure for your ATV.
The most common reason an ATV won’t start is often due to missing one or more steps in the standard start-up process.
If that’s the case, no worries; it has happened to me, and it usually happens to everyone at some point.
Chinese ATV Starting Procedure
- Position the ATV on a level surface.
- Make sure the fuel valve is in the “On” position.
- Sit on the ATV.
- Apply the brakes.
- If the ATV has a transmission, place the gear shifter in P (Park) or N (Neutral).
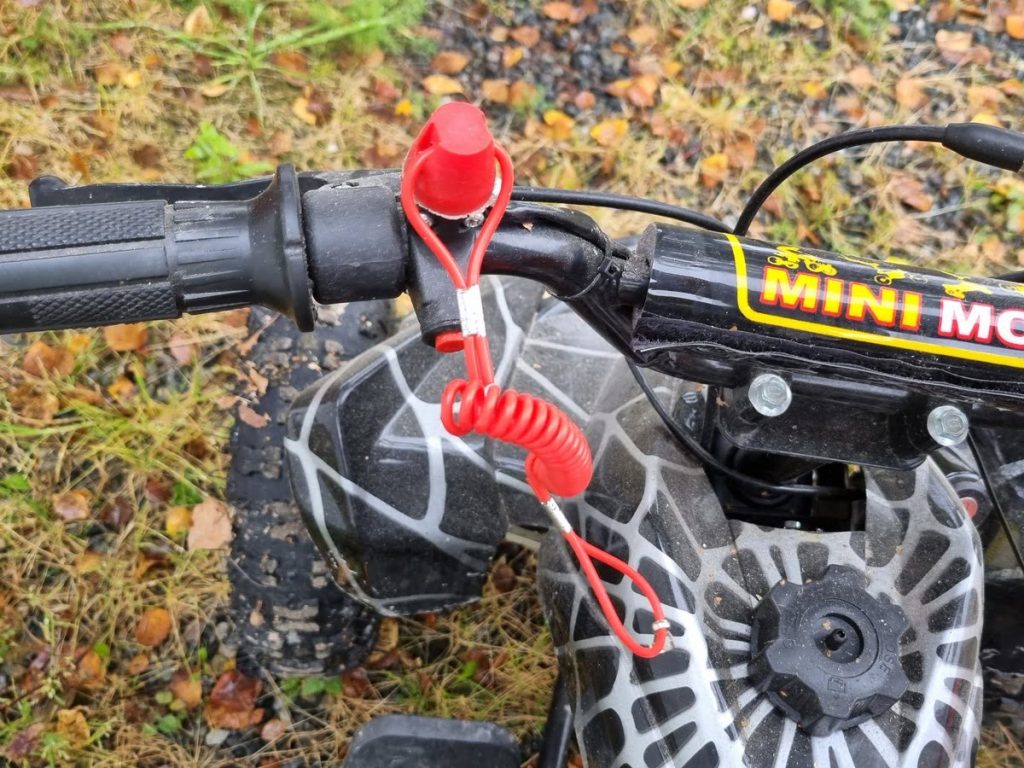
- If the ATV has a tethered lanyard pull stop, make sure the lanyard cap end is on tight.
- If the ATV has a remote kill switch (youth models), press the unlock button to deactivate the kill switch.
- If it’s cold, apply the manual choke on the handlebars or the carburetor.
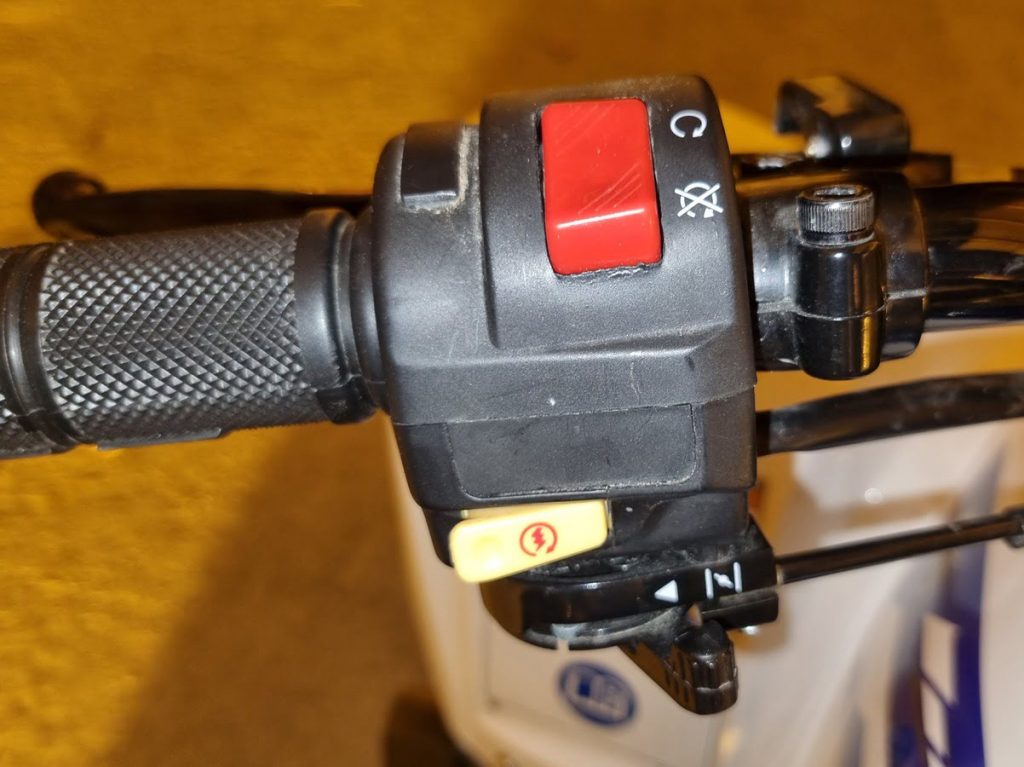
- Place the engine stop switch / kill switch in the “Run” position.
- Turn the ignition key to the “Start” position.
- Press the starter button to engage the starter. Never activate the starter for more than five seconds at a time.
- As soon as the engine starts, release the starter button.
- If the engine does not start, release the starter button and wait at least five seconds.
- If the ATV starts, let it run for a few seconds before turning off the manual choke.
Tip 1: Most ATVs have a starter interlock feature that prevents the starter from engaging if the gear shifter is not in park or neutral and the brakes are not engaged. In this case, you won’t hear any noise, and the ATV will act like it’s completely dead.

Tip 2: Chinese ATVs often have a manual choke lever on the carburetor. Alternatively, there is a choke lever on the handlebars. When it’s cold or if the bike has been sitting, you may need to activate the choke for the bike to start.

Troubleshooting a Chinese ATV That Won’t Start
If the ATV did not start after the basic start-up procedure, a mechanical issue might be causing the problem.
The fastest way of troubleshooting a no-start situation is based on what symptoms the ATV displays and then through a process of elimination, beginning with the most fundamental issues.
Note that this post covers the most common causes to look into when your Chinese ATV does not want to start. The list of possible causes is almost endless. If you do not find a solution to the problem in this post, please refer to our more in-depth ATV won’t start troubleshooting guide.
If you feel you’re stepping outside your mechanical comfort zone, your best bet is to take the bike to the dealer for further investigation and assistance.
When the Engine Does Not Turn
You go to start the ATV like you usually would with the ignition key set to start and the kill switch turned off / set to the “RUN” position. But when you hit the power button, nothing happens.
- When pressing the starter button, the starter does not activate.
- The engine is not cranking/turning.
- No clicking sound or other signs of the ATV trying to start.
Make Sure the Battery Is in Good Condition
If the battery voltage drops too low, it may not have enough power to turn the starter engine.
- Locate the battery. The battery on Chinese ATVs is typically located underneath the seat or below the rear fender on either side.
- Read the battery voltage. You need a multimeter tool or a volt meter to read the battery voltage.
How to read battery voltage using a multimeter
- The red lead connects to the “V” port, the black lead connects to the “COM” port, and the meter should be in the V DC 20 setting.
- Put the black lead probe to the battery negative (-) terminal and the red lead probe to the positive (+) battery terminal.
- Ideally, the battery should read 12.8V or 12.6V at a minimum.

If the battery voltage is low, you need to recharge the battery.
A battery sitting at a low voltage for an extended period may be damaged beyond repair.
Related: How to Test an ATV or UTV Battery. Good, Reduced, or Bad? and How to Charge a Dead ATV Battery
- Check for Loose or Corroded Battery Terminals
The wire connectors should be firmly connected to the battery terminals. Snug them up if they are loose. Also, ensure the wire connectors are in good condition and properly connected to the wires.
If there is any corrosion on the battery terminals or wire connectors, they need to be cleaned for a proper connection.
Caution: Always wear protective eyewear when working with or near the battery. Be careful not to short the battery by accidentally touching ground with the tool when working on the positive battery terminal.
Check the Main Fuse
Most Chinese ATVs have the main fuse on the positive (red) starter wire.
- Look for a see-through plastic housing near the positive (+) battery terminal.
- Open the fuse housing and make sure both wires are correctly connected.
- Make sure there are no visible breaks in the fuse.
- If necessary, replace the fuse.
Make Sure the Starter Relay or Solenoid Is Getting Power
ATVs either have a starter relay or a solenoid. We’re not getting too technical about the difference between the two, as they serve the same purpose.
The starter relay, or starter solenoid, is a crucial part of the ATV’s electrical system. It activates the electric starter when you press the starter button.
This component is connected directly to the battery through a thick red wire for positive power, and it grounds either through a black wire or directly through the ATV’s frame.
Smaller ATVs typically use a relay due to the low current required to run the starter, while bigger ATVs typically use a solenoid.
A starter relay looks almost like any other relay: a small box about 1×1 inch in size.

The solenoid is cylindrically shaped and slightly larger than a relay. It has three or four connectors, typically located near the starter motor.
Each time you press the starter button, the relay/solenoid should make an audible clicking sound. The sound is less audible on relays than on solenoids. If you hear a click, you know it is getting power.
If there is no sound, the relay/solenoid may not get power or be seized.
You can use a multimeter to test if there is a power issue. The multimeter settings are the same when reading the battery voltage.
- The red lead goes to the battery side of the relay/solenoid (red, heavy gauge wire).
- The black lead goes to frame ground.
The relay/solenoid gets power if you get a reading of 12V or more at the battery side connector.
If there is no reading, ensure the wires from the battery are not damaged, are correctly connected, and there is no corrosion at the terminals. Also, check for rust as three-prong solenoids grounds through the base.
Test for a Defective Starter Button

Starter buttons can go bad from internal corrosion or mechanical failure. If you have a multimeter, testing the starter button is relatively straightforward.
- Disconnect the two-prong terminal by the solenoid that goes from the starter button.
- Engage the brakes and set the kill switch to the “ON” position.
- Set the multimeter to continuity to test for a connection between two terminals.
- Place the red lead to the positive wire connector, typically yellow and red. Pick one if unsure; you can test the other afterward.
- Place the black lead on frame ground.
- The multimeter should read “1” – no continuity.
- Activate the starter button. The multimeter should now indicate continuity by sounding an audible signal or displaying a continuity reading different from “1”. A reading near zero indicates a good connection.
- If defective, replace the starter button.
Test for a Bad Kill Switch
If left unused for extended periods, the kill switch may experience internal corrosion, leading to a short circuit.
The two internal terminals on a working kill switch should connect when the switch is in the “Off” or “0” position. Moving the switch to the “Run” or “1” position should break the connection.
To test if the switch works, you can use a multimeter to test for continuity as you did with the starter button.
- Disconnect the connectors by the switch.
- Set the multimeter to continuity.
- Place the red lead on one switch terminal and the black on the other. It doesn’t matter which.
- When the switch is in the “Run” position, the multimeter should read “1, “indicating no connection.
- If you do get a continuity reading, this could be caused by the switch shorting out due to internal corrosion.
As a short-term solution with a corroded switch, you could attempt disassembling and cleaning the switch internals with a wire brush and some WD40. But you are likely better off replacing it with a new one for a long-lasting result.
Wiring Issues Between the Battery and Start Button/Ignition Key Switch
If both switches check out all alright, ensure the wiring from each button is undamaged and properly connected.
When the Engine Does Not Turn Over But Clicks
You press the starter and hear a clicking sound, but the starter does not engage, and the engine does turn. This indicates there is an issue with the solenoid or possibly with the starter.
Because there is a clicking sound, you know that the solenoid is getting power. But the solenoid could be faulty even if it clicks.
A spring-loaded, electronically charged magnet switch is connected to a steel bar inside a solenoid.
Pushing the starter button activates the magnet switch so that the steel bar completes the circuit between the positive input terminal from the battery and the output terminal going to the starter. This is what causes the clicking sound.
When releasing the starter button, the spring ensures the connection is broken instantly and disengages the starter.
When you hear a click, but the starter does not engage, there is no connection between the two terminals. This is usually caused by corrosion at the base of the terminals. The metal bar comes up but is too corroded to pass an electrical current between the two terminals.
The solenoid internals may rust if exposed to water, causing the solenoid to seize up. This eventually causes the solenoid to burn out as the rider keeps trying to start, but the solenoid cannot complete the circuit.
One way to test a solenoid is to jump the main terminals manually using a heavy gauge wire. Do not attempt this if you are not confident in what you are doing.
A safer way of testing a solenoid is by removing it from the ATV and activating it by applying an external 12 V source (car battery) to the terminal for the starter button. Then, test for continuity between the input battery terminal and the output starter terminal.
When the ATV Engine Turns but Won’t Start
In this case, the engine turns over as expected, but the ATV does not want to fire up.
An engine needs three essential components to run: fuel, spark, and air. When the engine turns over but does not start, there is usually an issue with either of the three components.
Make Sure the ATV Gets Fuel
Before you do anything, ensure there is gas on the fuel tank, and the fuel valve is open (in the ON position). You’d be surprised how common it is to misjudge how much fuel is left.
There are several ways to test if the ATV is getting fuel, but my favorite is removing the spark plug. That way, you’ll be able to check for spark simultaneously.
- Locate the spark plug. Look for a black rubber cap on top of the cylinder head.
- Remove the spark plug wire cap from the spark plug. It pulls straight off.
- Unscrew the spark plug using a spark plug removal tool or a wrench and the proper size socket.
- The spark plug’s tip should be soaked with fuel from cranking the engine.
- If the plug is completely dry, you know the fuel is not reaching the cylinder head.
Another way to quickly test if the ATV is getting fuel is by spraying a shot of starter fluid into the air intake. If the ATV starts with starter fluid, you know there is a spark, and the issue is likely fuel-related.
Common Causes When an ATV Is Not Getting Fuel
Begin your troubleshooting by ensuring proper fuel flow to the carburetor from the fuel tank:
- Check the Fuel Line:
- Locate the fuel line, which runs from the gas tank to the carburetor.
- Disconnect this fuel line from the carburetor.
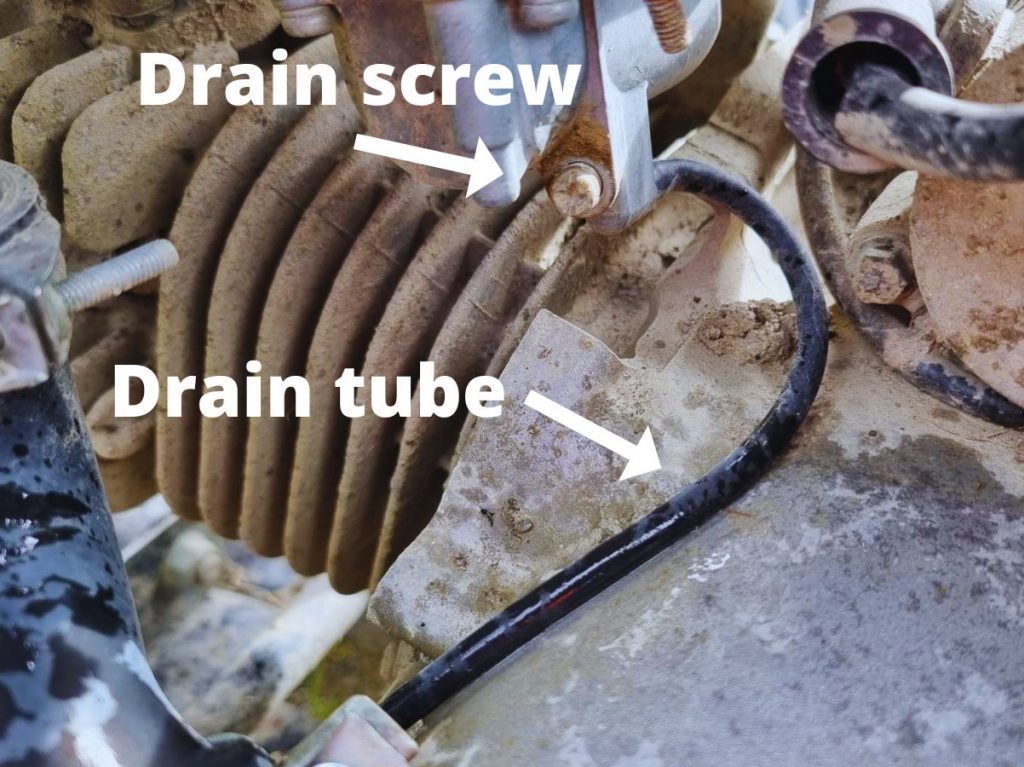
- Inspect the Carburetor Overflow:
- Find the carb overflow, identified as a drain tube near the bottom of the carburetor that isn’t connected to anything.
- Open the overflow drain using a screw on the opposite side. Place a container underneath to collect any drained fuel.
- Assessing Fuel Delivery: If fuel drains out, the fuel delivery system up to the carburetor functions correctly. In this case, the issue likely lies within the carburetor itself.
Depending on your findings, these are the usual culprits to look into:
Fuel delivery system
- A clogged gas cap vent prevents air from replacing the spent fuel.
- Damaged fuel valve (petcock valve). Possibly a clogged internal fuel screen.
- A clogged fuel filter.
- Broken or clogged fuel lines.
- Faulty fuel pump.
Related: Fuel Delivery Issues in ATVs – Causes and Solutions
Carburetor issues
- Stuck carb float (typical in ATVs that have been sitting for extended periods).
- A stuck needle valve.
- Gummed-up carb needs cleaning.
- Internal carburetor components, such as the jets, have come loose.
Related: How to Clean an ATV Carburetor – All You Must Know
Make Sure the Fuel Is Not Bad
If the fuel is bad, it may not ignite, even if it reaches the cylinder. Fuel can go bad over time due to evaporation or from contamination with dirt or water.
Related: How to Know if the Gas in Your ATV Is Bad or Not
Make Sure the ATV Is Getting a Spark
There are two main ways of testing an ATV for spark.
Caution! Electrical shock hazard. Do not perform a spark test if you are unfamiliar with the procedure!
Visually check for spark
- With the spark plug out, connect the plug back into the spark plug wire boot.
- Grab the plug weird and place the plug about 1/8th of an inch from the cylinder head. Make sure you are not touching any metal components.
- Activate the starter or pull the pull starter.
- There should be a bright blue repetitive spark arching from the tip of the spark plug to the cylinder head.
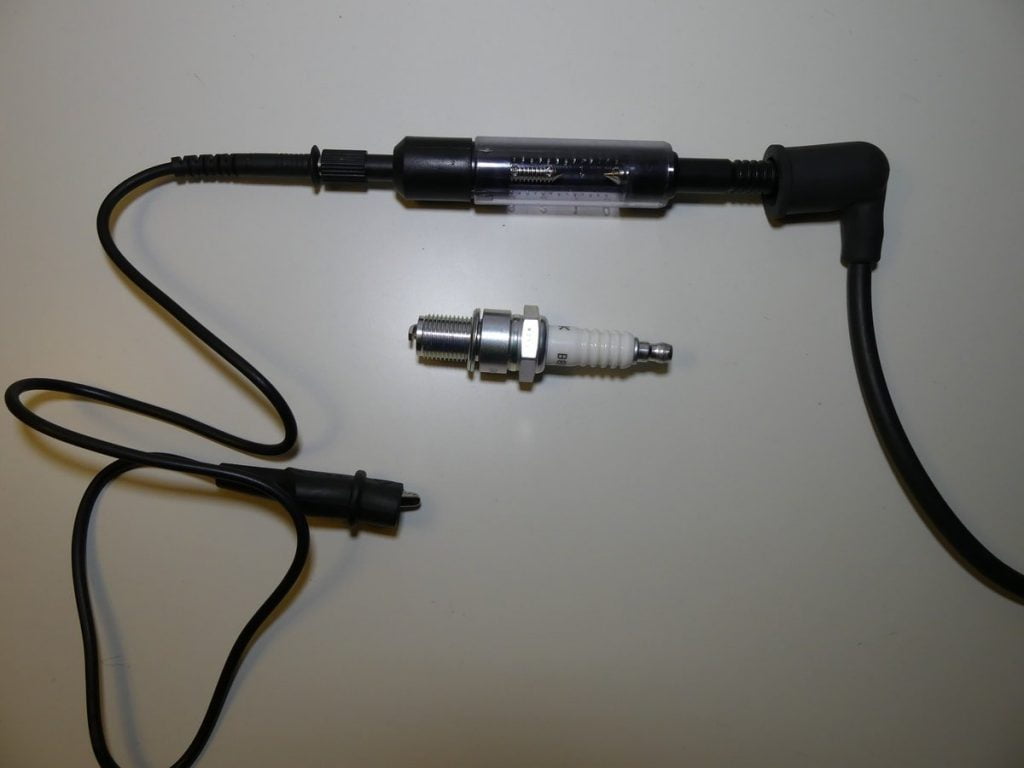
With a spark tester tool (safer)
- Install the spark plug back into the cylinder head.
- Connect an in-line spark tester between the spark plug and the rubber boot at the end of the spark plug wire.
- Keep clear of the spark plug and test tool.
- Activate the starter.
- The test tool will light up if there is a spark.
Common Causes When an ATV Is Not Getting a Spark
- Faulty kill-switch. Please refer to the test above.
- Unplugged or damaged wires in the wire harness.
- Faulty spark plug. Check this post to learn how to read a spark plug.
- Faulty ignition coil.
- Faulty CDI.
- Faulty stator. Learn how to test the stator here.
Please refer to these posts to learn more about troubleshooting an ATV that turns but has no spark and this one to learn how to test an ignition coil. In the last post, we also cover a range of other ATV no-start scenarios like:
- ATV won’t start – it just backfires.
- ATV won’t start – it just buzzes.
- ATV won’t start after running out of gas.
- ATV won’t start after washing.
- ATV won’t start with starter fluid.
- ATV won’t start in cold weather.
- And more.
Related: How to Start a Dead ATV: Step-By-Step Guide
Make Sure the ATV Is Getting Air and Has Compression
Air is the final of an engine’s three essential components to start and run.
- Make sure the air filter is clean and not clogged. Clean (if it’s a serviceable foam-type filter) or replace it and remove any debris, such as leaves, from the air filter box.
- Also, look for cracks in the carburetor intake boot, which could cause too much air to be drawn into the cylinder.
- Look for damaged or disconnected vacuum hoses.
- If all else fails, check for compression by doing a leak-down test. If you don’t know how to do this or don’t have the tools, your best bet will be to take the bike to a mechanic. Poor compression is usually caused by a mechanical failure with the cylinder, piston, or valves.