
This post covers common causes when your ATV doesn’t move forward or backward when you put it in gear. Typical components that may need to be addressed to fix this are:
- Brakes and bearings
- CVT drive belt and clutches
- Gear shift mechanism
- Axles and driveshaft
- Wet clutch system
- Electric shift motor or gear position sensor
Does the ATV Move When in Neutral?
I recommend that you start your troubleshooting by making sure all four wheels on the ATV spin freely and that nothing in the driveline prevents it from moving as usual.
To test this, all you need to do is to put the ATV in neutral (N), leave the parking brake off, and try to push it forward or backward by hand. Some of the larger ATVs can be a bit heavy to push, even for adults, but you should be able to make it move on a flat, smooth surface like asphalt or concrete.
If the wheels spin freely, you know that the driveline and brakes are okay and that the problem is with your gearbox, transmission, or gear-shifting mechanism. You may jump straight down to troubleshooting transmission issues.
If you cannot get the wheels to turn, no matter how hard you push, the problem may still be with your transmission or gear shifter. But because it is far more accessible, you should start by looking into the bike’s driveline, brakes, and bearings to ensure no issues.
Seized Wheel Bearings
Wheel bearings may seize up entirely if you let them wear too far before having them replaced.
- Jack the ATV off the ground and put it on jack stands.
- Check each tire for play. You do this by grabbing the top of the tire with one hand and the bottom with the other. Wiggle back and forth from top to bottom.
- If you feel excessive play, your issue may be with your bearing. Worn bearings need to be replaced.
On solid rear axle racing quads, you should also inspect the carrier bearing as they may break and lock up.
Seized Brakes
Now that the wheels are off the ground, you should inspect the brakes to ensure they are not seized.
- Make sure the parking brake is disengaged.
- Remove the tire. You should be able to spin the wheel hub by hand. If not, you can try turning the wheel hub by putting a pry bar between two of the wheel lugs.
- Inspect the brakes. Look for corrosion, dirt, or ice.
- They may be frozen solid if you’ve been riding in wet conditions and the temperature has dropped below zero. A hairdryer will thaw them if needed.
- Riding in mud may pack your brakes with dirt so that they stick. Proper cleaning should fix your issue.
- If your ATV has been sitting for an extended period, the brakes may have corroded, preventing them from releasing. Corroded brakes can usually be fixed by disassembling, cleaning, and lubing the caliper glide pins and pistons. Service kits that include replacement brake caliper pistons and glide pins are available for most ATVs. In more severe corrosion cases, you may need to replace the complete brake caliper and brake disk for the brakes to disengage correctly.
If you haven’t yet found a clear sign of an issue with either the wheel hub assembly or brakes, you should isolate them from the rest of the drivetrain for further inspection.
This way, you don’t waste time troubleshooting parts of the ATV that may work normally.
- Disconnect the driveline and try rotating the wheel hub again.
- If the hub is still not moving, you know something is seized in the hub or brake assembly. Address these areas before moving on to other parts of the bike.
Stripped or Broken Driveshaft or Axle
You usually don’t break an axle without noticing. The most common scenario for broken axles is your front axle popping when struggling in a mud hole at full throttle, and the tire suddenly finds traction. “POP,” and the ATV no longer moves.
An axle may strip if it pops out of place. The C-clip that holds it in place may come loose so that the axle starts moving out until just a small portion is still gripping and the splines stip. You will likely hear scraping noises if the axle has been stripped.
When a driveshaft or axle breaks, your bike will no longer pull on the wheel that the stripped or broken axle goes to. The remaining wheels will likely still pull as normal.
When installing bigger tires, you add more strain to the ATV’s driveline. Consider upgrading your axles to heavy-duty aftermarket parts that don’t break as easily.
Shredded Drive Belt
The drive belt on CVT transmissions may break due to old age, wear, or misuse. Hard accelerations or heavy pulls may cause an old belt to explode instantly, leaving the bike stranded.
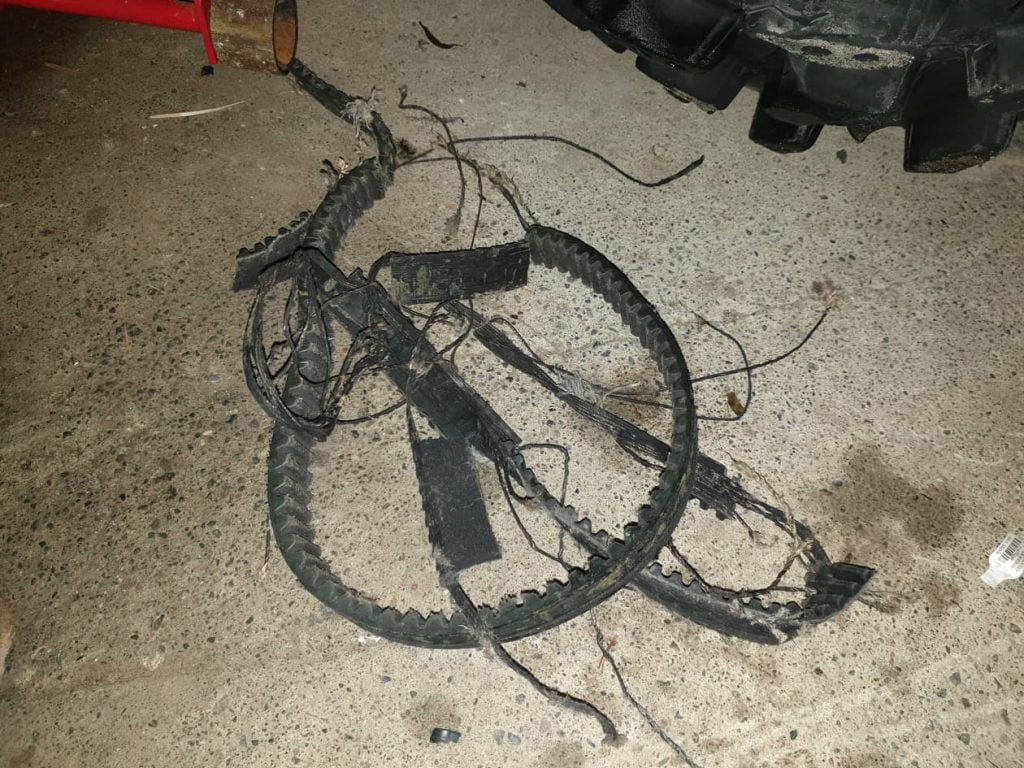
If your ATV instantly stops moving, you should remove the belt cover to inspect the belt. You may find your belt in a thousand pieces or worn so badly that it slips.
Related: ATV belt slipping – symptoms and causes
Water in the Drive Belt Housing
If you get water on the drive belt and CVT clutches, it will break the friction that makes your ATV move. The drive belt housing is sealed and should protect the drive belt from splashing water.
But if the cover fasteners are not correctly tightened or the seal is not in place, it may not be sealed properly. And if you have been riding in deep water, it may enter the belt housing through the belt housing vents.
Related: 16 Steps to Repair an ATV Submerged in Mud or Water
If you suspect that water in the belt housing is your cause, a drain plug at the bottom will drain any water that has entered.

After getting all the water out, the ATV should start moving again. Go gentle for the first few miles so the belt and clutches can dry completely before applying too much throttle, or the belt will slip, causing premature wear.
When you get back home, removing the belt cover is a good idea to see if you can find the cause of water entering.
In addition to loose bolts and a seal that has popped out of its place, you should look for damage to the casing. It is not unusual for the cover to get damaged by hitting rocks or branches.
Gear Shift Mechanism Issues
See if you can hear or feel if the gears inside the transmission are shifting when you put the ATV in gear. The gear shift indicator may indicate that the bike is in gear even if the internals have not shifted completely.
A shifter that feels loose or is not shifting all the way may need adjusting. Try putting the vehicle in gear with a bit more firm motion than usual. You can even gently hit the lever to make it “pop” into gear.
Do not use excessive force; you are only trying to find out if it needs a bit of convincing to pop into gear. If this helps, you will likely be able to fix your issue by adjusting the gear linkage.
Also, ensure none of the visible components in the gear shifting mechanism have come loose or are broken. Some ATVs use a plastic clip that sometimes pops off. And where the shifter rods connect to the transmission, you will find a bell crank that is well known to strip or crack.
You must ensure the clutch cable is adjusted correctly on manual clutch setups.
If all of the externals seem fine, but you can still not make the ATV shift completely, you may have a bent or broken shift fork, broken drive chain, or stipped pinion inside the transmission.
Before splitting the case, you can try this:
- The engine should be off.
- Remove the belt cover and drive belt.
- Shift the ATV into gear.
- Try turning the secondary clutch by hand. The bike should move.
If the ATV does not move, you likely have a transmission issue and must split the case. Do not attempt such a job if you are not confident you are capable. In any case, you will need a service manual for guidance.
Check out eManual Online to get factory workshop service and repair manuals for your ATV.
This post goes more in-depth on possible causes when an ATV won’t go into gear or shift gears.
Primary or Secondary CVT Clutch Issues
If one of the clutches is not working correctly, they may not engage to move your ATV forward.
Listen if you hear any abnormal or weird noises from the belt housing area while in gear and applying throttle.
To further investigate, you must open the belt cover and inspect how the clutches behave. Keep your hands and loose objects clear of the clutches whenever the motor runs.
- Put the bike in neutral.
- Apply some throttle until the clutches speed up.
- The primary (drive) clutch is the one coming from the engine.
- The secondary (driven) clutch is the one coming from the transmission.

- The belt should not turn on idle but should start turning when you apply throttle.
- The clutches behave differently on different types of ATVs:
None of the dry clutches on belted ATVs with centrifugal wet clutches should spin at idle, even when in gear.
When you accelerate, the wet clutch activates. This, in turn, engages the primary clutch, which then moves the belt. This movement of the belt spins the secondary clutch.
On belted ATVs without a wet clutch, the primary clutch constantly spins, while the secondary clutch only spins when throttle is applied. When idling, the belt rests on a bearing on the spinning primary, but as soon as it speeds up, it grabs onto the belt so that it starts turning.
If your ATV does not behave as described above, you may have issues with the clutches that must be addressed.
Differentials are another possible culprit if your ATV won’t move. A range of things can go wrong, but here are some of the more common:
- There may be debris or metal shavings constricting the gears. Flush all the old fluid out and add new according to spec.
- The mechanism for engaging or disengaging the diff may be broken. Visually inspect and repair if you see any signs of damage.
- Bearings inside the diff may be worn out or sized. It is not uncommon that dirt and water enter the diff, creating perfect corrosion and premature wear conditions.
- The gears inside the diff may be stripped. Listen for grinding noises. Rebuild kits are available for most ATVs. This job requires above-average mechanical skills.
Wet Clutch Oil-Related Issues
Some ATVs have internal wet clutches that sit in an oil sump. The same issues listed here also apply to the Hondas with hydrostatic transmissions.
Ensure You Use the Right Type of Oil
Wet clutch systems require a specific type of oil for the clutches to work correctly. If the oil you use is not wet clutch safe, it will prevent your wet clutch from engaging and your four-wheeler from moving.
Please refer to your service manual to learn what type of oil your ATV needs.
Make Sure the Oil Level Is Correct
Another common issue that will prevent your wet clutch from working correctly is running with too little oil.
Adding oil to the specified level may sometimes be enough to bring your ATV back to complete working order.
But if you’ve been running too little oil for too long, you may be looking at expensive repairs such as a transmission rebuild, oil pump replacement, or in the worst case, a complete engine rebuild.
Your service manual will tell you the correct oil level.
Other Wet Clutch Issues
Here are a few issues that may be worth looking into if you suspect that your wet clutch is not working correctly:
Clutch Out of Adjustment
Some, if not all, wet clutches have an adjustment screw for proper alignment. If not adjusted correctly, the clutch pack will always stay disengaged. A service manual will tell you where to find it on your ATV.
Many owners report that they find this adjustment screw very hard to move.
Jammed or Hung up Clutch Plates
If the adjuster screw is turned too far, it may push the pressure plate back too far, where it may get hung up. Other components, like the clutch plates, may hang up or get jammed.
You need to remove the clutch plate cover on your wet clutch to find out. Replace the clutch plates if you see any sign of damage.
Electric Gear Shift Motor Not Engaging
On Honda ES models, you may find that the shift motor does not entirely shift the transmission into gear. It may lurch or make a noise as if it is going into gear but then bumps back out of gear as soon as you apply throttle.
The grease used inside these motors may be too heavy, or it tends to gum up over time. Cleaning out the old grease and adding white lithium grease may be all that is needed to bring the motor back in working order.
Faulty Gear Position Sensor
Gear position sensors may go bad from shorting out or due to internal corrosion.
Check for continuity in the different gear settings if you know your way around a multimeter. If there is no continuity in any of the positions, you know that the sensor is toast or needs replacing.
FAQ
Why doesn’t my ATV move when I put it in gear?
Common causes include issues with the brakes, CVT drive belt, clutches, or gear shift mechanism.
What are the first steps to troubleshoot my ATV that doesn’t move when in gear?
Start by ensuring all wheels spin freely and nothing in the driveline prevents typical movement.
What could be wrong if my ATV wheels don’t spin freely?
This may indicate a problem with your transmission, gear shifter, brakes, or wheel bearings.
Wrapping Up
Diagnosing why your ATV doesn’t move forward or backward when in gear can seem like a daunting task, but it doesn’t have to be.
By systematically checking components like the brakes, bearings, CVT drive belt, and clutches, you can isolate and address the problem effectively.
Remember, understanding how your ATV works and keeping up with regular maintenance can prevent many of these issues in the first place.