
CVT belt slippage will likely happen to anyone owning an ATV sooner or later. While as frustrating as it might be, there is often no reason to let it ruin your day.
Various reasons may be causing it, but most are just a normal part of owning an ATV. Other times it may be a sign of severe damage to the clutches, and expensive components may be necessary to fix the issue.
I recently experienced belt slippage on my ATV (Polaris Sportsman XP 1000).
I was out trail riding with some friends when we decided to go up a small river. The water in the river was only in the ballpark of 15-20 inches deep. I expected my trusty Sportsman would have no problems handling it.
After riding in the water for about 5 minutes, the bike suddenly started losing its forward momentum. I was barely able to get it onshore with the little that was left.
Water had gotten into my belt housing, causing the slippage. Luckily I had brought some tools and could drain all of the water. This fixed the issue, and after some laps at moderate speed on dry land, it was ready to go as usual again.
Out of interest, I decided to do a little more research on the subject as soon as I got back home. It turns out water is just one of many potential causes of why this is happening.
Related: Why Does Your ATV Belt Squeal? How to Fix It?
1. The Belt Is Worn Past Its Serviceable Limits
Many don’t realize that ATV belts (the belt in your CVT, continuously variable transmission) are consumable wear items. Over time, it will wear out of spec and eventually need replacing for the bike to function properly.
There is a variety of reasons why the belt wears out. Causes like excessive heat or poor riding style will significantly shorten the life expectancy of the belt. These will be covered further down in this post.
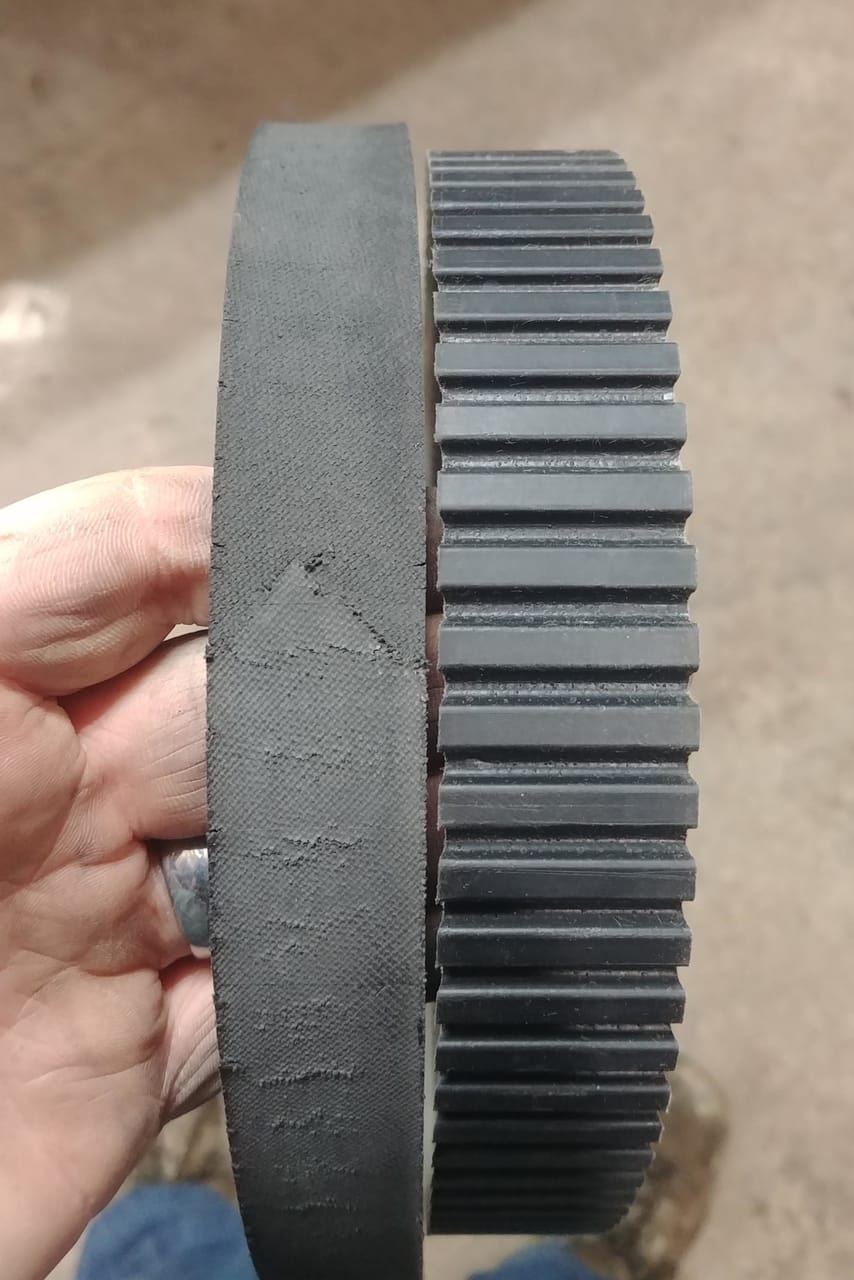
High age or high mileage is another common cause. If you see any cracking inside the cogs when you remove the belt and bend it backward, it’s time to replace it.

Also, look for any missing chunks. If so, you have no choice but to get a new one.
Over time the aramid cord within the belt will gradually lose its strength and adhesion, and you’ll get what’s known as flex fatigue.
If you start losing top-end power, this may be a sign that your belt is beginning to wear thin. You should find your belt’s minimum width in your service manual.
Remove the belt and use your calipers to measure the width in three places. This will ensure a correct reading, and you will also tell if the belt is evenly worn.
If the reading exceeds the specified minimum, the belt is beyond its acceptable limits and needs replacing.
2. The Belt Has Become Wet
Another widespread cause of belt slippage is the belt somehow becoming wet. The water will significantly reduce the friction between the belt and the clutch sheaves, leaving the whole transmission useless until it gets dried up again.
If this happens and the belt starts slipping, you mustn’t just give it full throttle to compensate. The spinning will create immense heat in only one spot, permanently damaging the belt.
You need to remove the moisture before you can drive any further.
The belt case is made to prevent water from getting inside but cannot be considered entirely waterproof.
The cover usually has a rubber seal, but if the seal is somehow damaged, twisted, or in some other way not seated properly, water will get inside.
Errors like these will, from time to time, slip through the factory quality control. A simple refitting of the gasket may be all it takes to fix the issue.
More common is water or snow entering the belt housing through its air inlet or outlet.
These ports need to be there for proper cooling of the CVT, and even though the manufacturers have improved the design of these inlets over the years, they won’t cope with every situation.
Even if you ride in shallow waters, water may splash and get sucked in if you ride too fast when you hit the water. Low speed is key when riding in water or powdery snow.
Also, riding in low gear will allow you to keep the RPMs up, optimizing the airflow out of the exhaust port on the casing and preventing water from entering by blowing it out.
If you want to transform your ATV into a submarine, installing a good snorkel kit to extend the inlet and exhaust port will be your best bet.
Another way water can get in is if something punches a hole through the CVT housing. Riding in areas with a lot of dry branches increases this risk. The housing is often just made out of plastic so that it can be broken.
This happened to a friend of mine. He found no issues with the seal but found a one-inch hole straight through it when he removed the cover. If the damage is not too bad, some strong sealant will patch it up again. Alternatively, you can always get a new cover.
And finally, you have situations like the one I told you about at the beginning of this post. When I got home, I noticed that some of the bolts on the CVT housing had started to come loose, creating a small gap where water would enter.
All it takes to fix this issue is to tighten these bolts and keep an eye on them in the future. If the problem reappears, I will use some Loctite on the bolts’ threads to keep them in place. Do not overtighten these, as this will rip the threads of the plastic housing.
What to Do When Your ATV Belt Gets Wet?
You must drain water regardless of what caused water to enter the housing. On the bottom of the housing, you will find a drain plug that can be removed. On the Polaris, this is an easy-to-access red plastic plug.

Allow the case to drain completely before you start the bike again. Let the bike idle for some time in neutral to let the fins on the clutch do their job. You can even rev it a little to speed up the process.
The airflow from the venting system will gradually dry up the belt and clutches. In just a couple of minutes, you should be able to start riding again gently.
Start at low speeds with little power to let it dry completely. If you hammer it right away, it will start slipping, potentially damaging the belt in just a matter of seconds.
3. Damage to the Inside of the Clutch Sheaves
With the belt removed, check for any grooves, nicks, or other damages to the inside of the sheaves. This will wear the belt prematurely and needs to be addressed.
In some cases, the damage can be repaired; in others, you must get new clutches.
4. Something Is Disrupting Proper Belt Cooling
If you smell or feel your belt slipping at speed, it could be possible that your belt is heating up and not cooling properly.
Ideally, the bike should be able to keep the belt cool with its belt housing cooling system. The basic principles of the system are relatively straightforward.
The fins on the clutches draw cool air in the inlet port on the belt housing, where it’s blown directly to the primary clutch before being pushed out through the exhaust by the secondary clutch.
If something disrupts this airflow, you will soon experience issues with the belt getting too warm, causing belt slippage.
Start by having a look at the exhaust port. If it’s full of mud, a simple cleaning will fix the heating issue. Also, inspect the intake port to see if anything is blocking it.
Over time the rubber in a belt running too hot will start hardening until, eventually, it will crack, and the cogs will peel off. This happens much sooner when the cooling is not functioning correctly, so checking up on it regularly may be a good investment.
5. Black Haze on the Clutches
If you’ve ridden with the belt too hot for some time, you should inspect the surface of your clutch sheaves. If you can see something that looks like a black haze on them, this will be belt residue from previous belt slippage or even residue from normal belt wear.
This needs to be removed; otherwise, your belt will continue slipping. Even putting on a new belt will be useless before you get this stuff removed.
Use a Scotch Brite pad with some alcohol or acetone to rub it all off. If this does not work, try some high-grit sandpaper. In a worst-case scenario, you may have to replace your primary or secondary clutch.
Do not use brake cleaner as a detergent, which will negatively affect the performance of the belt.
6. Broken Spring in the Secondary Clutch
If the bike does not want to take off smoothly but is jerking away, almost like it’s slipping and then acting as if it’s shifting gears, it may be because of a broken spring in the secondary clutch.
You need to take off the belt cover and inspect the spring. If the spring is broken, it needs replacing.
7. You’ve Got the Wrong Belt Installed
If you’re experiencing belt slippage after installing a brand-new belt, you may have gotten the wrong size. Just a tiny difference in dimensions can affect its performance.
The difference can be hard to spot with just the naked eye, so compare the specific model number to your bike’s required belt dimensions before you purchase.
If you intend to use this kind of belt each time you change it, you can use shims to alter the clutches’ setup.
8. Installing Bigger Tires
One of the first upgrades many do to their bike is installing bigger mud tires. Remember that doing so will affect how the clutches operate at different speeds.
The clutches will operate less efficiently, creating more heat and poorer cooling, which may lead to belt issues.
This can be prevented by installing a clutch kit that allows the clutches to operate efficiently with your chosen tire size.
9. Heavy Towing or Usind High Gear in Mud/Snow
Another common rookie mistake is using the high gear range when towing, riding up steep hills, or riding in snow or deep mud.
Doing so will burn the belt in no time, and as soon as you start smelling burnt rubber, you know it’s time to slow down.
Using the low gear range in situations like these will allow for better cooling because of the higher RPMs and how the clutches can shift entirely to where they will get a better grip on the belt, resulting in lower heat and higher torque.
10. The Belt is Burned
Too much heat will burn the sides of the belt, creating a shiny glazed look. This can happen to the whole belt or just to specific spots.
When the belt has gotten one or more of these burnt spots, the bike won’t take off without a significant jerking sensation. You will also smell burnt rubber and maybe even see some smoke.
To avoid this from happening, you need to do whatever it takes to keep the belt cool.
After some hard riding, putting the bike in neutral and revving at moderate engine speeds for some seconds is a good idea to cool down the metal clutches. This will prevent them from cooking the belt rubber after the bike turns off.
After a taxing pull through the mud, the last thing you want to do is to just shut off the bike as the remaining heat in the
11. The Clutches Are Out of Alignment
If the drive and the driven pulley are not appropriately aligned, you may experience belt slippage and other performance issues.
The clutches can be aligned using a model-specific alignment tool and procedure. The device you need for Polaris bikes is the “offset alignment bar.”
In addition to the tool, you must use a service manual for guidance when performing this procedure yourself.
12. Bad Clutch Bearing
If a bearing inside the pulley system has gone bad, it may cause the pulley not to release the belt.
Grip the clutch firmly with your hands and push it in any direction to see if you feel any slack. If you do, it might be time for an overhaul.
13. The Belt Is Not Properly Broken In
A typical rookie mistake that some doo as soon as they get the immense power of a new ATV between their hands is hammering the throttle before the belt is properly broken in.
They do not realize this is a surefire way to ruin the brand-new belt in no time. The belt will burn, and you’ll get belt slippage.
All new belts must be appropriately broken-in to ensure proper belt performance and longevity.
Proper ATV Beld Break-In Procedure
- Start by cleaning the belt with soapy water before installing it to remove grease and oils from the manufacturing process. Let it dry completely before you install it on the bike.
- With the belt installed, bring it up to normal operating temperature by running through the entire shift range, all while never exceeding 3/4 throttle. This will take about 15 minutes of conservative riding.
- Shut down and let the belt cool completely. This may take about 30 minutes.
- Repeat steps 2 and 3 once more. Now you are ready to start shredding the trails!
14. Mud, Sand, or Other Debris in the CVT System
ATVs are meant to be ridden in dirty conditions. But if you’ve been pushing the limits a bit too much, or if your CVT housing is not sealed correctly, you may have gotten sand, mud, or some other debris inside that is interfering with the proper function of the clutches.
Look at the air intake or exhaust port to see if they have come partly loose, enabling dirt to enter. Any open tubes need to be appropriately refitted.
Symptoms of a dirty CVT may be that the clutch will not engage until on higher rpm’s than usual, jerking, and belt slipping before it catches and goes.
When this happens, proper cleaning is likely all you need.
Start by removing the cover and the belt. Using some engine degreaser and a pressure washer to clean everything would be enough to get a decent result. Let dry before you reassemble. Try this first to see if it fixes your issue.
If it does not, a more in-depth cleaning may be necessary.
You will then need to remove the clutches and disassemble them for further cleaning. You will, in most cases, require a unique tool to disassemble your specific clutch.
PS! Be aware that the spring inside may be under tremendous pressure that must be released using the proper tool before the clutch can be disassembled safely. Different brands use different tools to achieve this.
If you are not comfortable doing this on your own, any dealer should have the tools to quickly take the clutch apart so that you can clean its insides as well.
Remember to put grease on the bushings and a drop of oil on the rollers before you reassemble.
15. Worn or Stuck Rollers
Inside the primary clutch, you will find three or more rollers that roll up and down the helix when you increase or decrease the engine RPM. This is the mechanism behind the clutch sheaves moving apart or together according to how much throttle you apply.
Over time, these will wear out. Any issue preventing them from rolling freely may result in a clutch that is not functioning correctly.
You may get belt slippage because the sheaves won’t be able to make proper pressure in the belt, or they won’t have the necessary range of motion to function at higher speeds.
I had this issue on an old snowmobile once (the same principle applies to ATVs with CVT systems). It would work fine in the lower gear range, but the belt started slipping as soon as I pushed it slightly in the higher gear range.
I disassembled the clutch and found the rollers were severely worn on one side. So after a good cleaning and greasing (in all the right places) and a brand new set of rollers, the clutch was as good as new, and there was no more belt slippage.
16. Worn Helix or Clutch Bushings
This cause is in the same category as roller issues. If the helix is somehow damaged or worn, the rollers cannot roll freely up and down as they are supposed to. Look for any cracks or burrs that should not be there.
Sometimes the whole thing will blow up into pieces, leaving you completely stranded.
When you disassemble the clutch, you should check the bushings in the secondary as per the service manual.
Related Questions
What Are the Symptoms of a Bad ATV Belt?
Loss of performance can be a sign of a bad ATV belt. If you see cracks when you bend the belt backward, if chunks are missing, or if the belt sides have a glazed look, it is bad and needs replacing.
