
A squealing ATV belt indicates something is not quite right with either the clutch assembly or the belt itself. It’s an annoying issue that may or may not be hard to fix at home.
To simplify troubleshooting, we have structured the post by typical belt-squeal symptoms. Under each symptom, we address the different issues that may be causing the behavior you are experiencing.
Caution! Never turn on the key, start the engine, or run a four-wheeler with the clutch cover off. It is potentially hazardous and may mess up components such as the KEBC actuator memory (Kawasaki ATVs).
When the Belt Squeals at Idle but Not at Speed
Squeal sounds at idle that go away as you apply throttle is the most typical behavior when struggling with ATV belt squeals. This symptom has a range of possible causes.
With the ATV idling in gear, the primary clutch should usually be spinning freely without the clutch sheaves touching the belt. As you accelerate, the gap between the clutch sheaves gradually tightens so that it grabs and starts spinning the belt.
When the clutch sheaves, for some reason, is grabbing the belt slightly when it should not, you get a belt squeal. It’s the friction between rubber and metal that is causing the characteristic squealing sound.
Along with the squealing sound at idle, the bike may display the following symptoms:
The ATV Is Hard to Shift in and Out of Gear
When the clutch sheaves are not spinning freely at idle, it causes tension on the gears inside the transmission. The tension between the gears may require that you use excessive force to operate the gear shifter. Sometimes, you won’t be able to shift gears at all.
The Squealing Sound Stops When Shifting to Neutral
When in neutral, the primary clutch should not be spinning and cannot exert force on the belt.
The squealing sound typically begins when the bike shifts into gear and the primary clutch activates.
Cause 1: The Belt Is Too Wide
Belt size tolerances on a CVT transmission are marginal. A belt just a fraction too wide may cause unwanted rubbing issues.
How to Fix It
- Use an OEM belt.
Aftermarket belts can offer better value, better performance, or both. But they may also be the cause of your belt squeal issues.
The reason can be minor variations in manufacturing tolerances.
Most of the time, an aftermarket belt will work just fine. But when faced with a mysterious belt squealing issue, where no cause is to be found, your best bet is to install an OEM belt to see if this helps.
On the numerous ATV forums, you will find the same story over and over. After several failed attempts, the noise disappeared entirely after installing an original belt.
As most instances of belt squeal are belt-related in some way or form, we recommend that you always try with an OEM belt before spending time and money on the clutches themselves.
- Allow the belt to break in properly.
A new belt will need a few miles of run-time to break in. Allow the specified break-in period to complete, as this may be all it takes to remove the belt noise.
Cause 2: Improper Belt-To-Sheave Clearance on the Primary Clutch
When the belt wears, some people remove one or more clutch shims. This will slightly decrease the width between the sheaves, compensating for belt wear. Maybe you did this some time ago, or a previous owner may have done it.
When installing a new belt, it will be slightly wider than the old worn one. Even with just one shim short from stock, you may get rubbing, causing the belt to squeal at idle.
How to Fix It
You can adjust the distance between the sheaves of the idle’s primary clutch by adding or removing shims. This allows for fine adjustment according to belt width.
The job can be done at home if you have the tools to split the clutch. If you don’t, your best option is to remove the complete clutch assembly and take it to a dealer to do the shimming.
This video demonstrates shimming a snowmobile’s primary clutch. The same basic principles apply to an ATV clutch.
Cause 3: The Belt Is Installed in the Wrong Direction
The proper way of installing a CVT belt is so that you can read the part number when standing next to the ATV.
If it reads upside-down, the belt is mounted the wrong way. This can, in some cases, cause belt squeal.
How to Fix It
Remove the belt, turn it around, and install it again.
Cause 4: Stuck or Worn Out Primary Clutch Center Sleeve/Bearing
At idle, the belt should not be touching the sheaves of the primary clutch but resting against a bearing outside the clutch shaft.
If this bearing starts to wear or jams up entirely, it won’t spin as it should. Instead, it will start rubbing against the inside of the belt.
How to Fix It
- With the engine off, remove the clutch cover.
- Remove the drive belt and locate the center bearing. It should look almost like a serpentine pulley on a car.
- Grab the center bearing with two fingers and try to turn it. It should spin freely. If you feel any dragging, grinding, or stuckness, you must address this issue.
For example, a bearing contaminated with sand from submerging the ATV can often be salvaged. Ideally, it should be taken apart for a thorough cleanse and lube, but this requires special tools.
Because removing any moisture before the bearing starts to rust is essential, you can try cleaning the bearing without removing it.
- Use an air compressor to blow it as clean as you can.
- Then spray it with WD-40 while trying to spin the sleeve with a pair of vice grips. Note that ATVs that have EBS systems use a one-way bearing. Do not try forcing the bearing to rotate in the locked direction.
- If the bearing had time to rust, it likely needs replacing.
- If the bearing is worn, it needs replacing as well. The job is relatively quick but requires special tools. If you don’t have these tools available, pulling off the complete clutch and bringing it to the dealer to replace the bearing will be easiest. This repair will typically cost $100 to $150.
Cause 5: The Clutches Need a Cleanse
All of the clutches’ components need to be moving freely for the clutches to be working correctly. Dirt and dust from worn components may lock up the rollers and other moving parts so the clutch does not engage or disengage completely.
How to Fix It
This is how to perform a quick CVT clutch cleanse:
- With the engine off, remove the clutch cover.
- Put on a dust mask; you do not want to breathe the fine dust trapped inside the clutches.
- Use an air compressor to blow off dust and debris from the clutch assembly.
- Reinstall the clutch cover and see if this helps. If not, you may need to disassemble the clutch assembly for a more thorough cleaning.
Related: ATV belt slipping – symptoms and causes
Cause 6: Worn Clutch Components
Worn components may also prevent the sheaves from moving as they should. Typical parts to address are:
- Worn rollers.
- Worn Teflon bushings. Look for metallic-looking or shiny dust, as this may signify worn bushings.
- Worn or damaged helix (less common)
Service the clutch by replacing worn parts. You can do this yourself or take it to a dealer if you don’t have the tools to disassemble a clutch safely.
This post does not cover how to disassemble a clutch; the steps vary depending on your ATV brand and model.
Cause 7: Worn or Broken Motor Mounts
If the motor mounts are worn or broken, you may find that the clutches are out of alignment.
How to Fix It
Inspect your motor mounts. Replace any worn or damaged motor mounts.
Cause 8: Belt Deflection Is Set Too Tight (Common Issue)
Too little deflection means that the belt is too tight. When the belt is too tight, it may engage slightly at idle when it should be spinning freely. Symptoms such as reduced top RPM is a sign of too-tight belt deflection.
Please continue reading below to learn how to adjust belt deflection, whether too tight or loose.
When the Belt Squeals Just as the ATV Starts Moving
Sometimes, there is no squealing when the bike is cold, but as soon as the belt heats up, you start getting squealing sounds when you take off.
Cause: Belt deflection is Too Loose
Belt deflection is the distance the belt deflects from its neutral position when pushing down on it, right between the two clutches.
Excessive deflection means that the belt is too loose. When belt deflection is too loose, it will fall into the secondary clutch while it climbs in the primary. This is comparable to starting a car in 4th gear instead of first. Typical symptoms are bogging down the engine at take-off.
How to Fix It
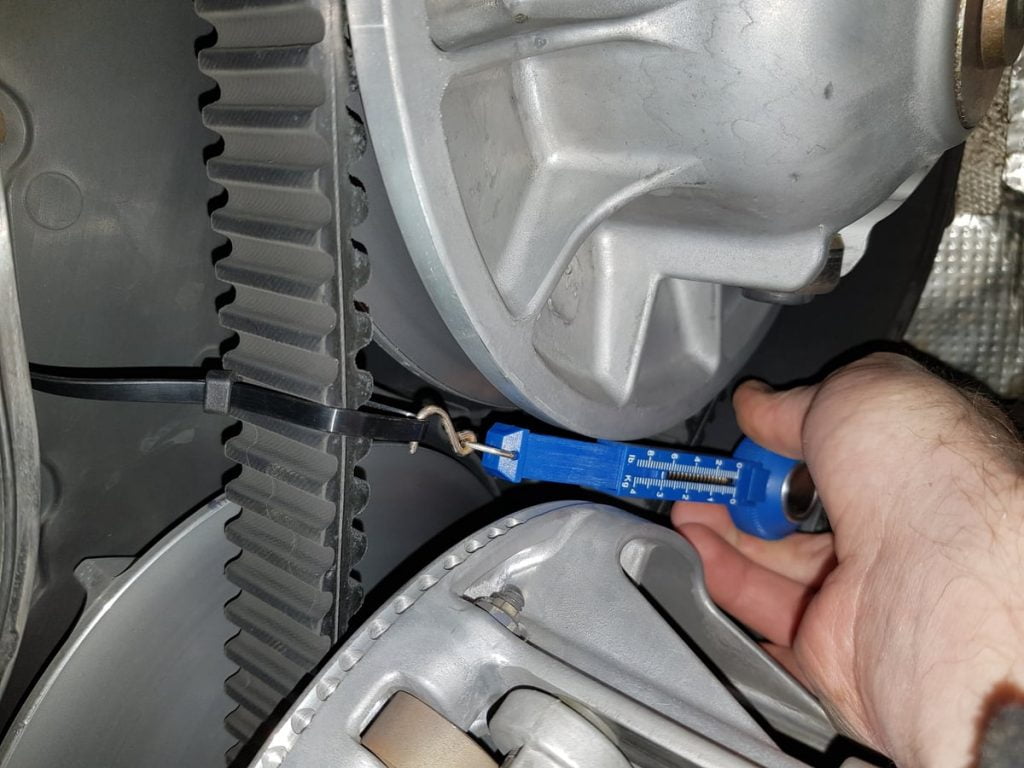
Measure the belt deflection.
Some service manuals will tell you to measure belt deflection by applying pressure to the belt by hand. While this is ok for most home mechanics, it may not be accurate enough to address the most stubborn belt squeal cases.
A more precise method is applying a specified level of down pressure using a scale.
How to measure belt squeal by hand (good accuracy):
- With the engine off, remove the clutch cover.
- Place a flat object like a ruler between the primary and the secondary clutch.
- Press down on the belt in the middle of the clutches with one finger. Do not push too hard, as it will just cause the sheaves to slide apart. According to the user manual, you should “push down on the drive belt until it is lightly tensioned.”
- Measure the belt deflection as the distance between the ruler and the belt. Your owner’s manual should tell you the correct belt deflection on your bike. The belt deflection should typically be between ⅞” to 1 ¼”.
How to measure belt deflection using a scale (better accuracy):
Steps one and two, and four are identical to the above method.
But when applying pressure on the belt, you use a scale instead of estimating the force to apply.
Your service manual will tell you the correct pressure to apply for an accurate reading. If you don’t have one, 13lb (6kg) of force is a good rule of thumb.
You don’t need a specialist tool to do this at home. You will get decent accuracy with a zip tie and a cheap fish scale.
Adjust the belt deflection if necessary.
Belt deflection is typically adjusted by turning an adjustment screw on the secondary clutch or by adding or removing spacer shims in the secondary clutch.
Adjusting belt deflection on an ATV secondary clutch that has an adjustment screw:
- Loosen the locking nut that holds the adjustment screw in place.
- Turn the adjustment screw either clockwise or counterclockwise.
- Turning the screw counterclockwise will bring the sheaves together, tightening the belt.
- Turning the screw clockwise will cause the sheaves to move further apart, thus loosening the belt.
- After adjusting, grab the belt and roll it through the primary and the secondary. This will ensure that the belt falls in place between each adjustment.
- Measure deflection and adjust accordingly until the deflection is according to spec.
Adjusting belt deflection on an ATV secondary clutch that uses shims:
As with the primary, the shimming of a secondary clutch can be done at home if you have the right tools. Again, if you don’t have the tools or skills, your best option is to remove the complete clutch assembly and take it to a dealer to do the shimming. Alternatively, you can bring the whole ATV.
When The ATV Squeal When Moving
Some noise and vibration when driving is expected on any CVT clutch. Installing a snorkel may enhance these sounds, as will pulling heavy loads at low speeds. But sometimes, the noise is higher than usual.
Cause 1: The Sheaves are Dirty
Clutch sheaves may get dirty from a spinning ATV belt or from not cleaning a new belt with soap and hot water before installing it, as you should.
How to Fix It
- With the engine off, remove the clutch cover and drive belt.
- Use a Scotch Brite pad and hot soapy water to remove any residue. Using sandpaper is not recommended as it may cause increased belt wear and reduce belt service life.
- Blow everything clean with compressed air before reinstalling the belt and clutch cover.
Cause 2: Running Higher Rate Clutch Springs
Running bigger tires causes excess stress on the drive belt. If you go up more than one inch in size, you need stiffer clutch springs to accommodate the added stress.
Stiffer springs cause more belt noise due to the added tension. It is normal to hear a noticeable difference between your stock setup.
FAQ
Why is my ATV belt squealing?
Your ATV belt might squeal due to slippage caused by improper tension, a misaligned pulley, or worn-out components. Regular inspection and maintenance can help.
How can I stop my ATV belt from squealing?
To stop your ATV belt from squealing, check its tension, alignment, and condition. If it’s worn or damaged, replacement might be necessary.
Can a squealing ATV belt cause damage?
Yes, if left unaddressed, a squealing ATV belt can cause further damage to the pulley system or even the ATV’s engine over time.