
Proper maintenance and care is an essential but often neglected aspect of owning an ATV winch.
This guide includes the most important maintenance tips and best practices to help you get the most out of your winch.
Why Is Winch Maintenance Important?
There are several good reasons to spend a few minutes maintaining your ATV winch.
- Safety: Using a winch with overly worn or damaged parts can be extremely hazardous.
- Performance: Regular maintenance will ensure that the winch operates at its full capacity.
- Durability: A neglected winch will have a reduced lifespan due to excessive wear and tear.
- Cost Savings: Regular maintenance can identify minor issues before they become significant problems that are more costly to repair.
Related: Winching 101: How Does an ATV Winch Work?
ATV Winch Maintenance: Step-By-Step Guide
1. Operate the Winch Regularly
A key element in keeping your inch in good working order is to use it regularly.
If you leave the winch for a year more without ever using it, chances are the next time you need it will not work. The motor may have corroded, or the gearbox may have locked up.
As a precaution, operating the winch at least once a month is recommended to keep it from seizing up.
Performing the other maintenance steps in this guide is sufficient to check off this step.
2. Inspect the Winch Rope for Damage
The winch rope or cable is crucial to winching safety and performance, but at the same time, it’s the winch component that’s most exposed to wear and damage.
That is why ensuring the rope is in good condition plays a big part in proper ATV winch maintenance.
Generally, you should inspect the rope for damage and excessive wear after each winching operation.
Periodic inspections are insufficient as you never know when damage may occur. Never use a damaged or excessively worn winch rope.
- Steel cable: Check for any kinks, signs of corrosion, or frayed wires.
- Synthetic winch rope: Inspect for any thinning in the rope due to abrasion, cut or damaged strands, and any fibers that appear fused or melted.
It is important to inspect not only the outer fibers but the inner fibers as well.
Grab a piece of rope with both hands and push against the rope to open the strands for a better look. If the inner fibers have a powdered look, it indicates internal wear and a weakened winch rope.
A discolored rope could indicate contamination by chemicals potentially harmful to the rope, like oil, gas, or battery acid. Petroleum contaminants are typically easy to detect by smell.
If you’re not confident the rope is good, it is better to replace it to prevent it from snapping when you need it the most.
NOTE: When a new synthetic winch rope is not yet used, the outer surface is smooth to the touch with no visible strained fibers.
As you begin using the rope, the rope quickly develops a light fuzz from the outer layers of fiber breaking. This is entirely normal and helps protect the lower layers of fibers.
After some use, the rope roughening up should stabilize and not progress into the layers underneath.
When to Replace a Winch Rope or Cable
Winch cable or rope replacement intervals heavily depend on how often the winch is used. Some winch manufacturers like Warn recommend replacing the rope once a year, but a properly maintained winch rope will typically last a while longer.
A severely frayed, kinked, or damaged winch cable or rope must be replaced immediately.
Whether the rope is still good or not ultimately depends on your judgment, but underneath are some guidelines.
Always replace a synthetic winch rope when:
- The rope cross-cut anywhere along the length of the rope is reduced by more than 10% by abrasion.
- One or more neighboring strands are cut.
- There are flat spots or lumps that do not go away by flexing the rope.
- There are excessively fused or melted fibers from heat or friction. Such damages are identified by a part of the rope becoming stiff with a glazed appearance.
3. Clean the Winch Rope

When sand particles and dirt get lodged between the strands of a synthetic winch rope, they act like abrasives that can damage the fibers when the rope is under heavy load.
Regularly Cleaning the winch rope is essential to prevent premature wear and extend the rope’s service life.
This is how you clean a synthetic winch rope:
- Unspool the rope from the winch drum, but leave ten rope wraps on the drum.
- Lay the rope on a relatively clean surface, like concrete or pavement. Sand or gravel surfaces will not work.
- Rinse the entire rope using a garden hose. Do not use a pressure washer, which can embed the small grains deeper into the rope.
- Fill a bucket of water and some mild soap. Do not use any strong chemicals, as this may weaken the rope.
- Begin in one end and run the entire length of the rope through the soapy water. While in the water, push the rope together to open the strands and loosen the sand and dirt. Rinse out as much of the grit as possible.
Note: Washing the rope in a washing machine is not a good idea, as the strands can catch and get pulled out.
Steel winch cables typically don’t require cleaning, but a light coat of oil will help prevent them from rusting.
4. Re-spool the Winch Rope
After each use or at least once a month, it is recommended to re-spool the winch rope properly onto the drum.
The rope must be on the drum tight and neatly to prevent a bird’s nest of rope or the rope from cutting in between the outer layers under load. Both of these scenarios are NOT fun to undo.
Related: 6 Ways to Untangle a Stuck or Jammed-up Winch Cable
This is how you properly re-spool a winch rope onto the drum.
CAUTION: Always read and apply the safety precautions outlined in the ATV- or winch owner’s manual. These include keeping your hands clear of the winch hook, rope, and fairlead when spooling in/out when the rope is under tension or someone else is at the control switch.
Things you will need:
- Gloves
- A winch remote or an assistant to operate the winch
- A tree strap and a shackle if you’re using a tree as an anchoring point
- Find a flat, level spot or a slight incline that is as long as the entire length of the winch rope. Choose a spot with a solid anchoring point at the top.
- Put the winch clutch in the free spool position and unspool the winch rope. Leave at least ten rope wraps on the drum to prevent the rope from coming loose. Then, re-engage the winch clutch.
- Attach the hook end of the rope to a suitable anchoring point.
- Back up until about 6ft. (2m) slack of rope is left lying on the ground, put the ATV in park (P), activate the hand brake, and turn the engine OFF.
- Stand before the winch and grab the rope with one hand (wear gloves). Ensure the rope winds off the bottom of the drum (mount side).
- Use the winch remote or as your assistant to power IN until the slack is wound neatly onto the drum. Do not power out; this will make the rope unwind from the top of the drum rather than the bottom.
- Disconnect the remote or ask your assistant to turn off the ignition switch and keep their hands clever of the winch switch.
- While maintaining tension on the rope with one hand, use your other hand to push the rope windings to the side where the rope attaches to the drum. There should be no gaps between the windings.
- Get on the ATV and gently back up to remove any slack left in the rope.
- Put the transmission in neutral (N) and spool about 10ft of rope onto the drum. The rope should remain under tension from pulling the vehicle.
- Stop winching, power OUT enough to remove tension, and put the ATV in park (P).
- Inspect the winch to ensure the rope winds neatly onto the drum. Alternatively, you could have an assistant stand to the side of the ATV and away from the winch rope to monitor the rope as you winch in.
- Get back on the ATV and winch an additional ten ft. of rope. Inspect and continue winching until about 8 ft (2,5m) of rope is left.
- Drive 2 ft (0,5m) forward to create slack in the winch rope and disconnect the hook from the anchoring point.
- Grab the winch hook by the hook strap and hold tension on the rope. Slowly winch in by “pulsing” the power in button until about 3ft (1m) of rope is left.
- Attach the hook to a suitable anchor point on the ATV and gently power pulse in to take up the slack. Do not power the winch hook into the fairlead, as it will cause permanent damage to the fairlead.
TIP: Leave the winch clutch engaged when the winch is not in use.
5. Inspect the Winch Hook
Inspect the winch hook for signs of excessive wear or damage like cracks or burrs.
Ensure the spring-loaded hook latch is not damaged, moves freely, and closes appropriately.
A working hook latch is essential for safe winching as it prevents the hook from accidentally unhooking from the anchoring point.
Finally, inspect the hook and split pins to ensure they are securely in place.
Replace the winch hook if damaged.
6. Inspect the Winch Mounting Hardware
Inspect and tighten all bolts to ensure they are secured and there are no missing bolts.
Do not use the winch until any missing or damaged mounting hardware is replaced.
7. Inspect Electrical Connectors and Wiring
Inspect all electrical connections, including at the battery terminals. Ensure the connections are correctly fastened and have not become corroded.
Corroded connectors should be disconnected for cleaning using some light sandpaper.
After cleaning the terminals and connectors, apply di-electric grease to prevent further corrosion.
Inspect the cables for worn wire insulation or damage that could cause shorts. Replace damaged cables.
8. Clean the Winch Housing
If the winch becomes filled with dirt and mud, this will not only affect how it looks but can also negatively impact its performance and shorten its lifespan.
Any time the winch gets covered in salt from riding a public road, cleaning off the salt residue as soon as possible is essential to prevent corrosion.
The main thing to remember when cleaning the winch housing is not to use a pressure washer.
While most winch housings are sealed, they are not designed to withstand high-pressure water. The area between the drum support and flange or clutch lever is particularly vulnerable to leaks.
Use only low-pressure water from a garden hose and a clean rag or sponge to clean dirt and debris off the winch housing. Avoid using chemicals that could damage the paint or rubber seals.
9. Remote and Control Switch Maintenance
Ensure the handlebar switch is undamaged and works appropriately. Clean only with a damp rag.
Inspect the remote for damage and replace the battery if the remote is wireless.
For wired remotes, ensure the remote socket is clean and not corroded. Ensure the socket cap is in place.
Store the remote somewhere clean, dry, and protected from impacts.
10. Charge the Battery
It is easy to forget how the winch relies on a fully charged battery to do a good job. Excessive winching will drain the battery, and giving it a proper charge is recommended after each winching operation.
11. Lubrication
On most ATV winches, no lubrication is required for the life of the winch.
However, if you wash the winch using a pressure washer so that water enters the winch housing, you might need to disassemble the winch to clean out the water-contaminated grease and replace it with new.

- Disassemble the winch while carefully taking note of how where each part goes. I recommend taking photos as it can be easy to forget essential details.
- Using paper towels, wipe off as much grease as possible.
- Place the parts in a tub and soak them in a de-greaser or brake cleaner.
- Let the parts soak for an hour before using a nylon brush and a rag to finish cleaning them.
- As you reassemble the parts in reverse order, apply grease to each component. Remember to apply a coat of grease on the gears covering the inside of the winch housing.
- Don’t pack too much grease, which can cause pressure build-up and prevent the winch from operating freely.
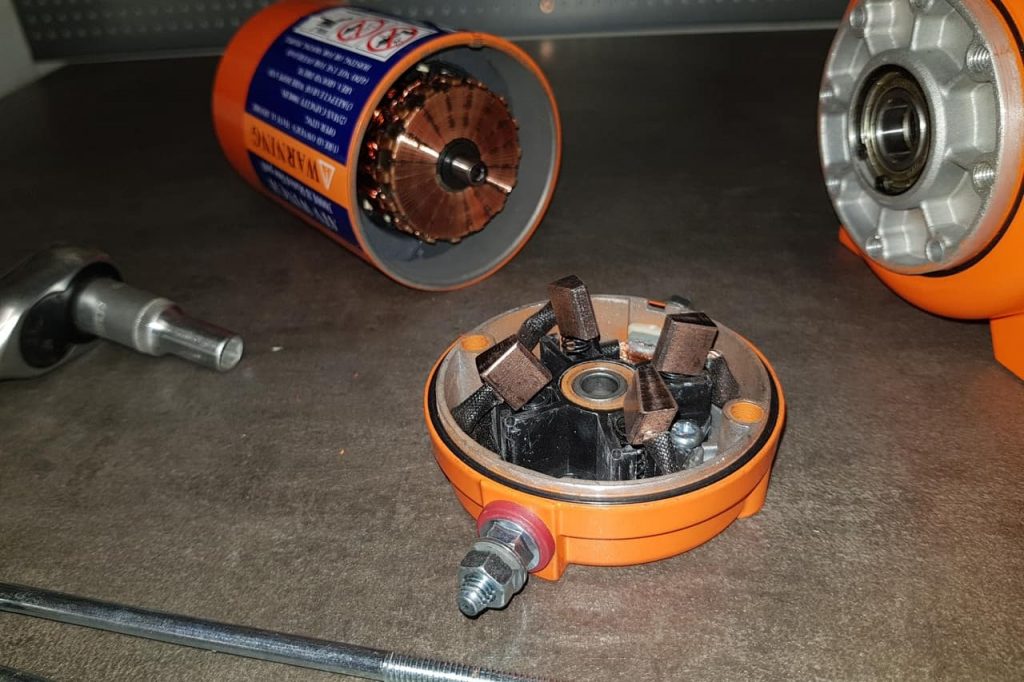
12. Winch Motor Maintenance
ATV winch motors typically don’t require any maintenance throughout the life of the winch. However, on a winch that is used a lot, you might need to replace the winch motor brushes as they wear out.
Also, if the winch motor gets exposed to water from condensation or leaks in the winch housing, it may begin to corrode.
To clean a corroded winch motor, disassemble the motor from the winch housing and clean using a nylon brush and some electronics cleaner.
Check this post for further details on troubleshooting a winch that doesn’t work properly.
13. Inspect Slings and Other Accessories
Ensure tree straps, choker chains, shackles, and pulleys are clean and undamaged. Replace damaged parts in your winching accessory kit as they wear out.
The Bottom Line
Making proper winch maintenance a part of your ATV cleaning routine after each ride can be well worth your while. After a few times, as you get familiar with the steps, the entire process will only take a few minutes.