If you’ve tried all the standard methods of bleeding your ATV brakes with no success, it’s time to attempt reverse bleeding them instead. The job is quite simple. This post will tell you three ways to do it step-by-step.
What are Reverse Bleeding Brakes?
With the standard methods of bleeding the brakes, you direct the stream of brake fluid down and out the bleed valve on the brake caliper. This is the same direction witch the fluid moves when you operate the brakes in a normal riding situation.
Theoretically, the air trapped inside the system should be pushed out with the brake fluid.
This downward flow of brake fluid is achieved by pumping the brake lever or connecting a vacuum device to the bleed valve to suck the fluid out of the system.
On the other hand, with reverse bleeding, the stream of brake fluid goes in the opposite direction.
The idea is relatively straightforward.
Instead of pressing the brake fluid from the reservoir down and out through the bleed valve, you find a way to press new fluid into the system through the bleed valve, from where it flow back into the brake fluid reservoir.
You can use a store-bought tool to do this or choose between some of the DIY solutions in this post.
Why Reverse Bleed the Brakes?
The standard method, by repeatedly pumping the brakes and opening the bleed valve, does not always work on smaller vehicles such as ATVs. Their small master cylinder may not be able to push enough fluid to get the job done.
Air bubbles trapped in the system end up being pushed back and forth inside the brake line and cannot reach the bleed valve.
Even after vacuum bleeding your brakes, there may still be bubbles of air trapped inside the system.
So reverse bleeding reverses the stream of brake fluid. The air moves easier upwards as it doesn’t have to fight gravity. The reversed fluid stream will better reach pockets of trapped air as well.
Other benefits are speed and the possibility of doing the job independently with no helper. The entire process will be done in just a matter of minutes.
Related: How to Bleed ATV Brakes; Manual and Vacuum Method
Disadvantages of Reverse Bleeding the Brakes
You can bleed the brakes on your ATV at least a dozen ways. All of them come with some pros and cons to consider. Here are some possible downsides with reverse bleeding the brakes:
- The brake fluid closest to the brake caliper is usually in bad shape due to heat. It may also be contaminated with debris. Forcing contaminated brake fluid up and through the master cylinder is not ideal. A way to partly avoid this is using a pump that uses no more than 10-12lbs of pressure. This should (at least in theory) ensure that debris stays down by the caliper.
- If you’re not going DIY, the tools required do cost a few bucks. The price range is between $60 and $400, depending on which brand and model you choose.
Different Ways to Reverse Bleed ATV Brakes
Now, let’s look at the different ways you can reverse bleed the brakes on your ATV.
1. Reverse Bleed Using a Reverse Brake Bleeding Tool
A variety of brands offer these types of tools, but they share the same basic design features.
The tool system consists of a container where you put the new brake fluid, a hand pump that sucks the fluid out of the container, presses it into the bleed valve, and some tubing, fittings, and connectors tie it all together.
Alternatively, you’ll find systems that connect to the master cylinder and uses a vacuum to suck brake fluid up the reverse way. Some systems can even do both.
Tools Required
- A reverse bleeding tool of your preference.
- An 8mm wrench and a hex bit that fits the lid of your master cylinder.
- A syringe or a turkey baster.
- New brake fluid according to factory specifications. The correct type should be marked on the reservoir cover.
How You Do It
These are general directions. The procedure may vary depending on what tool you get):
- Open the lid of the master cylinder to remove excess fluid. Use a syringe or a turkey baster.
- Assemble the tool according to the manufacturer’s directions.
- Prime the tool with fresh brake fluid so that no air is trapped inside. Pump until clear fluid squirts out of the connector end of the tool.
- Immediately connect the tool to the bleed valve.
- Open the bleed screw.
- Squeeze the handle about 6-8 times on the first wheel, then 5-6 on the other three. Keep an eye on the master cylinder so you don’t overflow it. And don’t press too hard on the handle, or you’ll create a mess up by the master cylinder.
- Use a cheap syringe connected to a piece of clear tubing or a turkey baster to suck up excess brake fluid from the master cylinder.
- When done pumping, remove the connector from the bleed valve and leave it open for a second or two. The pressure inside the brake system will press out any air close to the bleed valve.
- As soon as you see clear fluid coming out, close the bleed valve.
2. Reverse Bleed Using an Oil Squirt Can)
If you’re looking to keep your costs down, you can also get the job done with just a few cheap tools and parts you find in any automotive store. This DIY method includes using a basic oil squirt can.
Tools and Parts Required
- A completely clean oil squirt can. These are cheap, so you might as well get a new one for the job. It’s not worth the risk of getting anything else than clean brake fluid inside the brake system.
- A few feet of 5/16 inch clear vinyl tubing that fits over the brake bleed valve. A 5/16-inch diameter will be fine.
- An 8mm wrench and a hex bit that fits the lid of your master cylinder.
- A large syringe with a piece of clear tubing or a turkey baster.
- Pliers
How to Do It
- Remove the reservoir cover and diaphragm so that you can remove excess brake fluid when adding fresh fluid from the caliper side.
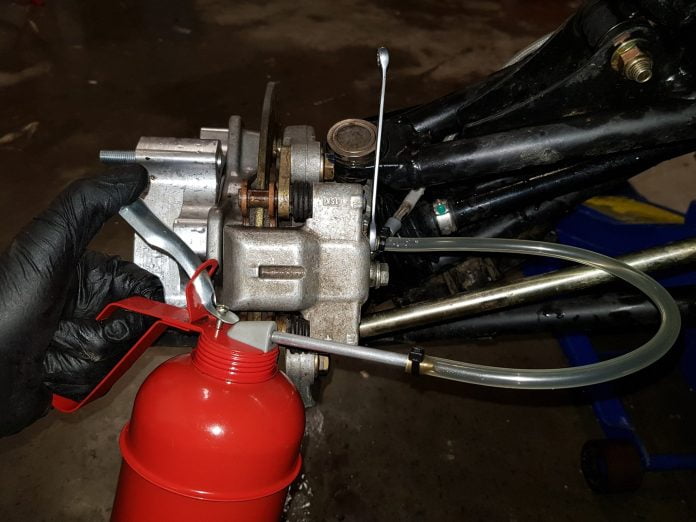
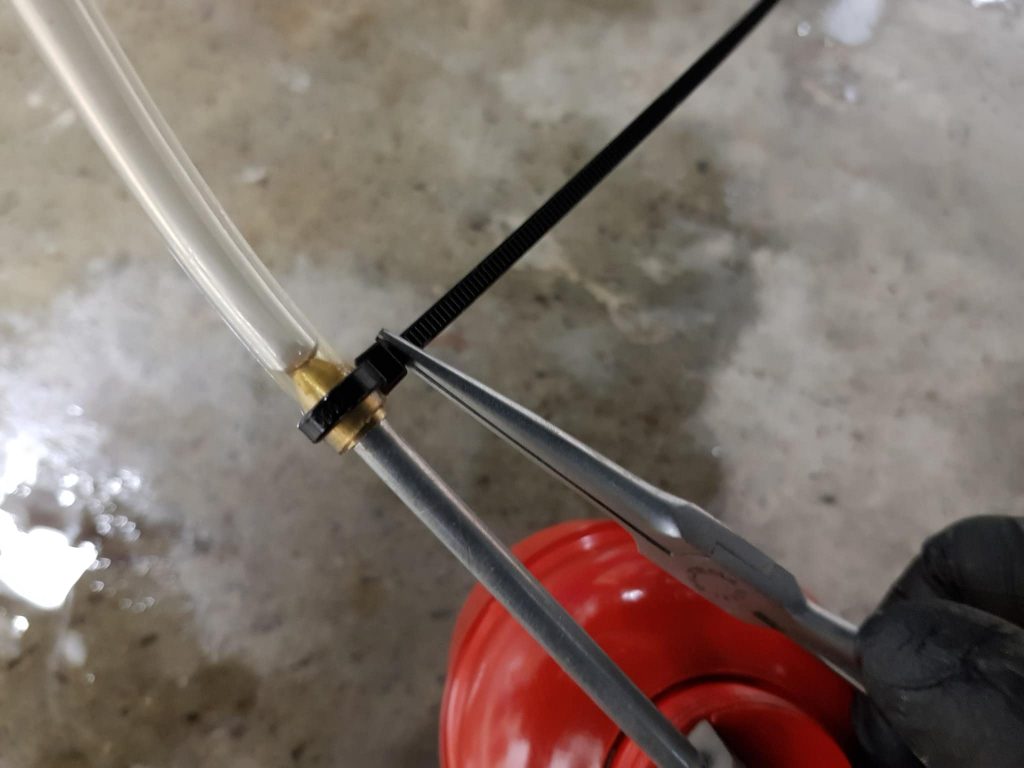
- Connect a piece of vinyl tubing to the nozzle of your oil squirt can. Use a hose clamp or a zip tie to secure it in place.
- Fill your oil squirt-can to the brim with new brake fluid and give it a few pumps until clear fluid squirts out of the hose.
- Put your 8mm wrench on the bleed valve. Please do not open it yet.
- Connect the hose to the bleed valve. Please make sure there are no air bubbles in the hose before you connect it. Use another zip tie to keep it in place. Use some pliers to get it properly snugged down.

- Open the brake bleeder about a quarter to half a turn.
- Start gently pumping fresh fluid into the system. Do not press hard. Take your time and press just enough to see the level rising in the reservoir.

- Use the syringe to remove excess brake fluid from the reservoir. Continue pumping until all of the fluid is replaced.
- Tighten the bleed valve and repeat on the other three tires.
- Finish off by making sure you have the right amount of brake fluid inside your reservoir, and then replace the lid and diaphragm.
3. Reverse Bleeding Using a syringe
Tools and Parts Required
- Two large syringes (preferably 50ml or bigger), where at least one of them is completely clean. You can get these at automotive stores or pharmacies for just a few dollars.
- A few feet of 5/16-inch clear tubing.
- Some zip ties.
- Brake cleaner and a rag.
- New brake fluid according to factory specifications.
- Pliers.
How You Do It
- Remove the reservoir cover and rubber diaphragm.
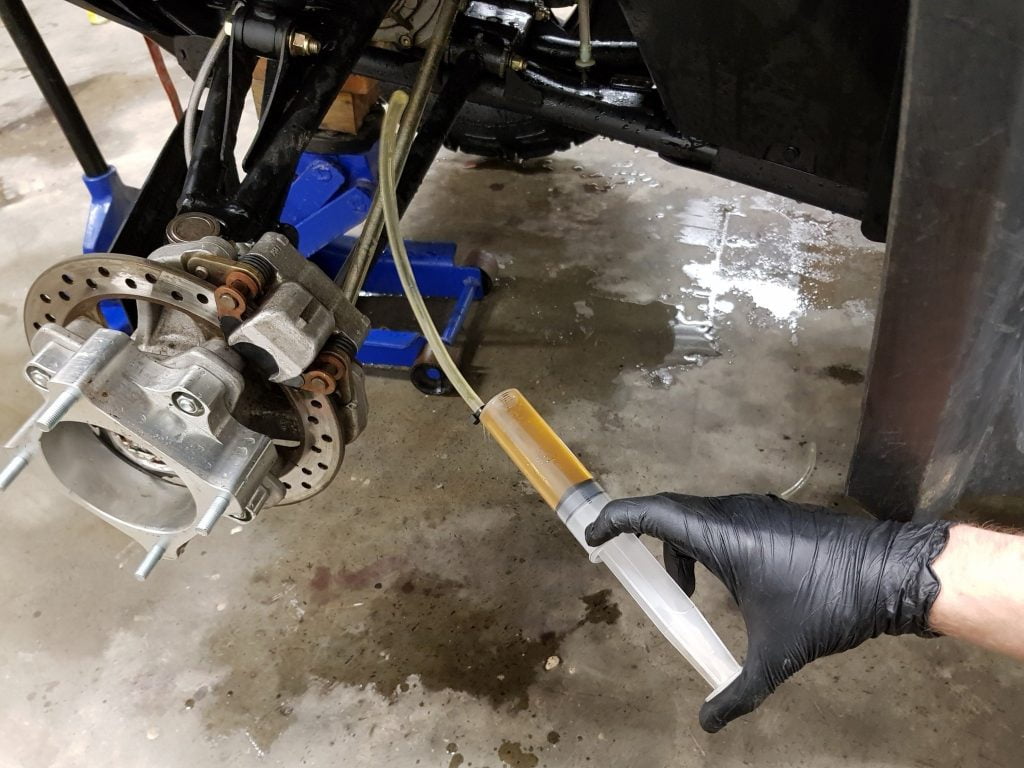
- Use one of the syringes to remove the brake fluid that’s in the brake fluid reservoir.
- Put your 8mm wrench on the bleed valve. Please do not open it yet.
- Connect a couple of feet of tubing to your other syringe. Use a zip tie to tighten the tube to the outlet of the syringe. This is to prevent it from popping off when you apply pressure.
- Fill the other syringe with new fresh brake fluid, and connect it to your bleed valve.
Again, use a zip tie to keep it in place.
- Before you start injecting brake fluid, you need to make sure there is no air in the tube. Hold the syringe upright and tap the tube until all of the air has moved up and into the syringe.
- Open the bleed valve about a quarter to half a turn.
- Start gently compressing the plunger on the syringe to pump brake fluid into the system. Take your time; do not press too hard, or you will pop the tube off. If that happens, you will need to start all over again.
- You will likely have a small amount of fluid leaking out. Have a cloth or paper towel ready to clean it up.
- Keep an eye on your reservoir. Stop pressing when it is getting full. Use the other syringe to remove excess fluid before you continue. You can use a piece of wire to hang the syringe containing fresh fluid when removing the old.
- Continue this process until all of the fluid is replaced.
- Tighten the bleed valve and remove the hose.
- Clean off any spilled brake fluid. Spray the caliper and the area around the master cylinder with brake cleaner to make it completely clean.
If you’re still having problems bleeding the brakes on your ATV, I recommend looking at this post, where I give all of the best tips I have learned about stubborn brakes that won’t bleed properly.
Related: How to Bleed an ATV Master Cylinder (Front and Rear Brakes)
Wrapping Up
If traditional brake bleeding methods fail, reverse bleeding can be an effective alternative for your ATV. Not only does it align with the air’s natural tendency to rise, but it can also be done independently, saving you both time and potential help.
With options ranging from using a specialized tool, an oil squirt can, or a simple syringe, you’re bound to find a method that works for your needs.
FAQ
What is reverse bleeding in ATV brakes?
Reverse bleeding is a method for removing air from brake lines. It involves pushing fluid from the caliper to the master cylinder.
How to reverse bleed ATV brakes?
For reverse bleeding, connect a syringe filled with brake fluid to the caliper’s bleed valve, open it, and push fluid toward the master cylinder.
Is reverse bleeding more effective for ATV brakes?
Yes, reverse bleeding can be more effective as it pushes air upwards, which aligns more naturally with air’s tendency to rise.


