
As an ATV owner, understanding how to bleed your brakes is an indispensable skill that can save you time and money and potentially avert brake failures.
This guide provides a detailed, step-by-step approach to manually bleed your brakes and also offers an alternative method via vacuum bleeding.
What Does Bleeding the ATV Brakes Mean?
Hydraulic brake systems use special brake fluid to transfer the energy from your hand or foot to the brake caliper. The fluid is essential for proper brake function.
When pressure is applied, the brake fluid activates a piston inside the caliper. The piston will then press the brake pad against the brake disc, creating friction to stop the bike.
Bleeding the brakes means letting out some of the brake fluid to remove trapped air or to replace the brake fluid altogether.

When Do You Need to Bleed the Brakes?
There are two leading causes for having to bleed the brakes on your ATV:
To Remove Air From the Brake Lines
Brake fluid cannot be compressed, but air can. If even the tiniest air bubble enters the system, the brakes will not function as they should but feel soft and squishy. To get all of the air out of the system, we need to “bleed” the brakes.
Air may enter the system if you replace or disassemble one or more components connected to the brake line, such as removing the brake caliper for a service. Or you may have a loose brake line connector, allowing air to enter the system.
Please note that air should not get into the system under the regular operation of the ATV. Therefore you have to locate and address the cause of the leak before bleeding the brakes.
To Replace Old or Bad Brake Fluid
Another common situation where knowing how to bleed the brakes comes in handy is when it is time to replace the old brake fluid with new. So-called flushing the brakes.
Brake fluid is hygroscopic, which means it absorbs water over time. Also, it breaks down when exposed to heat. The fluid closest to the brake calipers is the most affected because of the heat produced when breaking.
Healthy brake fluid should look clear or with just a slight amber color. If it looks like cola, it is well overdue for being replaced.
Bad brake fluid will negatively affect your brakes’ performance, so be sure to replace it according to your ATV’s service schedule intervals. Luckily this job is both cheap and usually relatively easy to do.
It’s a good idea to completely replace the brake fluid on your bike every time you change your brake pads or at intervals, according to your ATV service manual.
Bleeding Front Brakes vs. Bleeding Rear Brakes
Most ATVs have one master cylinder for the front brakes on the handlebars and another for the rear brakes in a separate location. The reservoir for the foot pedal is often located a bit away from the actual cylinder unit.

The setup varies between brands and models. Some handlebar-mounted master cylinders operate both the front and rear brakes.
The method for bleeding them, however, is pretty much identical.
To locate the master cylinder(s) on your bike, trace the brake lines from the brake caliper. You must address the brake fluid reservoir connected to any brake causing problems.

If you are unsure where your problem is, you might as well bleed the brakes on all four wheels. Then start with the caliper the furthest from the master cylinder and move against it.
How to Bleed ATV Brakes Manually
Let us begin with the standard method for bleeding any hydraulic brake system. It requires almost no tools or previous mechanical experience. Just follow the steps below:
Tools and Parts Required:
- A jack to get the ATV off the ground.
- A wheel nut tool, preferably a hand tool as the air or electric torque wrenches, tends to be a bit powerful for ATVs.
- The correct hex or Phillips bit or a small impact driver.
- 8mm wrench for the bleeder (most ATV bleeders are 8mm). Both a boxed end wrench and a flat nut wrench will work.
- A clamp or a friend to press the brake lever
- Brake fluid according to manufacturer requirements. Refer to your service manual, where this will be listed. It should also be marked on the brake reservoir cap. It’s always best to stick with the same brake fluid grade used when the ATV was new. If you don’t have the owner’s manual, Most ATVs use regular DOT4 brake fluid.

Optional (but recommended):
- A piece of 5/16-inch clear vinyl tubing, inserted into a small container such as an empty oil bottle. Use it to collect old brake fluid for proper disposal. Not only will the environment thank you, but you will also keep your shop and ATV clean.
- Latex gloves. Brake fluid is quite rough on your hands.
1. Jack up the ATV
Start by jacking up the ATV and remove the wheels where you are bleeding the brakes. It is possible to bleed the brakes without removing the wheels, but you will get much better access to the bleed nipple with the wheel out of the way. If this is your first time bleeding the brakes, I recommend removing the wheels.
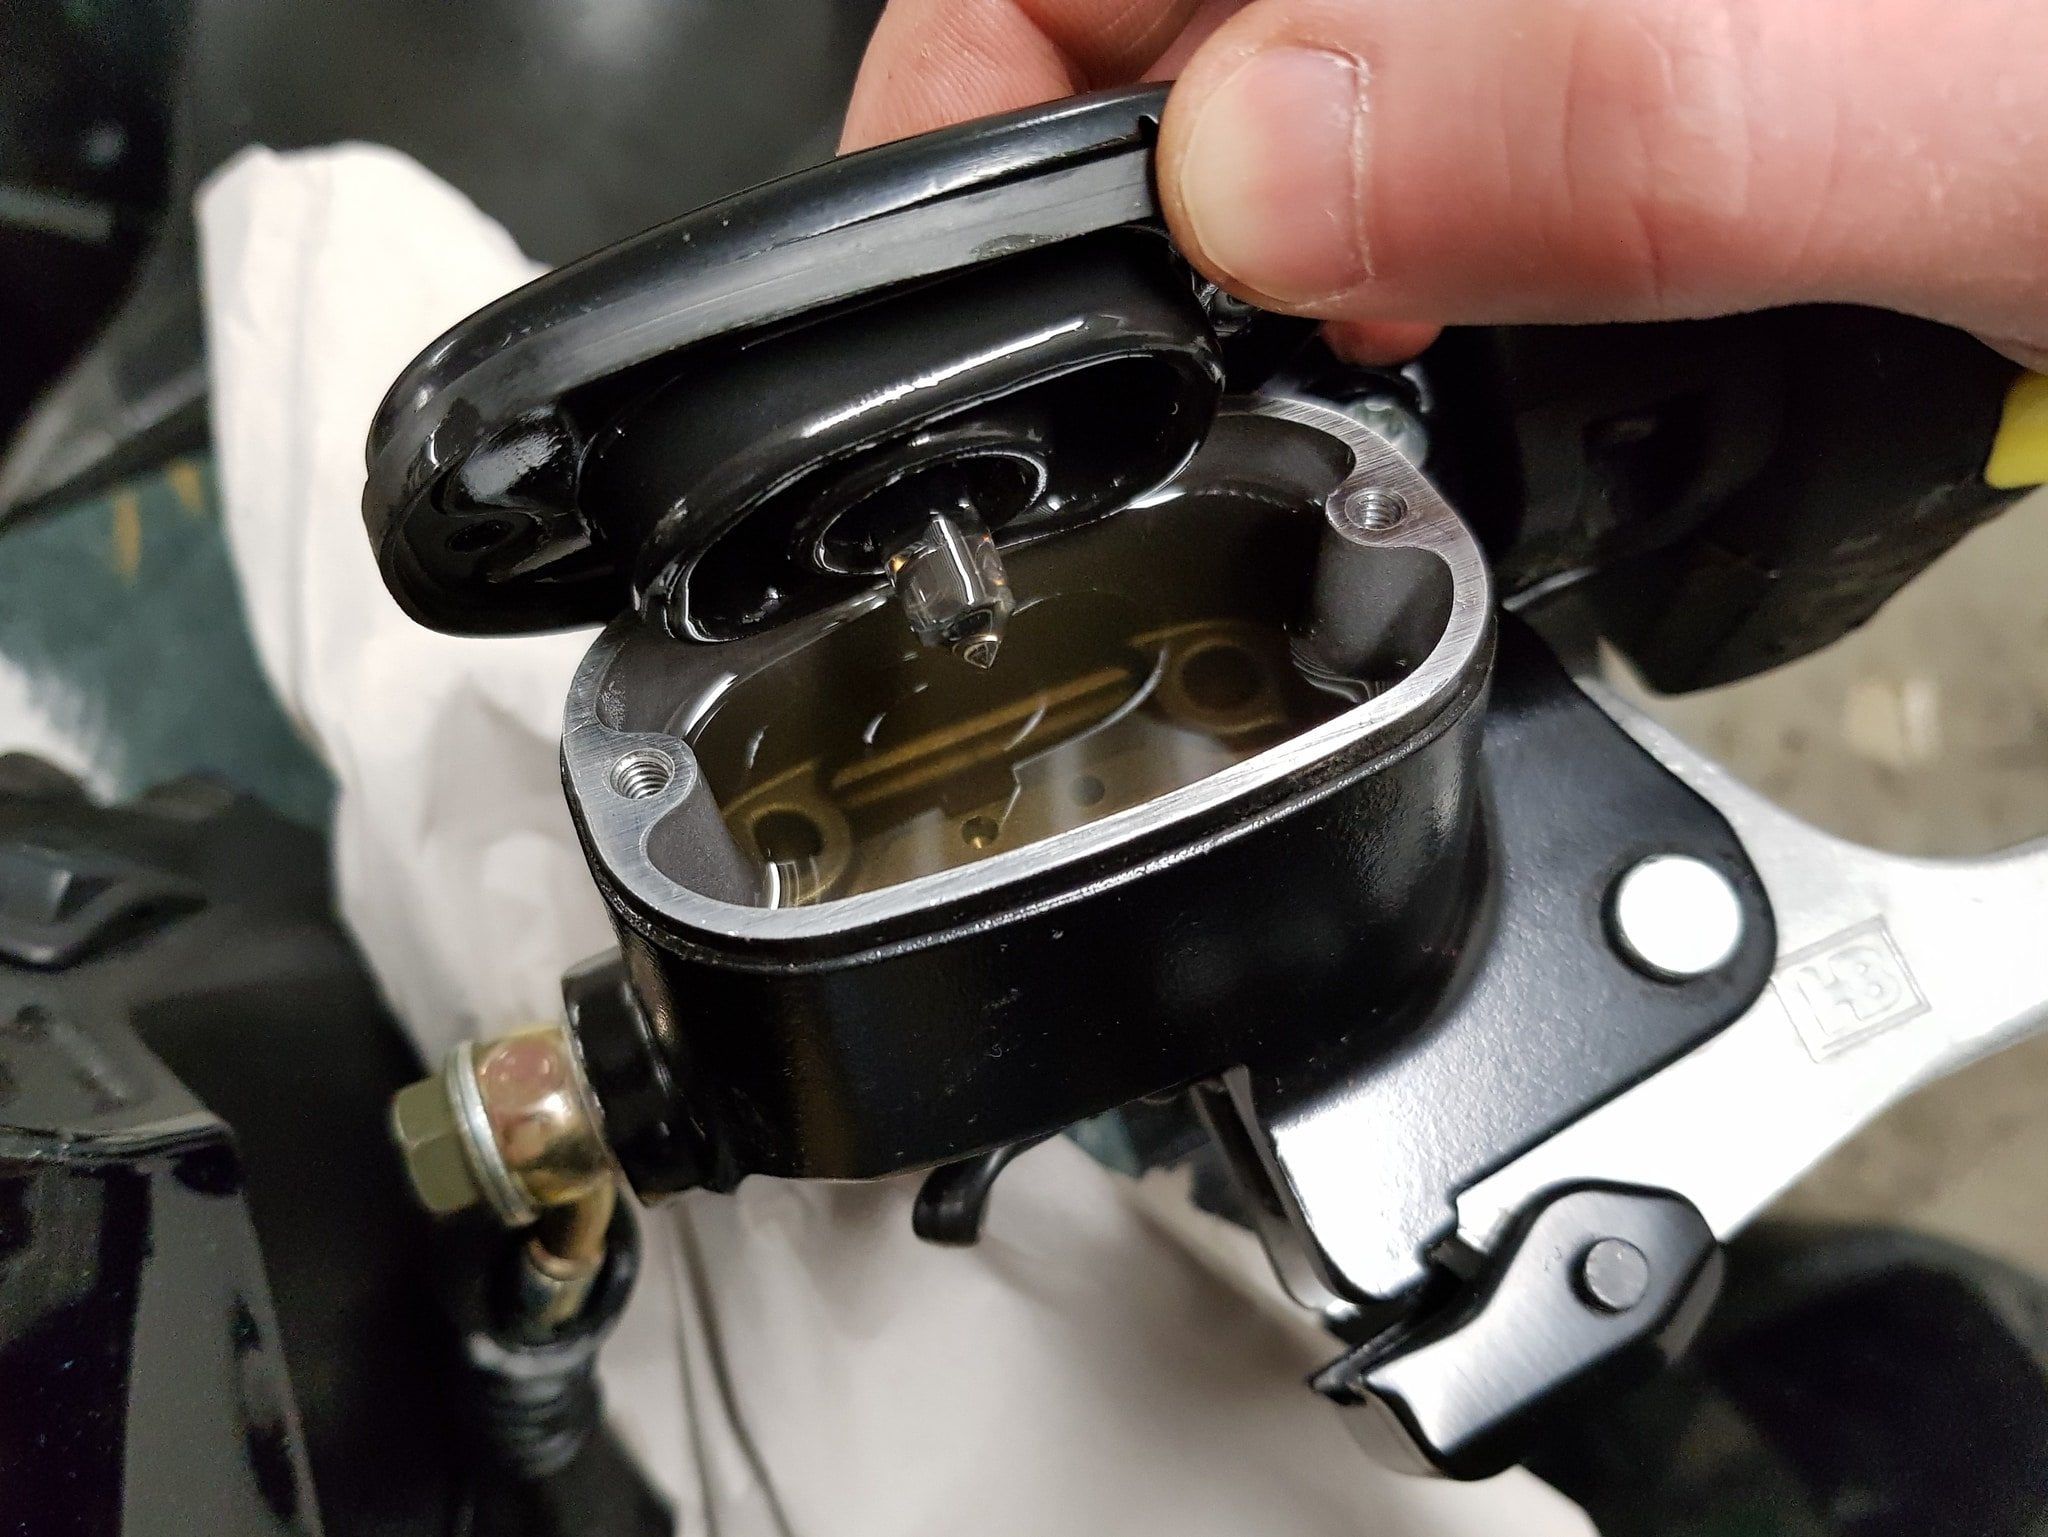
2. Remove the Brake Fluid Reservoir Cap
You will need to add new brake fluid as the old goes out. The lid on the reservoir up on the handlebar is held in place with two hex screws. Be careful, as the threads strip pretty quickly.

Depending on the ATV’s age and the time since the screws were last removed, they may be firmly set in place. This is where the small impact driver comes in handy. Find the correct bit and give the screw a gentle tap with the trigger.
This will knock loose any corrosion and open the screw slightly. One knock is usually sufficient. The reservoir for the foot pedal usually has a twist cap that unscrews by hand.
3. Clean the Cap and Rubber Diaphragm Thoroughly
When reassembling it later, you do not want to contaminate the system with debris, dirt, or water.
4. Add Brake Fluid
Add brake fluid to the brake fluid reservoir to the maximum level mark.
Pay close attention so that the brake fluid level in the brake fluid reservoir never drops below the minimum mark while bleeding the brakes. You may need to top off the reservoir several times before you are finished.
It’s recommended that you reinstall the lid before moving to step 5. While it is possible to pump the brakes with the cover off, you risk quirting brake fluid all over your bike if you pump the brakes too hard or fast.
5. Pump the Brake Lever or Foot Pedal 3-4 Times
Depending on which brake system you are bleeding, pump the brake lever or foot pedal to build pressure in the brake lines.
Remember to pump gently if you do this with the lid open! Then keep the lever pressed in by hand. If you are alone, try using a spring-loaded clamp to keep tension on the lever, as shown in the picture below.

6. Open the Bleeder Valve
Start with the valve that is the furthest from the brake fluid reservoir. It is located on top of each brake caliper and is opened by turning it anti-clockwise about half a turn. You should see brake fluid squirt out of the bleeder.
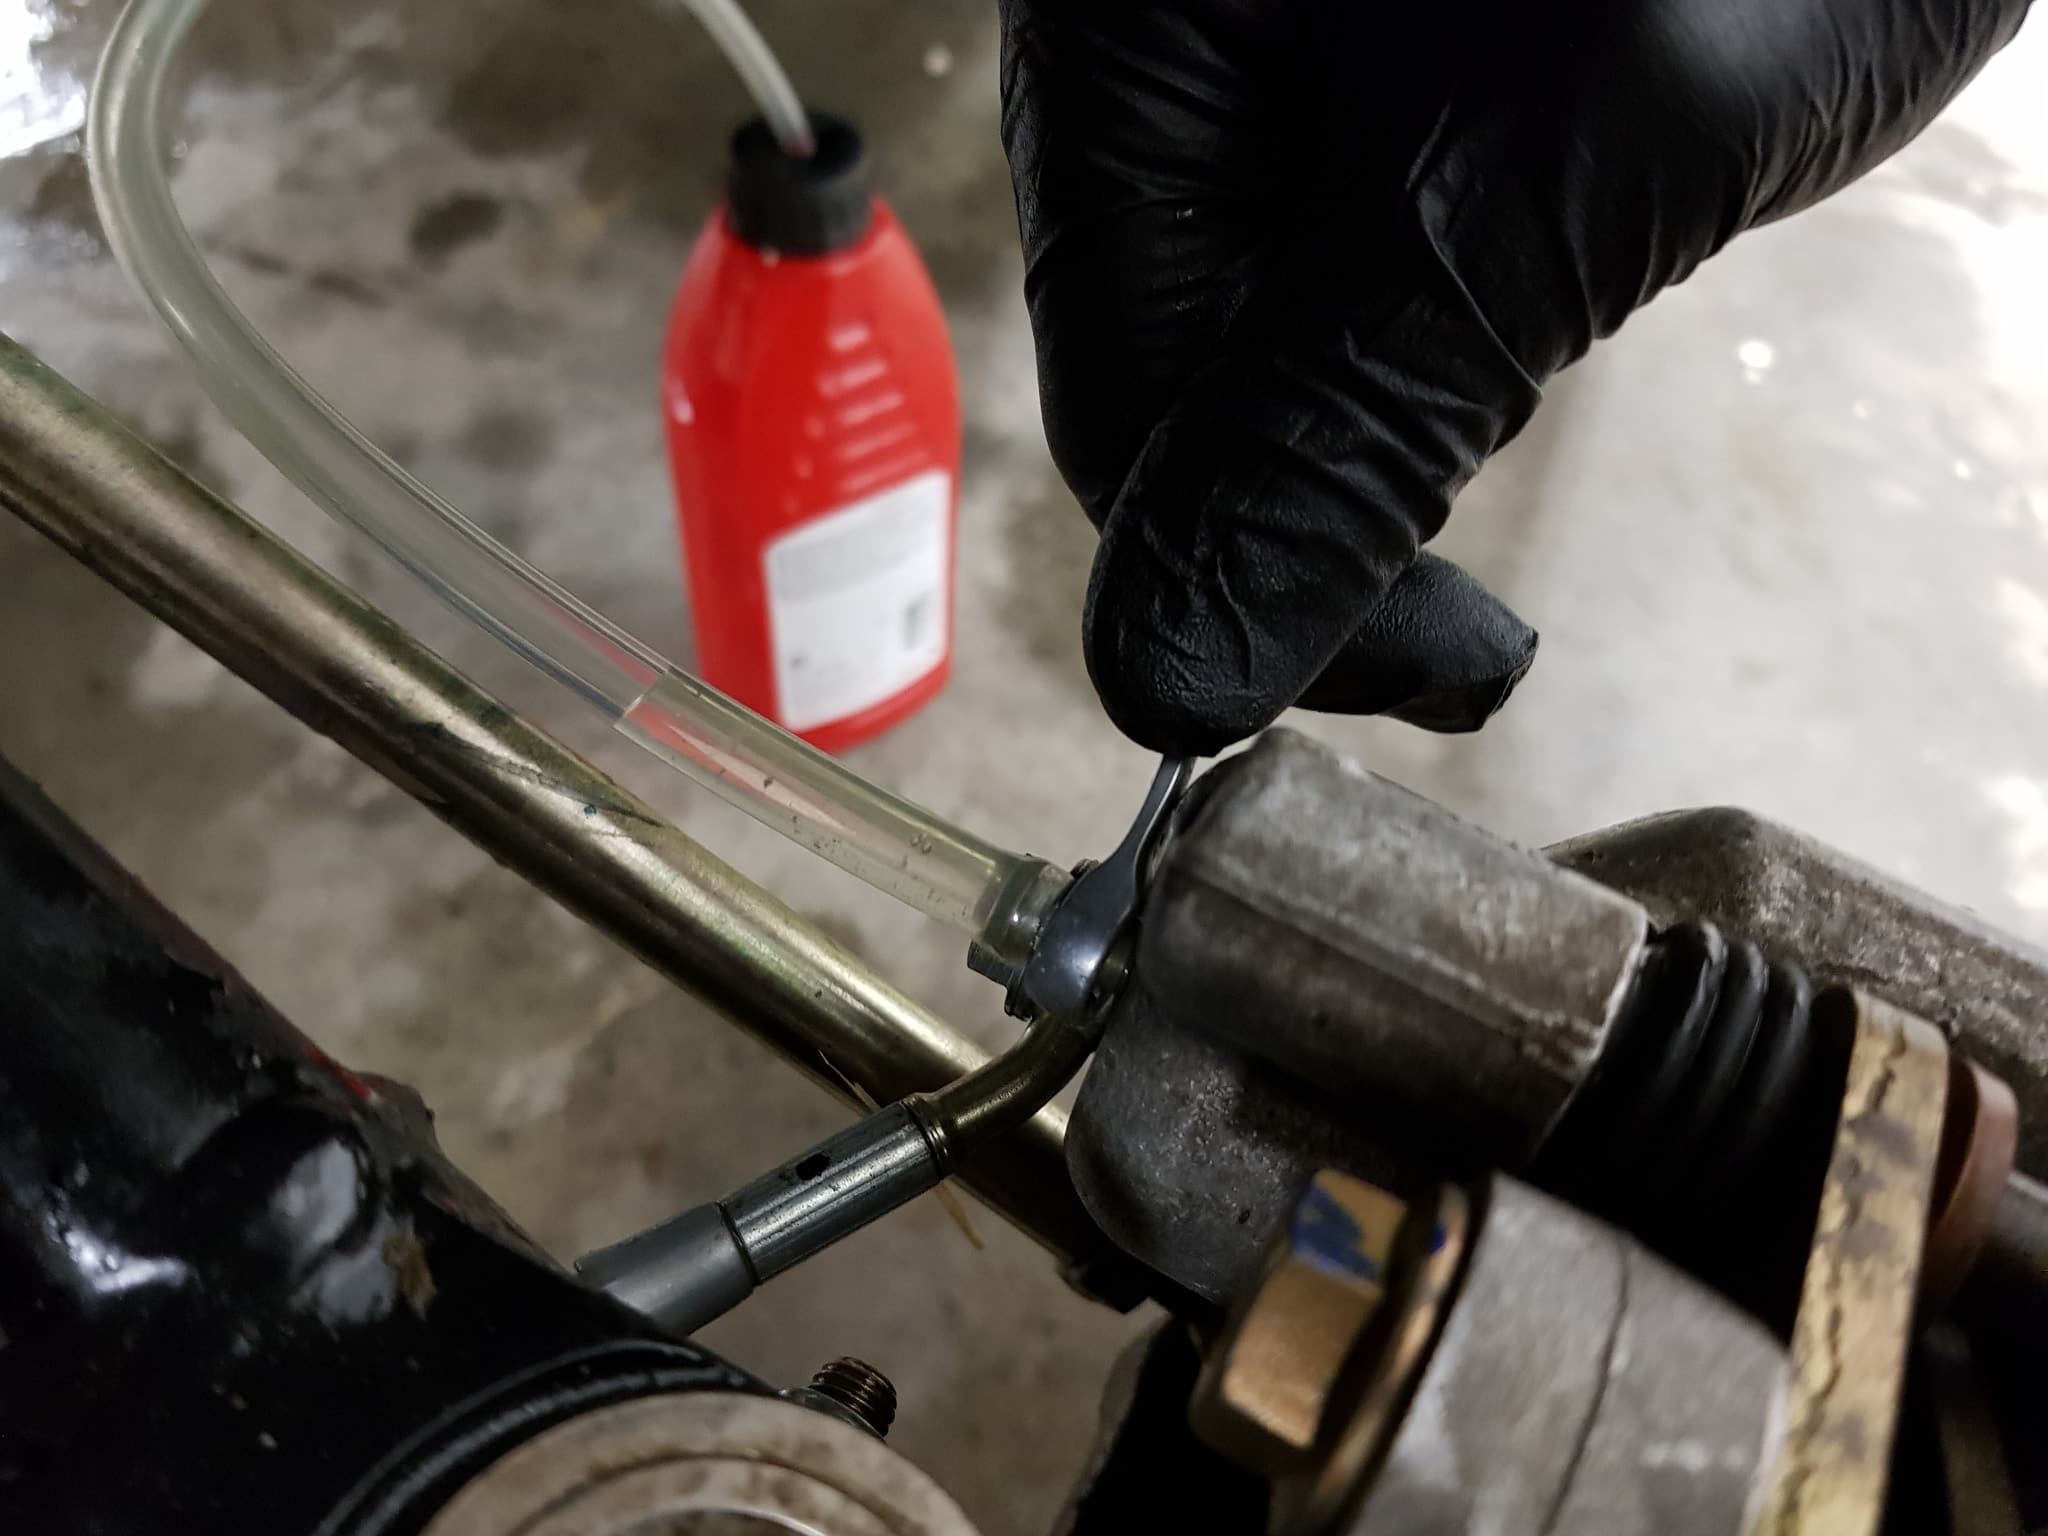
7. Close the Bleeder Valve
Close the bleeder valve when the brake lever or foot pedal reaches about 80% of its range of travel. Do NOT overtighten the bleeder. The threads in the aluminum brake calipers strip easily!
8. Repeat Until There Is No More Air
Repeat steps 5 to 7 several times until the brake fluid exiting the bleeder screw is entirely free of air bubbles. Check the brake fluid level each time to ensure it never drops below the minimum mark. Top off with more brake fluid when necessary.
This process may take a while, depending on how much air there is in the brake lines.
9. Follow the Same Procedure on All Four Wheels
Work your way systematically towards the brake fluid reservoir until all four wheels and the brake lines are bled and free of air. Some bikes have just one combined brake caliper for the rear wheels.
10. Add Brake Fluid to the Maximum Mark
The mark may be a line inside the reservoir or an inspection gauge on the side. Some reservoirs have an indicator on top of the cover that is white when brake fluid levels are low, but it turns black when the correct level is reached.

11. Reinstall the Lid and Rubber Diaphragm
Make sure it is seated properly. Do not over-tighten the bolts. You are now done and can reinstall the wheels.
Disadvantages of Manually Bleeding the Brakes
The manual method works fine most times, but not always. It comes with a few annoying downsides as well:
Not Enough Fluid Is Being Pumped
The master cylinder on an ATV and the piston inside it are relatively small compared to those you find on cars on any other larger vehicles. Because of its small size, it can only pump a relatively small amount of brake fluid with each pump.
This makes the standard method of bleeding brakes work less efficiently on smaller brake systems found on ATVs, UTVs, dirt bikes, motorcycles, or snowmobiles.
The amount of fluid being pumped may not be sufficient to expel the air bubbles before reaching the bottom of the cycle, necessitating the start of a new pumping cycle.
It Takes Forever
It will take about 10-15 minutes to flush the brake system on an ATV thoroughly using the manual method. It will take even longer if you do it on your own.
If you’re having problems removing all of the air, you might be looking at several hours of struggle before you eventually succeed or give up.
You’re Working Against Gravity
When you pump the brakes, you force the air downwards against the bleeding valve. Air is lighter than brake fluid and will always want to go upstream, away from the bleed valve.
Combined with a small pump, you may not be able to get all of the air down to the bleed valve.
So, what then? Luckily, there is another inexpensive and easy method for bleeding the brakes that works very well.
How to Vacuum Bleed ATV Brakes
Vacuum bleeding is another cheap and easy way to bleed the brakes properly.
Tools Required:
In addition to the five first bullet points listed for the standard method, you will also need a hydraulic brake bleeder tool.
These come in various shapes, but they all work by the same principle: they suck the brake fluid down and out through the bleed valve using a vacuum.
Some models use a hand pump to create the vacuum. They will also have a one-way check valve that allows brake fluid to flow out of the brake caliper without letting air back into the system when you release the pump.
Other models connect to an air compressor to create the suction effect.

This Is How to Vacuum Bleed ATV Brakes
- Step 1-4 is identical to manually bleeding the brakes as outlined above.
- Put the 8mm wrench onto the bleeding valve so that it is ready.
Hook up the vacuum pump to the bleeder valve. Make sure the pump is connected to an air compressor if required. - Activate the pump and open the bleed valve about half a turn. You should see bubbles of air squirting out and into the container of your tool.
- Keep an eye on the reservoir level. The vacuum pump will empty the small reservoir in just a few seconds.
- If levels are starting to drop low, re-tighten the bleed valve, deactivate your tool, and add more brake fluid to the reservoir before you continue. Read this post if you accidentally let your reservoir run dry.
- Continue bleeding until a steady stream of clear brake fluid flows inside the see-through hose connected to the bleed valve.
- Tighten the bleed valve before you remove the vacuum tool.
- Repeat on all brake lines you wish to bleed.
- Fill the brake fluid reservoir to the maximum mark, then reinstall the lid and rubber diaphragm.
Now you should be ready to tackle almost any brake bleeding jobs. But occasionally, even the vacuum pump won’t be sufficient to bleed all the air out of the system.
Before taking the bike to your dealer, it’s worth reading through this post on what to do when you cannot bleed the brakes using the abovementioned methods.
Alternatively, you can try to reverse-bleeding the brakes on your ATV.
Wrapping Up
Remember, brake maintenance is a crucial aspect of vehicle care, and learning to do it yourself provides you with greater control over your machine’s health.
Always make sure to perform this operation diligently and with caution, keeping your safety and that of others as a priority.
With the right tools and some patience, you’ll have your ATV brakes operating efficiently in no time.