
If you’re getting bigger tires or installing tire chains on your ATV, you might need wheel spacers to resolve clearance issues. Or maybe you’re just looking to make your ride a bit more stable and are willing to accept the potential downsides of wheel spacers.
Related: Are ATV Wheel Spacers Good or Bad (Pros/Cons)? Why Use Them?
Regardless of why you want them, here is a simple 2-part guide that helps you choose which spacers to get and how to install them afterward.
This guide will focus mainly on ring spacers, the most common and best alternative for ATVs. This type of spacer acts as a shim bolted between your wheel hub and rim.
At the end of the post, we’ll take a quick look at alternative ways to increase track width.
How to Choose ATV Wheel Spacers
There are several factors to consider when deciding on a wheel spacer to purchase. Some aspects may be more pertinent to you than others.
How Much Do ATV Wheel Spacers Cost?
A set of four spacers will set you back anything from $50 to $250 or more. The set I got for my Polaris was about $100, and I have no complaints about the quality, even after a couple of years of rough use.
If price is not a major concern for you, opting for the highest quality product available would be a sound choice, and you won’t go wrong. For everyone else, I advise avoiding the least expensive options on the market.
Getting a decent quality set of spacers from a reputable brand pays off.
Choose the Correct Bolt Pattern
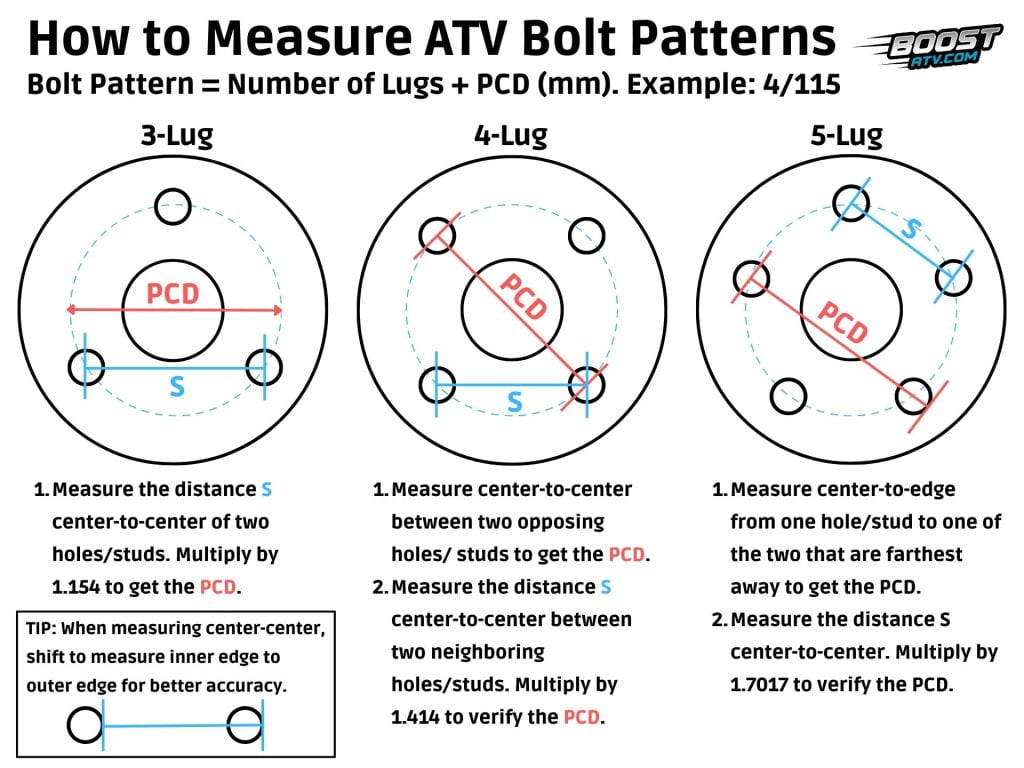
The bolt pattern of the spacer should match that of your ATV. It is pretty easy to measure if you don’t know it already.
- 3 lug: Measure the diameter of a virtual circle passing through the center of all three bolts. If you measure 90mm, the bolt pattern is 3×90.
- 4 lug: Measure the distance from center to center of two bolts across from each other, measured across the middle of the wheel hub. If you measure 110mm, the bolt pattern is 4×110.
- 5 lug: Measure from the center of one bolt to the outside of one of the bolts that are the furthest away. If you measure 110mm, the bolt pattern is 5×110.
I generally recommend that you avoid any “universal” spacers that are made to fit several different bolt patterns, as the fit will likely not be optimal for your machine with these.
Choose the Optimal Spacer Thickness
What thickness you should choose depends on how much you want to widen your ATV or how much extra clearance you need to gain.
A set of one-inch spacers will add 2 inches in total width to the ATV. But you will get only one-inch additional clearance at each wheel with the same spacer.

You can get spacers from 0.5 inches up to 2 inches wide. Some even offer three-inch models, but that’s pushing the limit. If you need more than two-inch spacers, I recommend looking for a wider aftermarket lift kit instead.
When choosing wheel spacers, the best practice is to get the thinnest ones that will still be thick enough to achieve what you want.
The Spacer Diameter Should Match the Wheel Hub Diameter
You need to ensure the diameter of the spacer is sufficient. Ideally, it should be the same diameter or larger than the mounting surface of the wheel hub. More surface in contact means better distribution of the push/pull forces involved.
More Expensive Spacers Are Usually of Higher Quality
As with most other things, you also get what you pay for in-wheel spacers. You will likely be okay with almost any spacer for most ATV applications. But I would still not cheap out and go for the lowest-priced products out there.
Manufacturing tolerances in the cheapest ones may not be as good, and you risk getting vibrations. Billet aluminum spacers are preferred over cast aluminum as the accuracy of the former is generally much better than the latter.
Equally important as the quality of the spacer is the quality of the lugs and nuts. The strength of the bolt should be detailed in the product specifications. If it isn’t listed and the dealer can’t provide an answer, I recommend choosing a different dealer.
Various Wheel Spacer Material Types
Aluminum is the most common, but other materials such as titanium, urethane, and other composite materials are also out there.
If you still don’t feel sure that wheel spacers are the right choice for you, please check out my post about the pros and cons of wheel spacers and when you need them.
In summary, choosing the right wheel spacers involves several steps:
- Consider your budget: ATV wheel spacers can range from $50 to $250 or more.
- Match the bolt pattern: The bolt pattern of the spacer should match your ATV.
- Choose the optimal spacer thickness: The thickness should be chosen based on how much you want to widen your ATV or how much extra clearance you need.
- The spacer diameter should match the wheel hub diameter: More surface in contact means better distribution of the forces involved.
- Quality of the spacers: Opt for higher quality spacers even if they are more expensive.
- Material: Aluminum is the most common, but other materials like titanium, urethane, and other composite materials are also available.
How to Install ATV Wheel Spacers: Step-By-Step
After you’ve ensured you have the correct spacers for your specific ATV and need, it is time to install them. This is how you do it.
Tools You Will Need
- Floor Jack
- Lug wrench
- Torque wrench
- Plastic Mallet

1. Place the ATV on a firm and level surface
Never jack up or remove wheels from an ATV unless you do it on a firm and level surface. Doing so makes the whole process much safer, faster, and more comfortable.
2. Put the transmission in park
Put the bike’s transmission in “P” or put the park brakes on to prevent it from rolling whenever you work on the ATV.
3. Loosen the lug nuts slightly
Before you lift the ATV, loosen the lug nuts on the wheel you’re working on. It’s harder to loosen them once the wheel is elevated. However, please refrain from completely removing them at this stage.

4. Elevate the wheels using the floor jack
Place the jack on a flat and stable spot of the ATV frame, directly under the bike center, either at the front or rear.
Jack up both wheels on the same axle simultaneously, as that’s considered the most stable method for elevating an ATV. Raise the lift until the wheels you are working on no longer touch the ground.
After elevating, place two jack stands under the frame, one on each side of the jack, then lower the jack down until the frame rest on the two jack stands.

5. Remove the wheel from the hub
Finish unscrewing the loose lug nuts and remove the wheel from the wheel hub. Put aside the lug nuts; you need them to attach the wheel to the wheel spacer later.
6. Mount the spacer to the wheel hub
With the lugs on the spacer facing outwards, mount the spacer to the lugs attached to the wheel hub.
Ensure all lugs enter the holes in the spacer simultaneously, keeping the spacer level to the hub all the way in. Failing to do so may cause binding issues.
If needed, gently tap the spacer with a plastic hammer until completely seated. If you get stuck, gently remove the spacer and start over using a crowbar.
Then, thread the nuts provided with the spacer kit on the wheel hub lugs.

7. Tighten the spacer nuts according to the specifications
The instructions provided with the spacer kit should tell you how much the nuts need to be torqued down. Most accidents involving wheel spacers happen due to not using the correct type of bolts or not tightening them down according to spec.
If you don’t already own a torque wrench, ask a friend if you can borrow theirs. If that’s not an option, it’s a good idea to purchase one for yourself. As an ATV owner and home mechanic, a torque wrench is an indispensable tool you’ll need sooner rather than later.

8. Mount the tire to the spacer
Thread the tire onto the spacer studs. Use your stock lug nuts, but only snug them down for now.
9. Lower the ATV back down to the ground
No need to elaborate on this step!
10. Tighten the wheel nuts (lug nuts)
The nuts should be tightened as tight as you would without the spacers. Always tighten in a crisscross pattern.
Remember that ATV lugs cannot be tightened as much as those on cars before they break. Use the torque wrench now that you have one, and follow these guidelines:
- ATV steel rims are typically torqued at 30 – 40 ft. lbs. (41 – 54 Nm).
- ATV cast aluminum rims should be torqued at about 50 – 60 ft. lbs. (68 – 81 Nm).
Remember to reduce the torque by about 20% if you use anti-seize on the threads. Lubricated bolts are easier to turn and, therefowon’ton’t need as much torque to get where they need to be.
Some user manuals say cast aluminum should be torqued at as much as 75-90 ft. lbs. (102 – 122 Nm). However, both personal experience and stories from various ATV forums suggest that choosing excessively high torque may lead to stripped threads and broken lugs.
You have now successfully installed a wheel spacer. Follow the same procedure on the remaining wheels.
11. Inspect the spacers regularly
Make it a habit to inspect your spacers after each ride. Bolts may break or come loose, or the spacer may crack, especially if you bought cheap ones.
Every 20-30 miles, you should take out your trusty torque wrench and ensure no bolts are starting to come loose.
Other Ways to Increase the ATVs Track Width
ATV Wheel Spacers vs. Spacer Studs
ATV spacer stud bolts are a cheaper alternative to ring wheel spacers. They are, however, not as strong as the ring spacers. For most ATV applications, spacer studs will be strong enough. But for racing applications and any high-speed riding on paved roads, it is recommended that you use ring spacers.
ATV Wheel Spacers vs. Offset Rims
Both wheel spacers and offset rims on an ATV will have the same effect on steering and stability. The biggest difference is the cost and installation time. As long as you use a quality set of spacers, they should be just as durable and safe as offset rims.
FAQ
What is the purpose of ATV wheel spacers?
ATV wheel spacers are used to widen the vehicle’s stance for better stability and handling. They also provide clearance for larger tires.
How much do ATV wheel spacers cost?
ATV wheel spacers generally cost between $50 and $250 per set, depending on the brand, material, and size of the spacers.
Is the installation of ATV wheel spacers a costly process?
The installation cost can vary. It’s typically a straightforward process that many ATV owners do themselves. Professional help might increase the cost.
Wrapping Up
In conclusion, installing wheel spacers on your ATV can significantly improve stability, tire clearance, and handling, but choosing suitable spacers and installing them correctly is crucial.
Post-installation, regular inspections are crucial for maintaining the longevity and safety of your ride.