
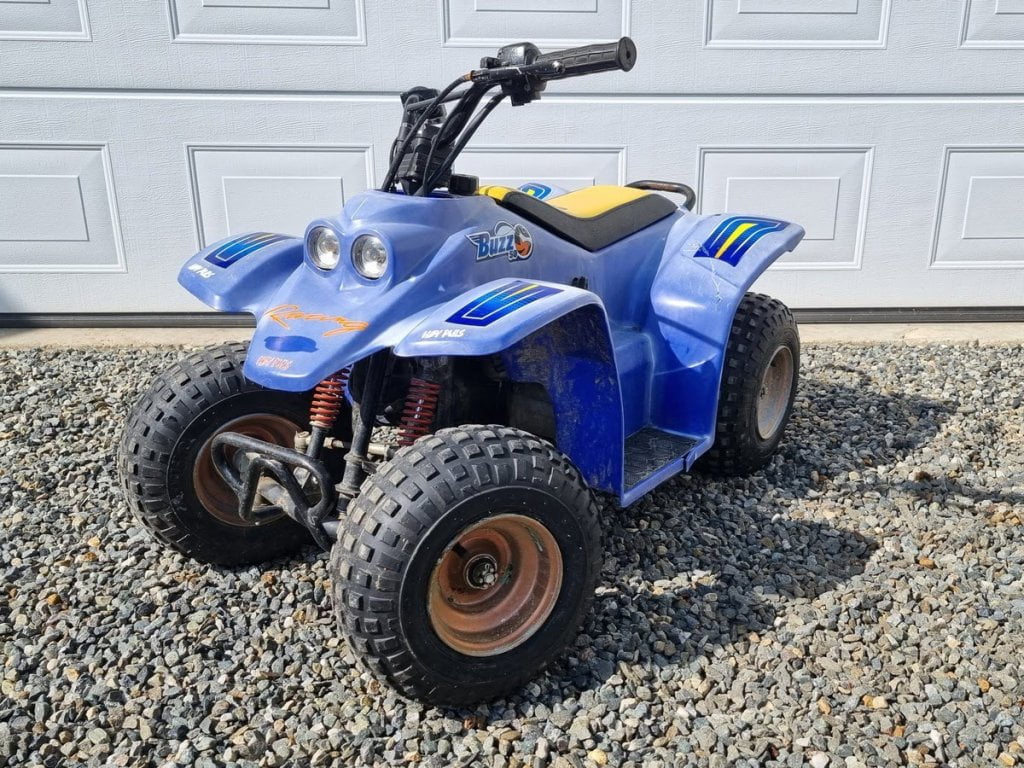
ATV plastics are durable but live a rough life from spending most of their time exposed outdoors. Over time, plastic panels and trim tend to develop a dull and distressed surface, adding years to the bike’s appearance.
UV exposure from the sun causes color change and fading. Mud bashing, maneuvering tight forest trails, riding boots, or everyday farm work will inevitably leave stains and scratches on the plastic surface.
Restoring the plastic can completely transform the look of an ATV from an old and beat-up piece of junk to almost as if it just rolled out of the showroom.
In this article, you’ll find some of the most effective methods (with instructions) and when to use which. Each method has its pros and cons to consider.
Disclaimer: Results may vary. The final result largely depends on your skill and patience. There are plenty of pitfalls to fall into if you are not careful!
Different Forms of Plastic Damage
Photo Oxidation
Sunlight causes photodegradation, while exposure to air causes oxidation. The combined exposure to UV radiation from the sun and oxygen from the air causes a synergy effect known as Photo Oxidation, often called UV degradation.
UV radiation breaks the bonds between the plastic polymers, allowing oxygen to bond and weaken the plastic at an accelerated rate.
The degradation is typically limited to the surface layer. But as the surface layer breaks down, it becomes brittle and is subject to shrinkage. The stresses from the shrinkage induce further oxidation and begin to initiate cracks in the deeper layers, leaving it brittle.
Biodegradation
Exposure to biological agents and microorganisms causes what’s known as biodegradation, which turns into a problem when colored plastic begins to turn black from mold and grime.
Mechanical Wear and Damage
Mechanical wear includes swivel marks, small and large scratches, or minor nicks in the plastic from impact.
How to Choose Between the Different Methods?
As you start searching for methods to restore and renew ATV plastic to its original shine, you’ll quickly discover several popular techniques to choose from.
The various procedures are described in more detail further down this article.
To get a good result, you may need to use a combination of techniques depending on the type of damage and how far it has progressed.
Not all plastics are the same. For instance, side panels are usually treated differently than black plastic trim.
Milder forms of damage typically require a less comprehensive approach than more severe cases. Many quick-and-easy alternatives do an excellent job of hiding imperfections and making the plastic shine, but typically, they don’t last very long.
You need to ask yourself how much time and effort you want to spend, how often you are willing to repeat the process, and what downsides you will accept.
Choosing the wrong approach may cause more harm than good.
Restore Lightly Faded ATV Plastic With Barely Visible Oxidation
I would not consider sanding or other mechanical treatments at the beginning stages of fading.
A rejuvenating treatment with a plastic restorer should bring back the original shine and prevent further degradation.
Apply a sealer to protect the plastic and keep the ATV covered when not in use to prevent further oxidation.
You can try dry buffing on unpainted plastics with micro scratches and swivel marks and then apply a sealer.
Restore Mildly Oxidized or Mildly Scratched ATV Plastics
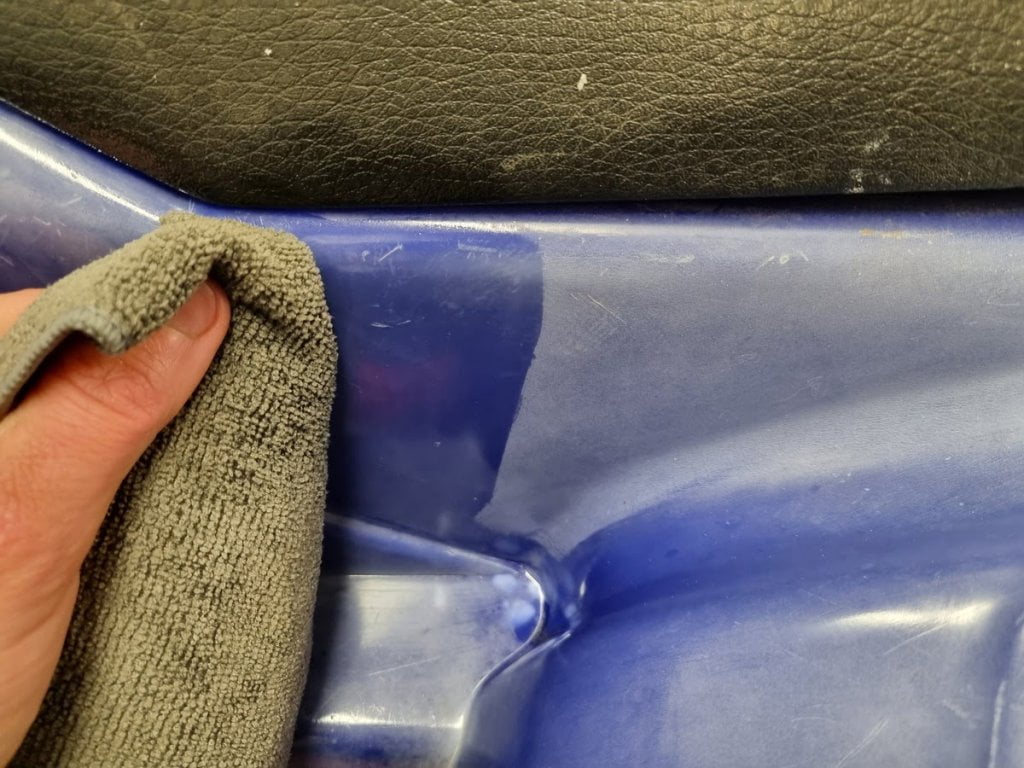
At this stage, oxidation has begun to make the plastic turn white, but the surface is still smooth to the touch.
Plastic restorers might not always be effective, but boiled linseed oil can offer a more durable result. The linseed oil method is a suitable choice if you lack the time for wet sanding or prefer not to subject the plastic to heat treatment.
If linseed oil doesn’t provide the desired result, a non-aggressive mechanical treatment may be required, like wet sanding with very fine sandpaper (2000 grit) and polishing with a plastic polish compound.
Alternatively to sandpaper and polish, you can use a three-step plastic polish product like the well-known Novus plastic polish kit.
Restore Heavily Oxidized or Heavily Scratched ATV Plastics
At this point, oxidation has resulted in a white, chalky surface on the plastic. Additionally, chemical degradation due to exposure to substances like gasoline, oils, or brake fluid may have further deteriorated its condition.
Your only option is to mechanically remove the damaged top layer to uncover healthy plastic beneath. The best options are scraping with a razor or wet-sanding and finishing with a polish.
If unsure whether this aggressive method is required, I recommend testing a more gentle approach before bringing out the sandpaper. As soon as you begin sanding, there is no going back.
Restore Faded Black Plastic Trim
Plastic trim typically has a textured surface, making it less suited for sanding or other mechanical treatments.
Your options are:
- Expensive, commercially available plastic restorer products that can keep the trim black and shiny for months.
- Cheaper products that work for a few weeks or until the next time it rains.
- Heat treatment with the potential downsides that come with this method.
Restore Mold-Covered ATV Plastics
I recommend using a powerful multipurpose cleaner like Super Clean and a pressure washer to remove black mold—afterward, polish with an orbital buffer, heavy cut polish, and an aggressive cut wheel.
Another option is a purple power and a green Scotch Brite pad (600grit) or Mr. Clean Magic Eraser on a damp rag.
Initial Preparations
Proper preparations are essential to ensure a good result, make the job much more manageable, and prevent damage to other components.
Removing cargo racks and anything that prevents proper access is usually worthwhile.
If you opt for alternatives that involve sanding, scraping, heat treating, or strong chemicals, you may be better off removing the affected piece from the ATV entirely.
Hide the Fading With Rejuvenating Products
There are two main categories of rejuvenation products: plastic restorers and trim dressing products. In reality, there is not a clear distinction between the two.
For all of the products listed, ensure that you follow the instructions provided by the manufacturer.
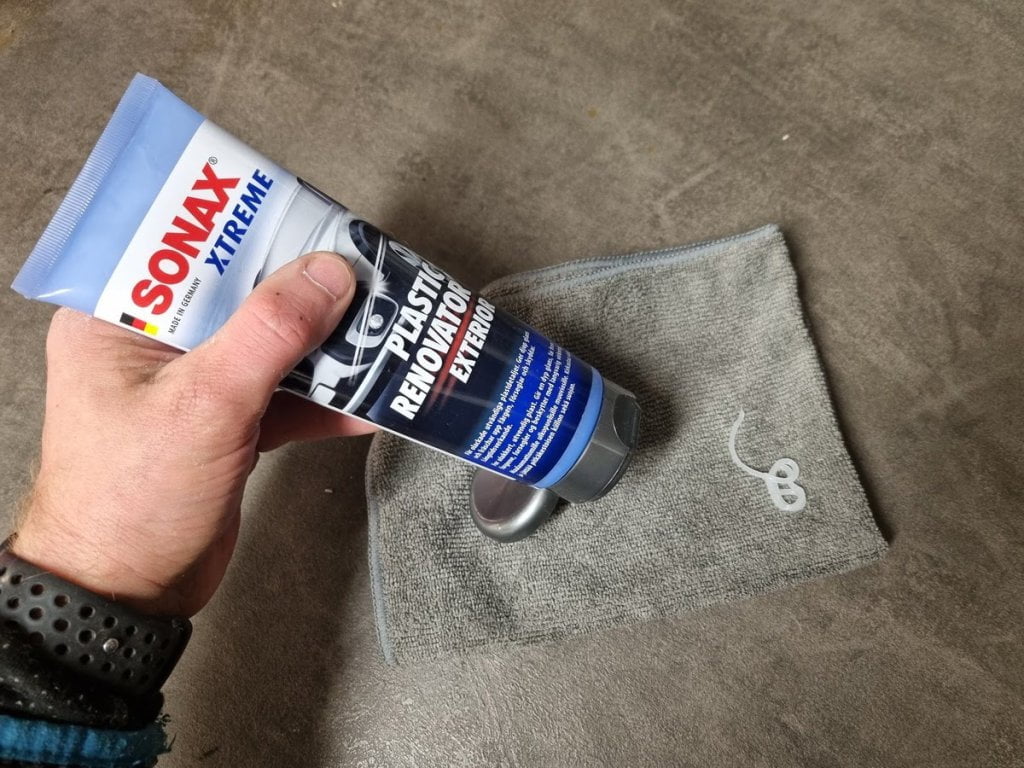
Plastic Restorers
Plastic restorers are products advertised to restore plastic to how it was when it was new.
While many of the products seem very promising initially, the results usually don’t last very long. In reality, many products advertised as plastic restorers are more maintenance products.
Based on user reviews, I’ve selected four different products that seem to be some of the better alternatives.
Solution Finish ($$$$): This is a solvent-based restorer designed explicitly for black plastics and vinyl. Although it’s the most expensive option, many consider it the only true plastic restoration product.
The fluid contains fine ground black carbon fibers designed to penetrate the pores of the plastic. For a longer-lasting result, it is recommended to top off with a quality plastic coating.
The key to success is starting with a clean surface, preferably one that hasn’t previously been treated with other plastic restorers.
Some users report the color wearing off on clothes, and that rain or damp weather before the product dries can leave streak marks.
Lithium Trim Serum ($$$). Another premium product that is slightly cheaper but does a great job. According to the reviews, it lasts significantly longer and leaves a darker black color than the more affordable alternatives.
Car Guys Plastic Restorer($$). According to the manufacturer, it has a water-based polymer formula that contains a unique and newly patented polymer additive.
I’m not sure what the special ingredient is, but most reviews give the product a thumbs up and say it is very effective.
Expect each application to last 2-3 weeks in really sunny areas and longer if you live up north or cover the ATV between each ride.
Chemical Guys Tire+Trim Gel Plastic and Trim Restorer ($). According to the manufacturer, the product restores and protects plastics, rubber, and vinyl materials by locking in essential oils, and the reviews I’ve seen seem promising.
Chemical Guys offers a wide range of budget-friendly yet quality detailing products. They have other options if you don’t want a gel.
Trim Dressing and Sealers
Trim dressings are more of a quick fix to instantly improve the appearance of plastic and protect it from UV radiation. They work best on black plastic trim but also help against fading in colored plastics.
The main issue with these products is that they don’t offer a long-lasting solution. Some products may last a few weeks, while others wear off the next time you ride in the mud.
These products are typically silicone, oil, water, or wax-based, each with pros and cons. There are hundreds, if not thousands, to choose from, but I include one that’s grown popular in the offroad community.
SC1 from Maxima is a tried-and-tested high gloss coating spray that does a great job at hiding light fading, scratches, and imperfections to restore the factory shine. It is water resistant, but expect to reapply after every other wash.
SC1 is a silicone-based sealer. It’s been said that silicone can accelerate the oxidization process, but this isn’t a widely reported issue.
Other silicone-based sealants from reputable brands, which possess similar properties, should also be effective.
Amsoil Mud Slinger is a popular oil-based alternative.
Wax-based sealers typically give a more beautiful finish but don’t last as long. There are many brands to choose from, but any high-quality product should work.
Different-Purpose-Products
You might be missing cheaper alternatives like Mop and Glow, Lemon Pledge, Armor All, WD40 (any penetrating oil), furniture polish, etc.
These are all products that are designed for purposes other than restoring plastics. But that doesn’t stop people from trying them on their ATV- or dirt bike plastics. And some do help make the plastic look better.
I’ve not included them in my list because, from the various user reviews I’ve read, none of them are as effective, they don’t last as long, some can be harmful to the plastic, and some leave a sticky surface that attracts dirt.
If I were to choose one alternative to use in a pinch, it would be tire-shine or tire foam products, as they share many of the same features as silicone-based plastic sealers.
Scraping With a Razor Blade
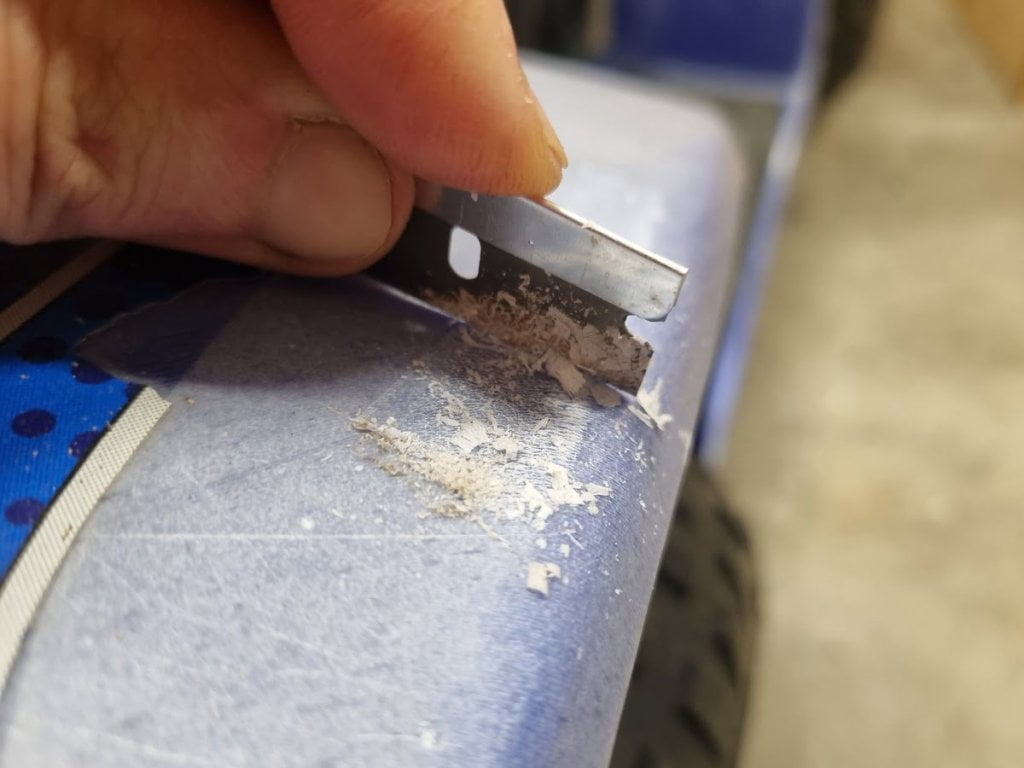
This method involves using a sharp razor blade to remove heavy oxidization, surface residue, or protruding plastic ridges from deep scratches.
Pros
- Effectively removes a lot of damaged material.
Cons
- Risk of creating deep gouges or flat spots on the surface.
- Additional steps are required for a smooth and shiny finish.
- It doesn’t work very well in tight spots and curves.
Things You’ll Need
- A razor blade or a utility knife blade.
How to Do It
- Grab the blade with your hands or use a blade handle to reduce the risk of cuts.
- Gently drag the blade at a 90-degree angle across the plastic surface to scrape off thin layers. Continue until you uncover healthy-looking plastic.
- Never push the blade as it may cut into the plastic.
- Never apply excessive pressure, as this can create flat spots.
- Be careful when scraping near curves. The edges of the blade will create deep scratches that are hard to remove when dragged along a curve.
Incremental Wetsanding

Using sandpaper to make the plastics shinier may seem contradictory, but the method has proven very effective.
The key is being thorough, which takes A LOT of time.
The fundamental approach to sanding plastic involves starting with the coarsest grit paper to eliminate all oxidation and scratches. Then, progressively use finer grit paper to attain the desired appearance.
Pros
- While this method takes some time and elbow grease, it can bring even heavily oxidized plastic to a smooth finish without using razor blades, steel wool, or a torch.
- It is one of the few methods that give a lasting result.
Cons
- Time-consuming. Expect to use several hours from start to finish, depending on the size of the piece. Would I use this method to restore the plastics on a beat-up youth ATV? Not a chance. However, If you’re restoring a more unique and rare part like the gas tank on a vintage dirt bike, this method can be worth your while
- Additional steps are required to get a factory shine.
Things You Need
- A spray bottle with soapy water (regular dish soap)
- Wet sanding paper in grits ranging from 320 to about 1200 or higher. 320, 400, 600, and 1200 should be fine.
How to Do It
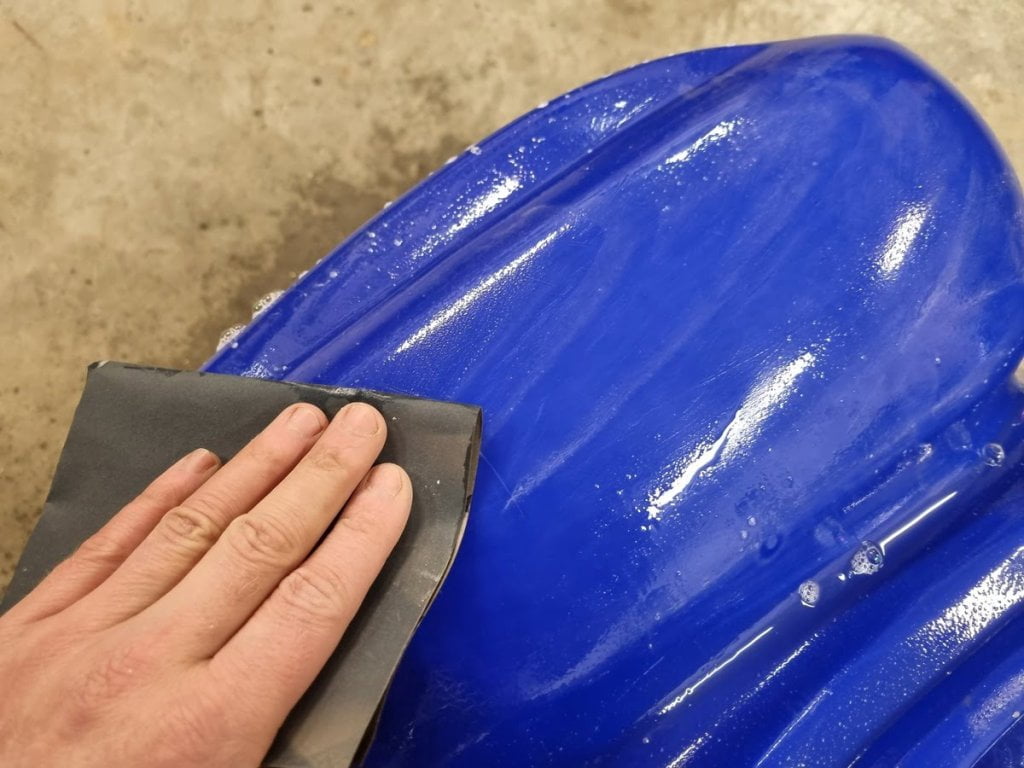
- Clean the part thoroughly using water with a drop of dish soap and rinse.
- Spray the part with plenty of soapy water. The soap will help prevent the sandpaper from clogging up.
- Begin sanding with 320-grit paper in an x-pattern or straight.
- In cases where the plastic is heavily oxidized, and the 320-grit sandpaper is not aggressive enough, I recommend scraping off most of the oxidization with a razor blade. In tight corners where the razor blade cannot reach, consider using a 150-grit foam-style wet sanding block. Sand with 220 grit before continuing with 320 grit.
- Sand the part in several passes, and rinse with plenty of soapy water between each pass. Continue until all of the oxidation is removed or until you’ve removed all scratches. The following steps are to remove the remaining scratches from the 320-grit paper.
- Sand with 400-grit. Do several passes using plenty of soapy water.
- Now, do several passes with 600-grit paper.
- Finish off with a few passes with 1200 grit sandpaper, rinse, and dry.
- The piece is ready for the final finish: dry polish or polishing with a plastic polish compound.
Many opt for a heat treatment to enhance the shine, then sanding with 2000-grit sandpaper to smooth the surface. This is then polished using a buffing wheel to achieve a factory-like shine.
Please refer to the specific steps for either heat treatment or polishing based on your selected finishing method.
Dry Polishing With a Buffing Wheel
Dry polishing plastics involves using a dry buffing wheel to bring out the original shine in plastics that are already sanded smooth. Buffing wheels are made for polishing cars, but they also work for polishing ATV plastics.
The method works without using a polishing compound; the light friction between the plastic and the buffing wheel is all it takes.
Pros
- Effectively recreates the factory shine in unpainted plastic without deep scratches.
Cons
- The technique takes a lot of practice to master.
- It is easy to melt gauges and damage the part if you apply too much pressure or polish in one spot. Polishing with an orbital polishing machine and a suitable polishing compound is safer.
- It does not work on faded plastics; the faded layer must be removed first.
Things You Need
- A soft woolen buffing wheel designed to be used with a drill. Most automotive parts stores have them.
How to Do It
- Bring the drill up to speed and allow the buffing wheel to gently brush against the plastic as you slowly but continuously move it in one direction along the plastic surface. You’ll notice when the plastic turns shiny.
- Others prefer a technique where you go back and forth, which increases the risk of damaging the piece.
- Do not apply excessive pressure; the buffing wheel should only “kiss” the plastic surface. If the buffing wheel grabs the plastic, you’re pushing too hard.
- Fix gouges by holding the puffing wheel with very light pressure over the damaged area until the damage is gone.
- To achieve a more durable and even glossier finish, use a microfiber cloth to apply a sealer, preferably with hydrophobic polymer technology.
Polish With a Polishing Compound
A safer alternative to dry polishing with a rotating buffer wheel is polishing with an orbital polishing machine and a polishing compound.
You will need an orbital polishing machine, a heavy-cut polishing compound, and an aggressive cut wheel (orange works well).
Polish as usual according to the instructions that came with the polishing machine.
After polishing, apply a UV-resistant plastic sealer to prevent further fading.
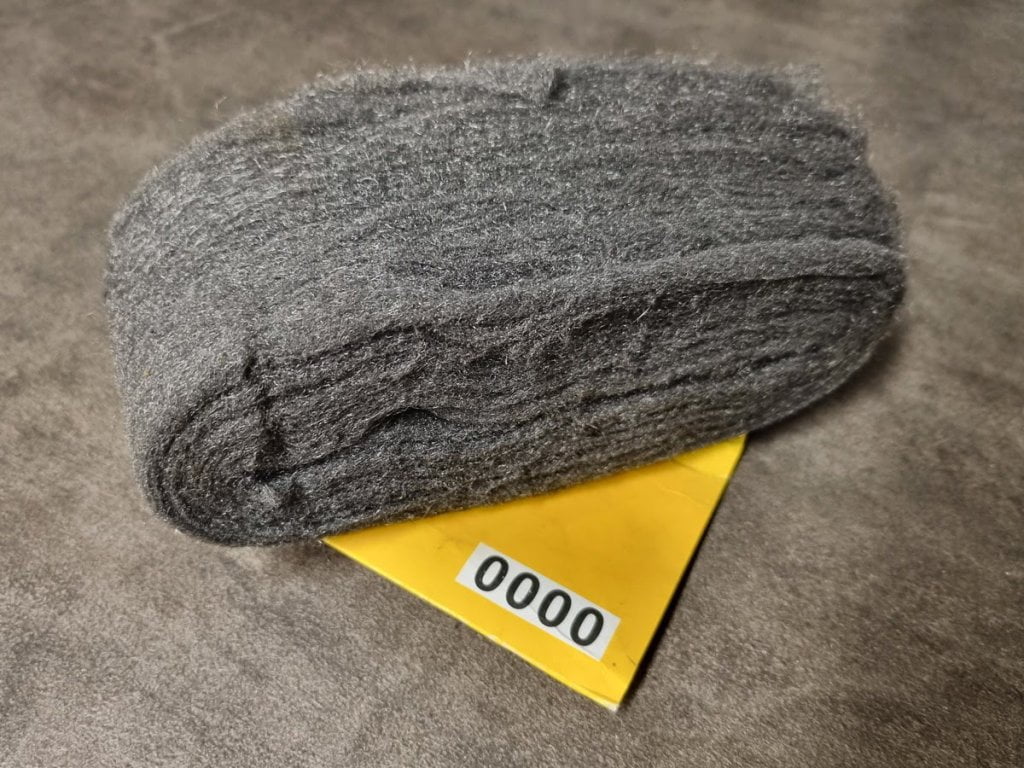
Steel Wool, Boiled Linseed Oil, and Paint Thinner
This method uses boiled linseed oil mixed with paint thinner to bring back the shine. The oil works as a sealer, and the alcohol dilutes the oil to a thinner layer that dries more quickly.
To achieve superior results on extensively faded surfaces, apply the solution to the plastic using super fine steel wool (0000 grade). Alternatively, use the steel wool to smooth out scratches before applying the linseed oil.
Pros
- Significantly faster than sanding.
- It leaves a shiny, non-sticky surface that does not easily attract dust.
- Works just as well on black plastic trim, rubbers, and powder-coated metal racks as colored plastic panels.
Cons
- Solvents such as paint thinner damage plastics and decals if left on too long. A safer option would be to replace the paint thinner with 90%+ rubbing alcohol.
- Not very effective against deeper scratches.
- The solvent does not remove the oxidization, but the oil masks it and makes it darker until the oil wears off.
- Medium durability. Expect the results to last from a few weeks to a few months, depending on usage and how you store the ATV.
- Some say weathered linseed oil causes mold.
- New decals won’t adhere properly.
Things You’ll Need
- Boiled Linseed oil. Non-boiled linseed oil does not dry quickly and will leave a sticky surface that attracts dust.
- You can use Penetrol, a paint additive that contains linseed oil, as an alternative to boiled linseed oil. The result should be just as good, but Penetrol dries faster.
- Paint thinner or rubbing alcohol.
- Super fine steel wool (optional).
- A disposable rag.
- Rubber gloves.
How to Do It
- Clean the plastic thoroughly using soapy water or borax.
- Rinse with clean water and allow to dry completely.
- Mix 60% paint thinner and 40% boiled linseed oil in a suitable container. If you’re using rubbing alcohol instead of paint thinner, consider changing the ratio to 80% alcohol and 20% boiled linseed oil to aid drying.
- Use rolled-up 0000-grade steel wool to apply solvent evenly across the plastic piece. If you’re not using steel wool to remove scratches, use a suitable piece of cloth instead.
- Use the steel wool to rub the solution in a circular motion onto the plastic surface. Continue rubbing for 5-10 minutes, depending on the part’s size.
- Leave the solution for a couple of minutes before wiping off any excess solution.
- Repeat the treatment for a longer-lasting and more durable result.
Caution! Rags soaked in paint thinner and linseed oil are known to self-combust. Properly dispose of the used rags.
Heat Treatment With a Torch or Heat Gun

Several YouTube videos and forum users suggest using a heat gun or torch to rejuvenate scuffed-up or faded ATV plastics. While this method does appear very fast and effective, it’s not one I would use too often.
Heat treatment involves using a heat gun or a torch to heat the plastic surface until it reaches the glass-transition temperature and restores its color and shine.
The method is controversial, and you should know and accept the possible downsides before applying this technique.
It’s worth noting that certain ATV service manuals recommend the flame treatment process for ensuring decals adhere to PE plastics. This suggests that manufacturers may not view this method as overly harmful.
Pros
- It is an affordable, quick, and easy way to improve the appearance of faded plastics.
- This technique can also help reduce or eliminate the whitish stress marks that often appear when plastic is bent, flexed, or damaged.
- Long-lasting results (about a year in sunny areas).
Cons
- Heat accelerates thermal degradation. Plastic exposed to high temperatures for extended periods will lose strength and toughness, leaving it more prone to cracking and chipping. The process accelerates in proportion to the temperature and time of exposure.
- Brittleness. I’m no material engineer, but from what I understand, the process causes the plastic to lose some of its original structure from the manufacturing process on a molecular level. The polymer chains break down into shorter pieces, making the plastic more prone to falling apart. You may not notice a significant loss of material strength after just one heat treatment, but repeated heat treatments are not advised.
- The process creates an unnatural and somewhat rippled shine that needs further treatment, like sanding or polishing, to restore a factory shine.
- Heat treatment may cause thinner plastic panels to warp.
- Leaving the heat source in one spot too long will cause the plastic to burn and turn black.
Things You Need
- A heat gun – any heat gun will work as long as it gets hot enough.
- Or, a propane torch.
How to Do It

The procedure is roughly the same whether you use a heat gun or a torch. The heat gun is safer and should give a slightly more consistent result.
Caution: Do not flame-treat painted plastics. Never use an open flame near fuel or other flammable materials.
- If you use a heat gun, set it to the low setting. Increase the heat only as you get more comfortable with the process.
- Pass the torch flame or the heat gun nozzle back and forth over the plastic until the surface appears slightly glossy. This usually happens somewhat faster with a torch (2-3 seconds) than with a heat gun (several seconds).
- Don’t hold the torch or heat gun nozzle too close to the plastic. Two to three inches from the flame tip or heat gun nozzle should be fine.
- Keep the flame or heat gun moving, and never hold it still in one spot.
- To make the plastic keep its shine, apply water to the treated area before it cools. Note that this can weaken the material, depending on the plastic type.

Keep the Plastic From Going Dull in the First Place
It is much easier to keep the plastics from going dull or becoming covered in grime in the first place than having to do a complete restoration job.
Here are a few things you can do to keep your ATV plastic looking new for years.
- Always store the ATV under a cover or preferably in a shed or garage when not in use.
- Apply a high-quality plastic sealer before you go bashing in the mud. This will leave the plastic surface slick and hydrophobic, preventing the dirt from sticking. Some sealers have UV inhibitors in them as well.
- Clean after each ride before the mud dries up, and apply a top coat of sealer.
- Some plastics can fade from washing with degreaser products like 409, Purple Power, Greased Lightning, Super Clean, Zep, etc.